Public clouds are now indispensable in modern software development. They offer flexibility, scalability and high availability. At the same time, cloud cost management can be tricky, and generate unwanted spend that will be a considerable burden for the overall budget of your software project. In our three-part series on cloud cost management, you will read how to keep costs under control in the three most popular public clouds: AWS, GCP and Azure. In this first installment, we will present our approach to AWS cost optimization.
Cloud-based development costs—a use case
One of our clients came to us with the following problem. They were developing a cloud-native application that required a CI/CD pipeline with an automated testing framework. Additionally, they were designing new features that needed to be tested and integrated with the main solution. The application had to be deployed in the cloud and the client had chosen AWS as a public cloud provider. The developer team needed to use different cloud resources (virtual machines, containers, databases, cloud storage, etc.) dynamically, i.e. based on the current project requirements.
Given the dynamic nature of the development environment, it was hard to keep cloud costs under control while providing the developers with the resources they needed. Testing and R&D particularly were generating unwanted cloud costs due to unnecessary virtual machines, containers and databases that were working but nobody actually was using them. As the project scale was considerable, these costs had risen to thousands of dollars monthly. We set out to build a solution that would reduce the financial burn.
It was designed to meet the following requirements:
- Work automatically
- Be easy to implement
- Be inexpensive to develop
- Enable the client to switch off the resources or decrease their usage but not delete them
Here, you can check our environment services.
Cloud costs—what you pay for
Before we delve into our solution’s details, here’s a quick overview of what falls into the general category of cloud spend. Some of the things public clouds charge for:
- a unit of time (hour/minute/second) when a given resource (e.g. a VM or a container) is working
- a unit of time when a given resource exists (e.g. a Kubernetes cluster in AWS)
- a number of executions/launches/uses of a given resource (e.g. a programming function, a message sent to a queue)
- the amount of data stored (MB/GB/TB, etc.)
- a number of API requests including requests to list, download or upload data to cloud storage (PUT, COPY, POST, LIST, GET, SELECT, etc.)
- a request to download data (e.g. from a back-up copy)
- data transfer (MB/GB/TB) depending on the location of the resources between which the transfer is performed and its direction (inbound or outbound)
- third-party product licenses
At the end of the month, the total cost of using cloud computing resources is the sum of micropayments for each service provided.
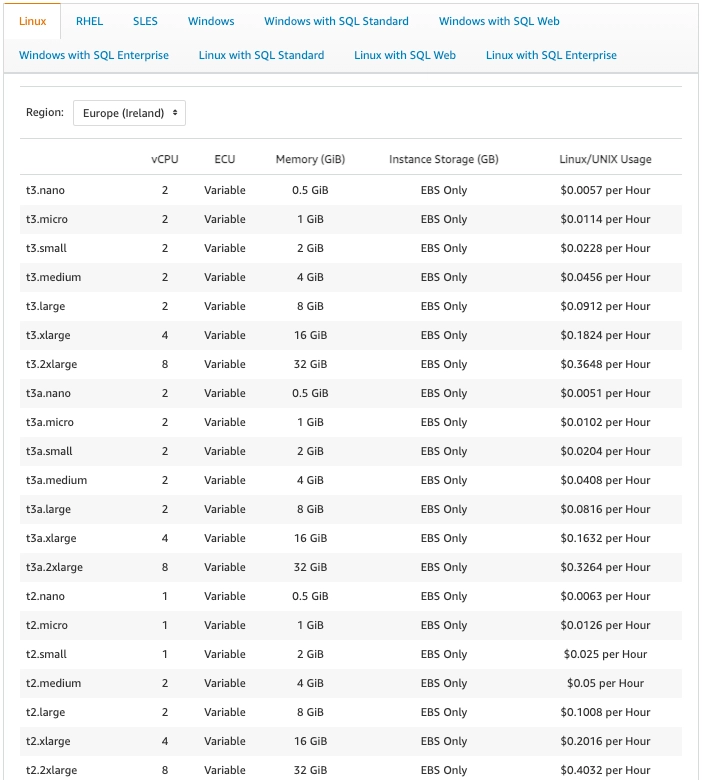
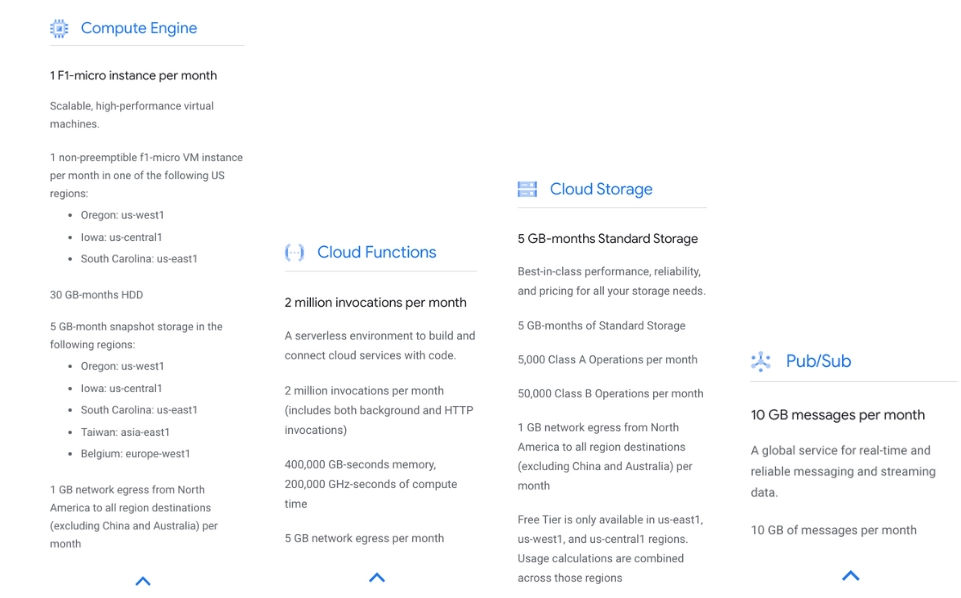
Of course, the pricing model differs among public cloud providers. Additionally, every provider has different free-tier options. Some providers allow users to use a particular resource for free (e.g. some types of virtual machines, storage) up to a certain limit for a period of one year. Others request payment after reaching a certain threshold monthly (e.g. a number of messages or requests). Examples of the free-tier options are shown in Fig. 2 and Fig. 3.

Cloud providers also offer cost-optimization tools. These include cost estimations for defining budgets, instance booking (e.g. paying upfront for a year or more), using spot resources that can be taken by other users depending on the cloud usage in a given region, and which, additionally, are good enough to be used in some testing tasks or instances that generate lower costs when idle. Cloud providers also use default limits or quotas for resources to curb spending, but these limits are usually big enough to generate thousands of dollars in costs. On the other hand, decreasing them will render cloud environments less flexible and cloud computing resources less available.
Unfortunately, in dynamic environments, which require resources that may not be included in free-tiers, such tools have severely limited potential. Additionally, developers in the project should have full flexibility in using resources they need in their everyday work. They cannot be limited to using only those resources that are available in a free tier model or in a given region.
AWS-native cost management solution
Given all this, it was clear that we needed something more advanced and flexible to manage our cloud spending intelligently. But in order not to reinvent the wheel, we checked if AWS native mechanism could be helpful in our use case. What interested us most was the possibility of temporarily switching off or blocking a resource after exceeding the budget.
In fact, AWS offers such a native mechanism for EC2 instances and RDS databases instances. You can define a budget, for example, by setting up two alarm thresholds. After reaching the first one, when 95% of the budget has already been spent, an e-mail notification will be sent to the persons responsible for the budget. When the 100% threshold is reached, virtual machines and databases instances are automatically switched off.
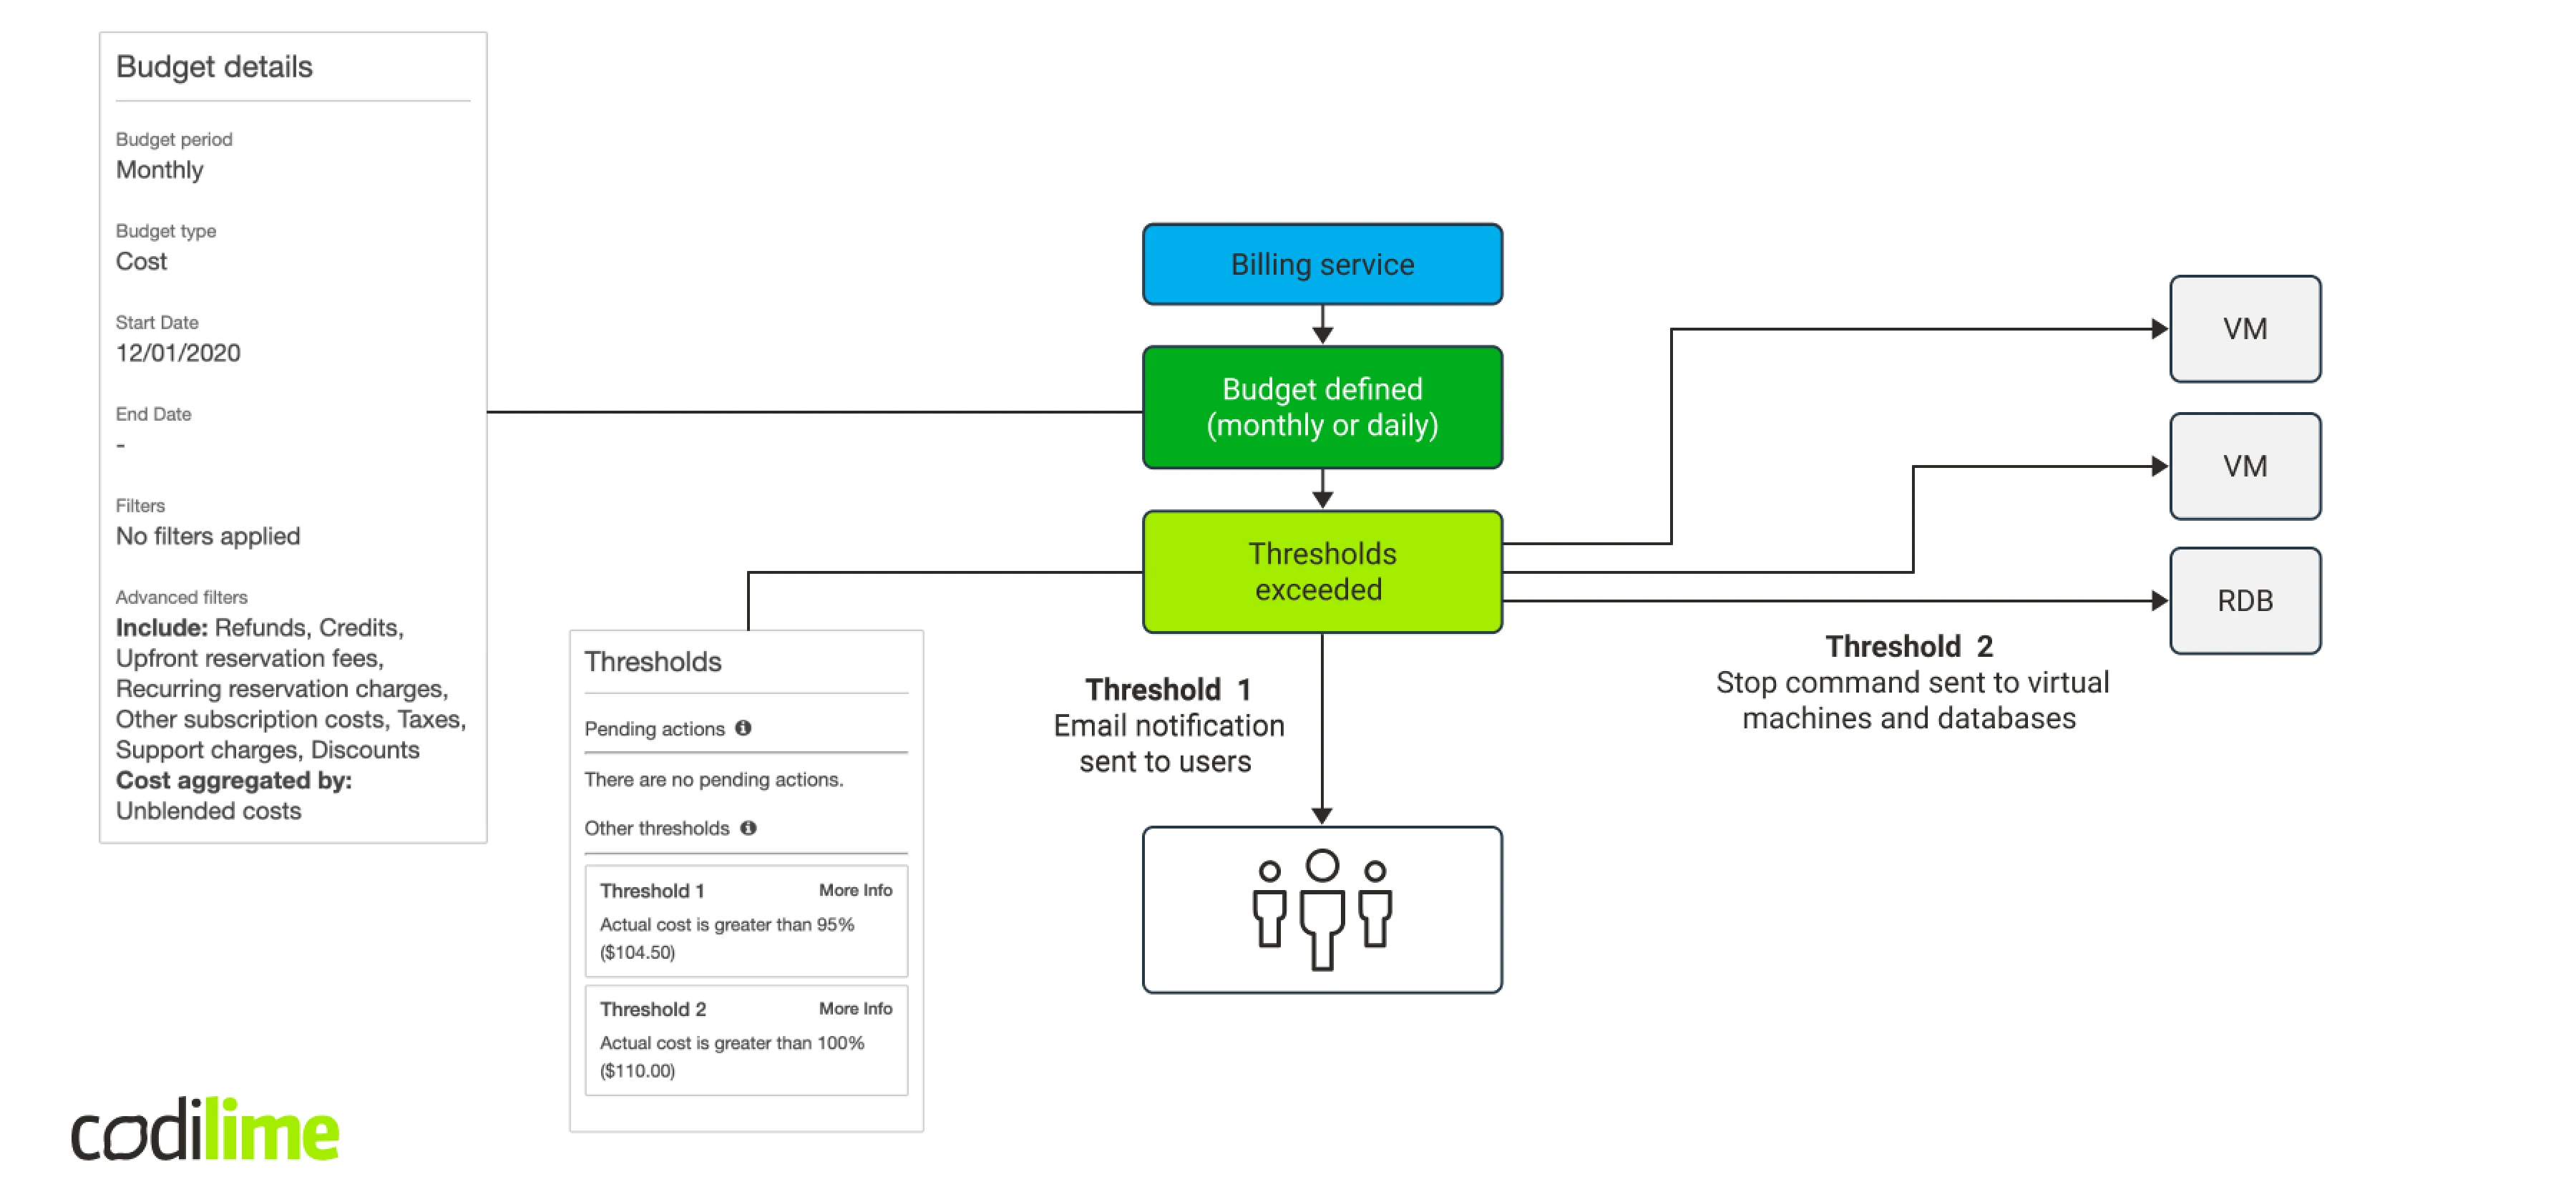
But this method has serious drawbacks. First, you can stop only two types of resources, which will be too few in our case. Second, when configuring an action, you can add a resource to be stopped only if it exists. You cannot add a resource that does not exist to the configuration. So, in order to make the entire mechanism work, you will need to cyclically collect the information about existing resources and update the budget. This compelled us to look for a better solution.
Exploring other possibilities
As we contemplated other ways to solve the problem, we came across the term “anomaly detection”, which led us to Amazon’s CloudWatch service. CloudWatch is a monitoring and observability service that allows you to monitor your resources in AWS. Anomaly detection is a CloudWatch feature. It uses statistical and machine learning algorithms to determine normal baselines, upon which it builds a model of expected values. Based on these values, it can detect anomalies with minimal user intervention. To build an anomaly detection model, CloudWatch also uses historical data up to two weeks back. Yet this service works well only in static environments and cannot be used in our use case, where resources are being created and deleted dynamically.
Looking deeper at the CloudWatch service, we thought that maybe it would make sense to monitor a few specific sets of metrics related to cost generation, e.g. CPU and RAM usage, I/O operations or network data flow in the interfaces.
However, this turned out to have a major drawback: the collected logs do not allow you to distinguish a deleted resource from an inactive one that is either switched off or not used at all, and thus is not generating costs. In fact, CloudWatch keeps metrics on resources that have already been deleted. Depending on the granularity option chosen, they can be stored for from three hours up to 15 months. At the same time, they can’t be deleted—the retention process is automatic. If, for example, a virtual machine is not generating logs, you cannot tell whether it has been switched off, deleted or is simply turned on but idle at the moment. So, to use this feature, we would need to use another API that would be checking if a given resource really exists. Such a solution seemed too complicated. This was decidedly not the road we wanted to take.
There is one thing worth noting, though. Like the AWS native cost control mechanism, CloudWatch allows you to monitor spending and take actions. Better still, it enables you to perform actions on the Auto Scaling feature for EC2 and ECS services. Still, as in the case of the AWS budget actions, you can only set alarm notifications for the resources that exist. And unfortunately, that was not what we needed in our use case.
Back to basics
At that point, we realized that whatever happens in the account, whether it is normal or anomalous, will be reflected in the final billing amount to pay. We therefore decided to take another look at the AWS native mechanism for budgeting, which sends notifications, when a defined budget is exceeded. E-mail notifications, chatbot alerts and Amazon Simple Notification Service were all options, but we eliminated the first two and went with the promising Amazon SNS. It allows you to use several communication channels to send notifications. We were particularly interested in HTTP/HTTPS and AWS Lambda.

When configuring the budget, you can define more notification thresholds. The workflow was as follows:
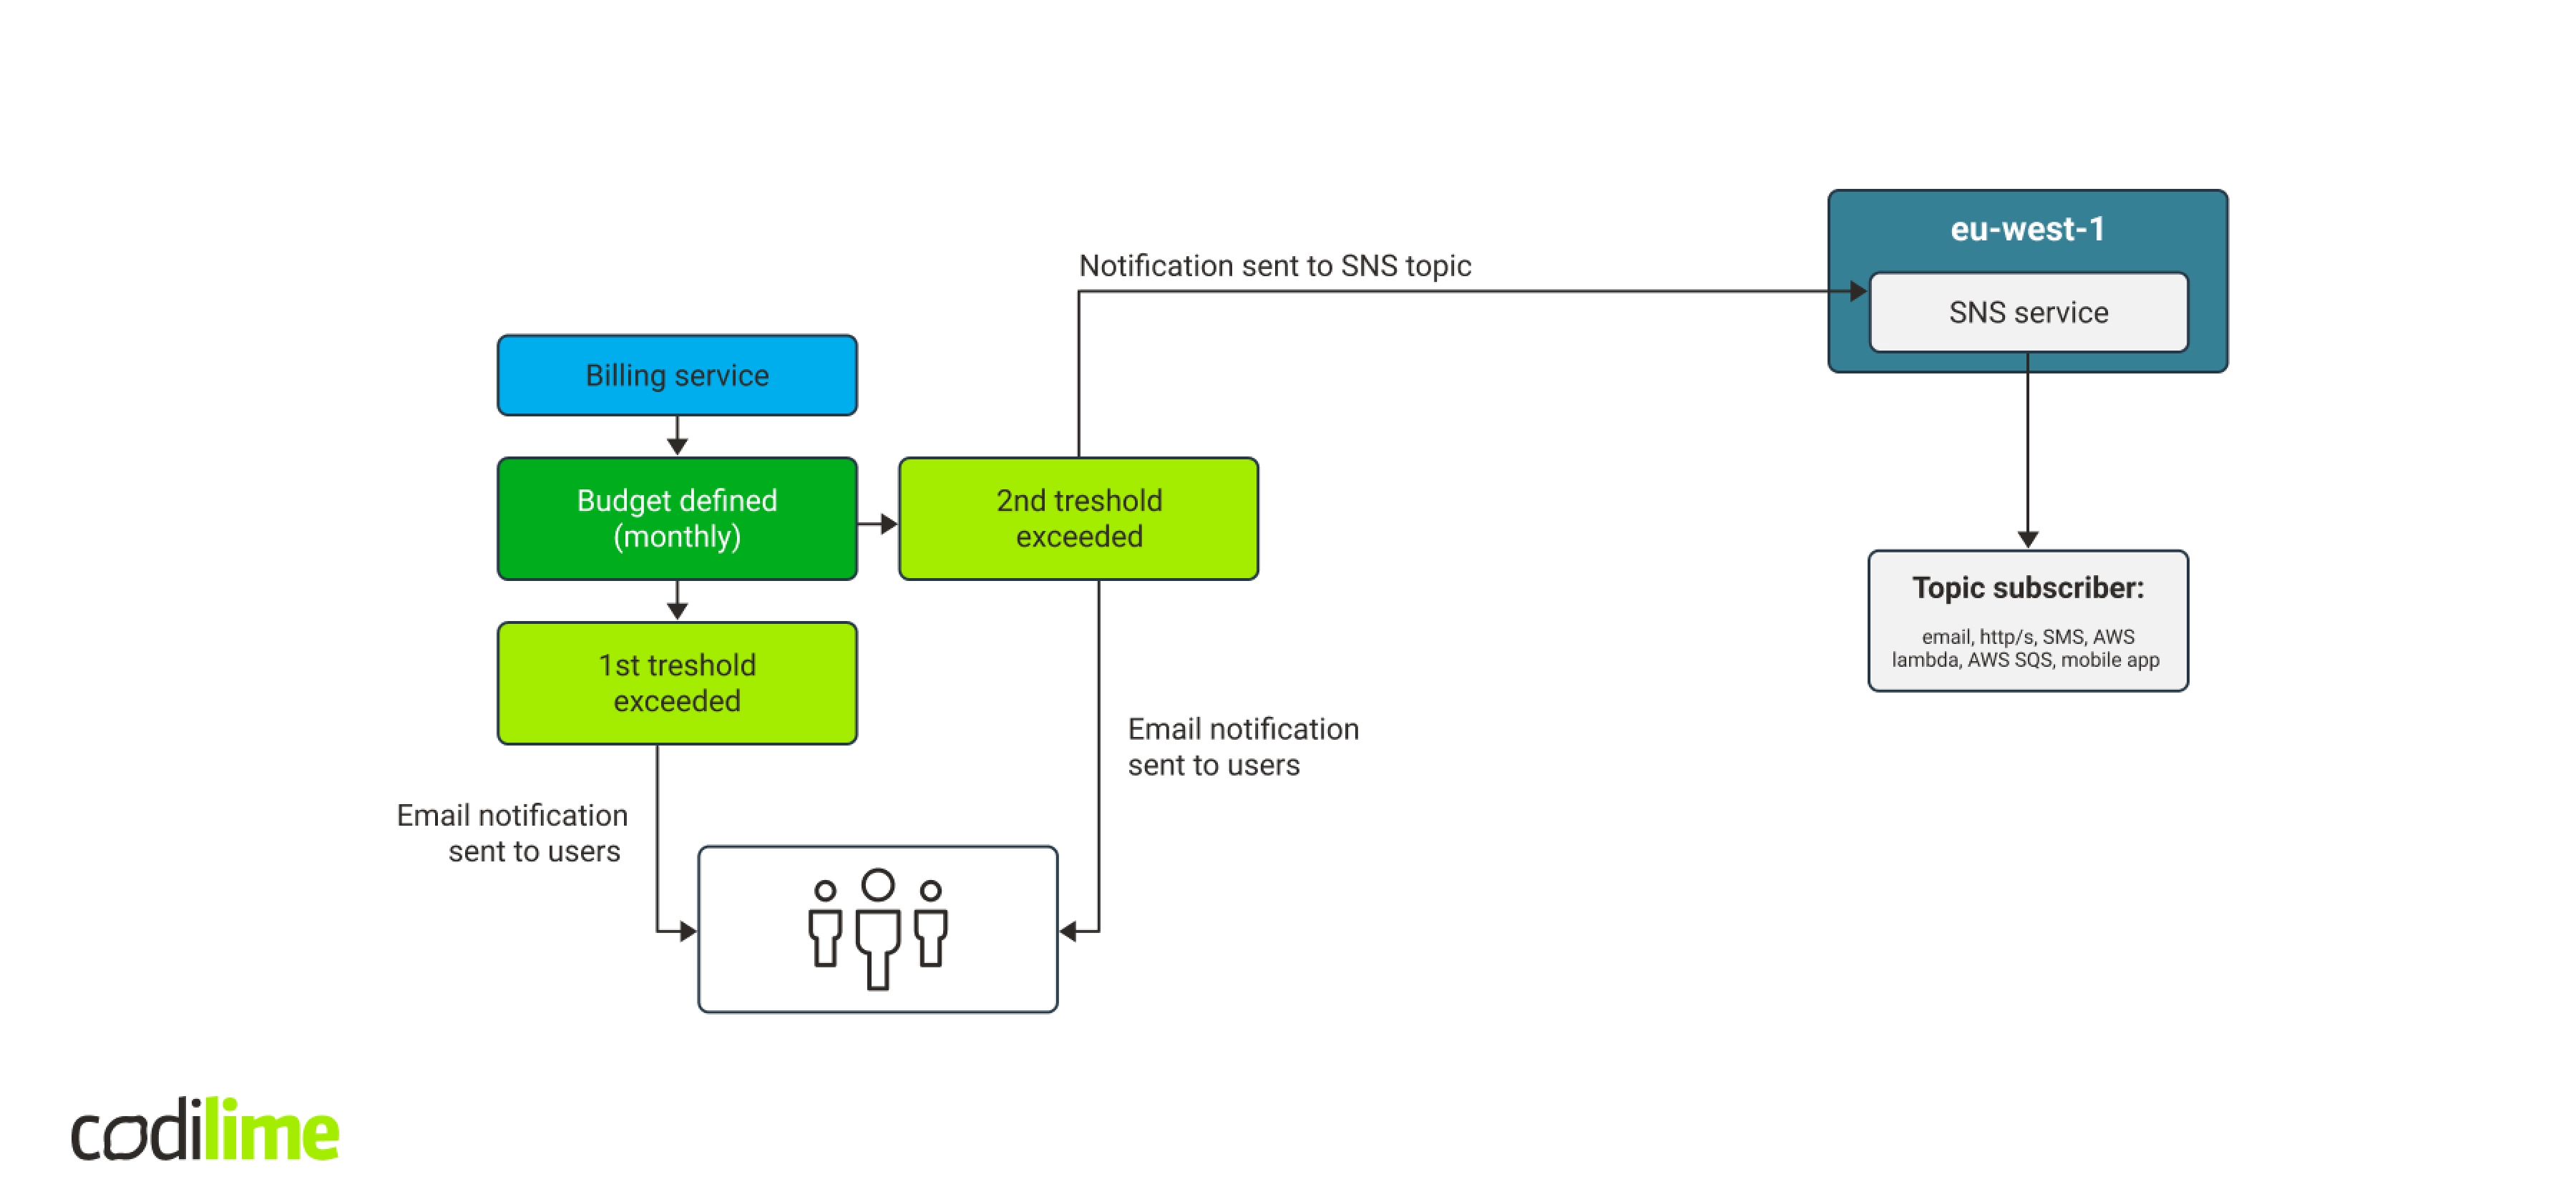
Combining SNS and AWS Lambda together
In our tests, budget sent correct notifications to the SNS topic, which forwarded them to us via email. Then we decided to use AWS Lambda service, which enables a serverless launch of programming functions. AWS Lambda supports technologies including Go, Python, Java, Node.js and Ruby. Calling a programming function seemed much easier than creating a VM or a container with REST API.
We ran several tests and the workflow ‘budget -> SNS topic -> SNS subscription - > AWS Lambda with Python 3.7’ worked very well. Additionally, a test notification can be sent directly via SNS, which will launch the function. You do not have to define the budget and wait until it exceeds the threshold to have the notification sent, making the entire testing process far faster.
The last issue to address was to set up a communication method between Python and AWS API. We soon enough discovered that there is a dedicated library boto3 that enables you to create, delete, configure and manage AWS services.
So, the workflow now looked as follows: after exceeding the budget, a notification is sent to the SNS service that will forward it to AWS Lambda service. That in turn launches a Python function to communicate with AWS to find and stop all EC2 working instances, ECS containers and RDS service databases. The workflow is laid out in Fig. 7.
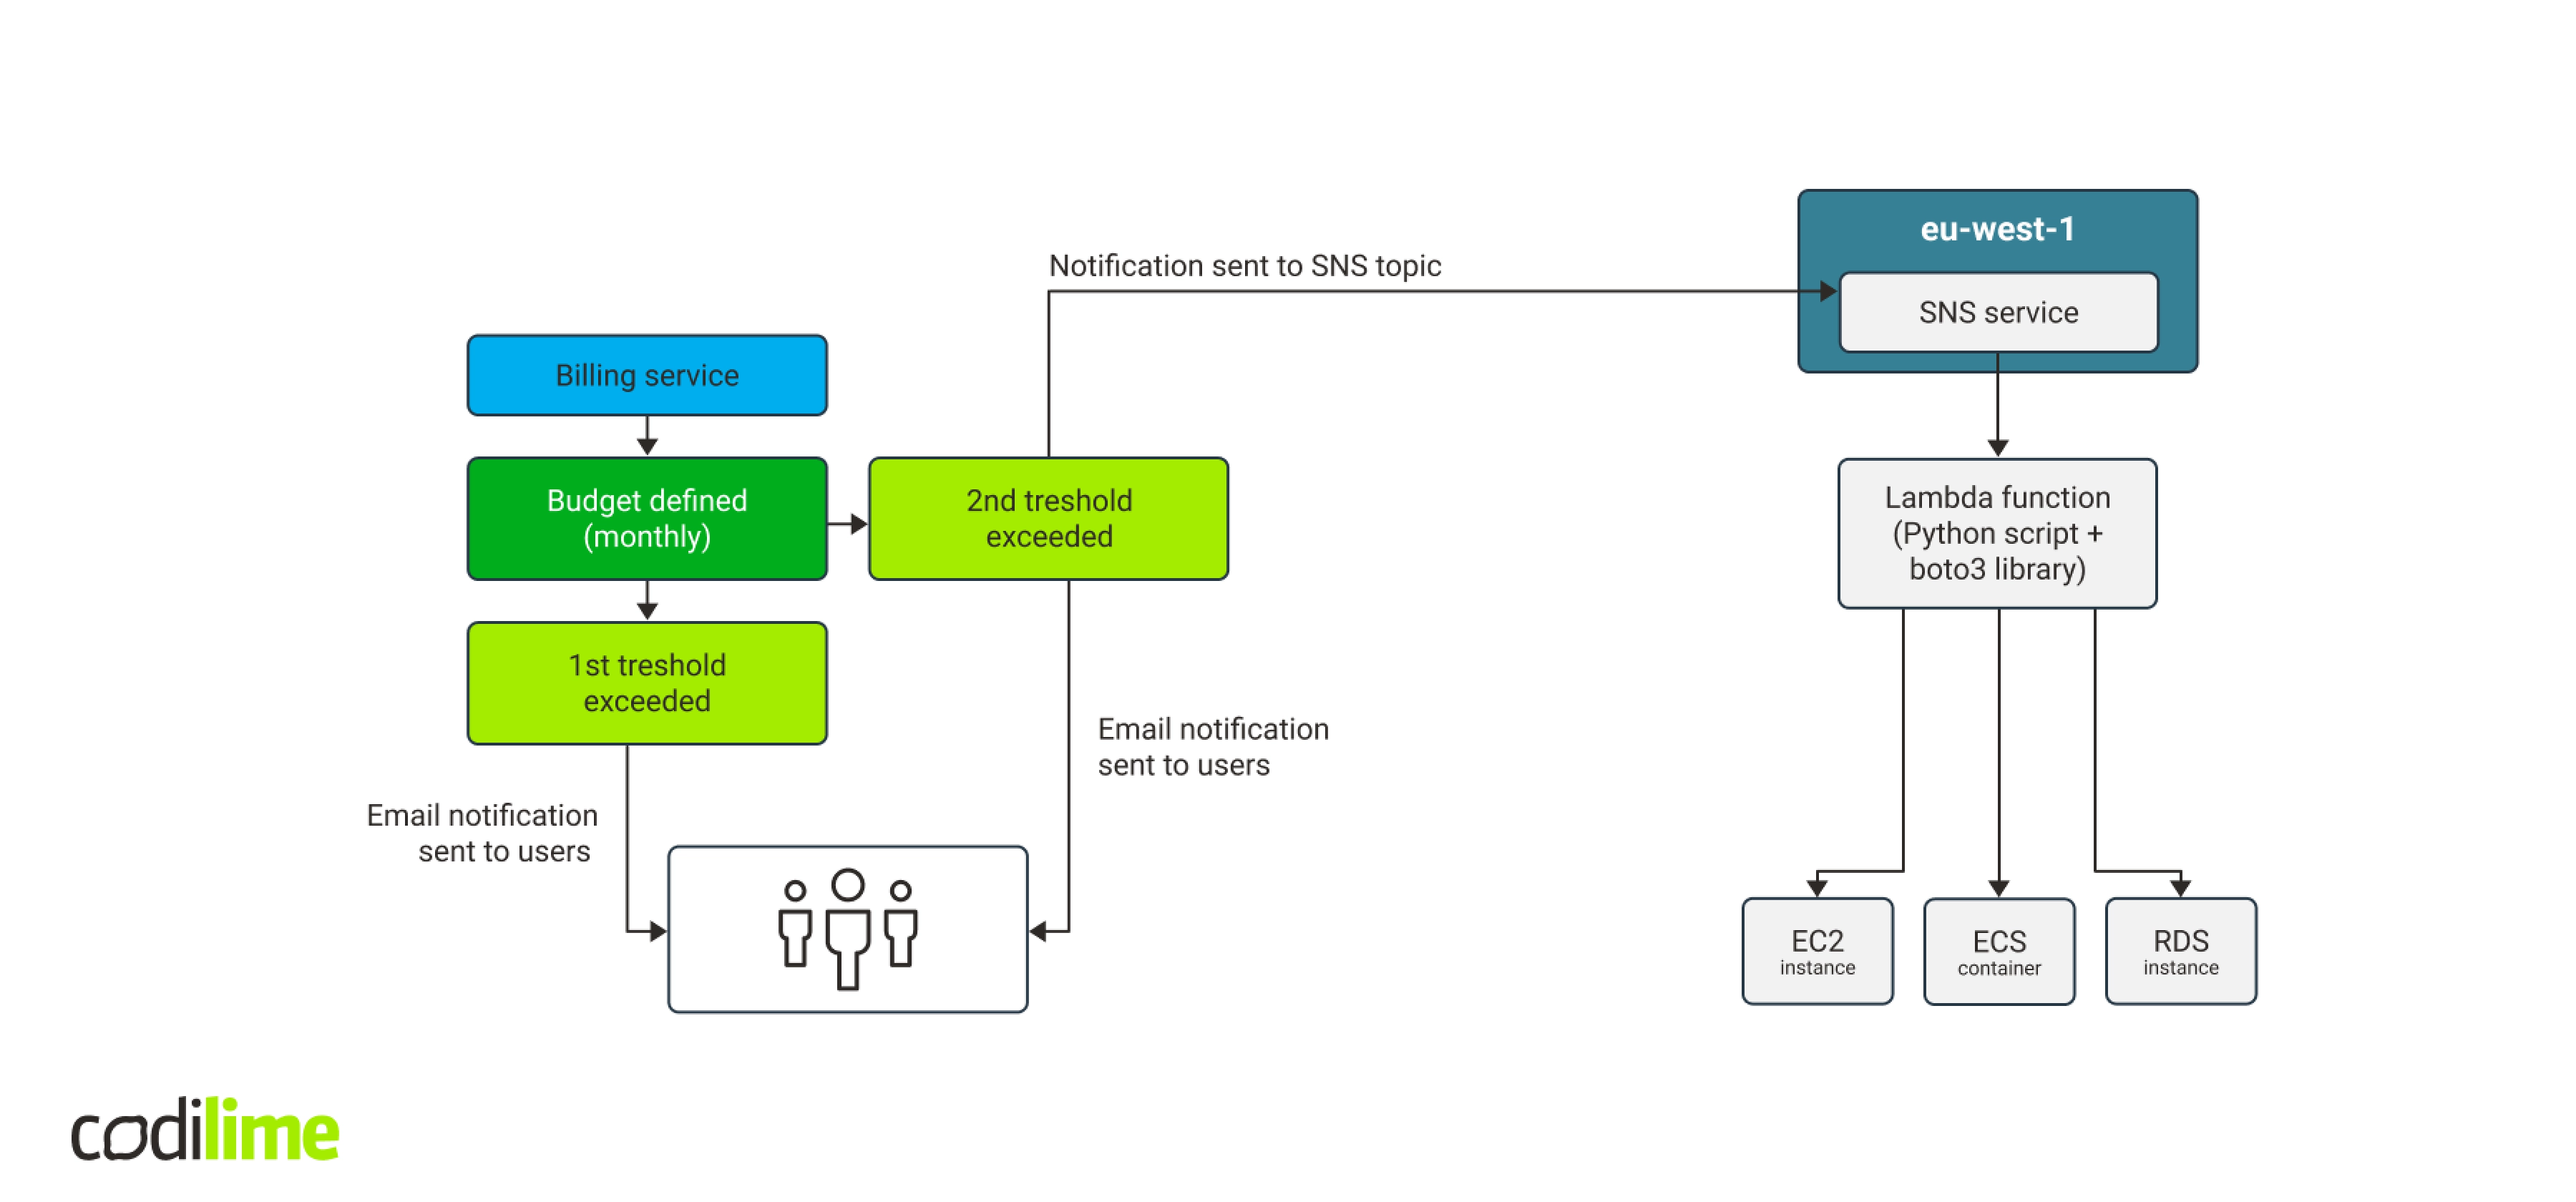
Using Python and boto3 library to manage cloud resources
Given the complexity of Amazon Web Services, we were aware that each of them needed an individual approach. First, we checked if stopping EC2 instances worked well. The EC2 class of the boto3 library contains the “stop_instances” method. Its argument is a list of IDs of the instances to stop.
Using an AWS console for development is inconvenient—it requires more clicks and a function must be deployed after editing, which takes a few seconds. Therefore, we decided to manually type the testing instance ID to check if it works and then start writing the code on our own workstation. This was much easier.
Our solution implements a functionality to stop the following resources.
-
EC2 instances
This functionality was implemented by getting the list of all instances in the region and filtering those with the “running” status. Next, the method “stop_instances” is called with the ID of the instance to stop:
ec2cl.stop_instances(InstanceIds = [instance.id])
-
Auto Scaling instances via Auto Scaling Groups
The “stop_instances” method stops all running instances. For instances managed via the Auto Scaling Groups service, a stopped instance is automatically started by Autoscaler. To stop the instances managed via Autoscaler, the settings of a group which a given instance belongs to must be updated. The group needs to be scaled down to zero. This can be done by setting up a minimal instance number parameter as zero and force scale down to this value. Use the “update_auto_scaling_group” method belonging to the “autoscaling” class.
Of course, you’ll first need to set up a list with group names that can be autoscaled via API. As filtering is unnecessary, we skipped it. An “update” operation does not return an error, if a group has already been scaled down to zero. Group scaling should be done before stopping standard instances.
asc.update_auto_scaling_group(AutoScalingGroupName = auto_scaling_group_name, MinSize = 0, DesiredCapacity = 0)
-
ECS tasks
Elastic Container service is used to manage containers. Before implementing the container, it is necessary to create a cluster. Next, you can either launch a task, i.e. an independent container, or a service, i.e. a container group that builds up the application. To stop a task you can use the “stop_task” method from the “ecs” class. To do this, you need a list of clusters and tasks with the “RUNNING” state in each cluster. Please note that this method uses Amazon Resource Names (ARN) while the methods of stopping EC2 instances described above used the IDs of VMs and names in the case of the autoscaling groups.
ecs.stop_task(cluster = cluster_arn, task = task_arn)
-
Services in ECS
This case is similar to stopping Auto Scaling Groups. The service needs to be scaled down to zero. To do that, use the “update_service” method from the “ecs” class.
Here one curiosity popped up. When you create a “replica” type of service, you need to fill in the field “Number of tasks,” which determines the desired number of tasks to be launched by ECS in our service. Additionally, you can start the Auto Scaling for the service filling in separate values for minimal, desired and maximal number of tasks. Whether you use the auto scaling feature for the service or not, putting zero in the desiredCount field will stop all tasks in the service.
ecs.update_service(cluster = cluster_arn, service = service_arn, desiredCount = 0)
-
RDS databases instances
Relational Database Service (RDS) offers relational databases provided as a service. It provides several versions of MySQL, MariaDB, PostgreSQL, Oracle and MSSQL databases. AWS also offers its own Aurora database that can be based on MySQL or PostgreSQL engines depending on your preferences. Additionally, Aurora allows you to create serverless instances, replicas, multimaster clusters, and the like.
To stop standard database instances, you can call the “stop_db_instance” method from the “rds” class. We get a list with instance names via API. You can stop only instances that do not belong to any cluster and have the status “available”. Such a database can have the option “stand-by” turned on, i.e. has a replica that is not visible to a user. This replica takes over the role if the main database is unavailable. In such a case, this database is treated as a standard instance and the “stop_db_instance” method switches off a stand-by database too.
rds.stop_db_instance(DBInstanceIdentifier = rds_instance_name)
-
Provisioned RDS clusters
RDS service treats databases based on the Aurora engine as clusters regardless of their configuration. Provisioned clusters are database clusters based on EC2 instances. Such clusters can be switched off using the “stop_db_cluster” method from the “rds” class. The cluster version is taken from the “EngineMode” field that should contain the “provisioned” value in this case.
rds.stop_db_cluster(DBClusterIdentifier = rds_cluster_name)
-
Serverless RDS clusters
Serverless RDS clusters do not use EC2 instances. They are billed based on “ACUs” (Aurora Capacity Units). The maximum number of ACUs is 256, while the minimum number depends on the database engine: for MySQL, it is one, for PostgreSQL, it is two. Serverless clusters cannot be switched off, but can be scaled down to the minimum values depending on the particular database engine. After taking a closer look at the results returned by API, we decided that it did not make sense to check whether a cluster is based on MySQL or PostgreSQL engine. API uses the numbers of a specific database version which can change in the future. The cost difference between one and two ACUs is insignificant, so scaling down to two ACUs is a perfectly acceptable solution.
To scale down, you need to use two methods from the “rds” class: ‘modify_db_cluster’ and ‘modify_current_db_cluster_capacity’. The first one changes the configuration while the latter forces a scale-down.
rds.modify_db_cluster(DBClusterIdentifier = rds_cluster_name, ScalingConfiguration = {'MinCapacity': 2, 'MaxCapacity': 2, 'TimeoutAction': 'ForceApplyCapacityChange'})

rds.modify_current_db_cluster_capacity(DBClusterIdentifier = rds_cluster_name, Capacity = 2, SecondsBeforeTimeout = 10, TimeoutAction = 'ForceApplyCapacityChange')
-
RDS multimaster cluster
RDS multimaster clusters are based on the Aurora database and neither AWS console nor API allows you to stop them or scale them down. The only possibility is to delete a cluster, but this would run counter to our initial requirements: a solution cannot delete resources. We therefore decided not to take any action for this particular cluster type. In the PoC, there is a message that the cluster is recognized. In the future, an email notification to administrators can be added. Should project managers decide otherwise, the resources can be deleted.
-
RDS global clusters
RDS global clusters are databases distributed across several regions. Like multimaster clusters, they are based on the Aurora database and neither can be stopped nor scaled down. Analogically, only a message informing that the cluster was recognized will be displayed in our PoC.
The final solution overview
AWS cloud is divided into regions, which imposes some limitations. Putting a copy of a Lambda script in every region will be the simplest way to address them. To launch Lambda scripts, it is enough to have one SNS service instance located in any region, as it easily communicates with the services in other regions. A budget, on the other hand, is a part of the billing service. This service is not connected to any particular region, but it is related to the entire account. Our concept is presented in Fig. 8 below:
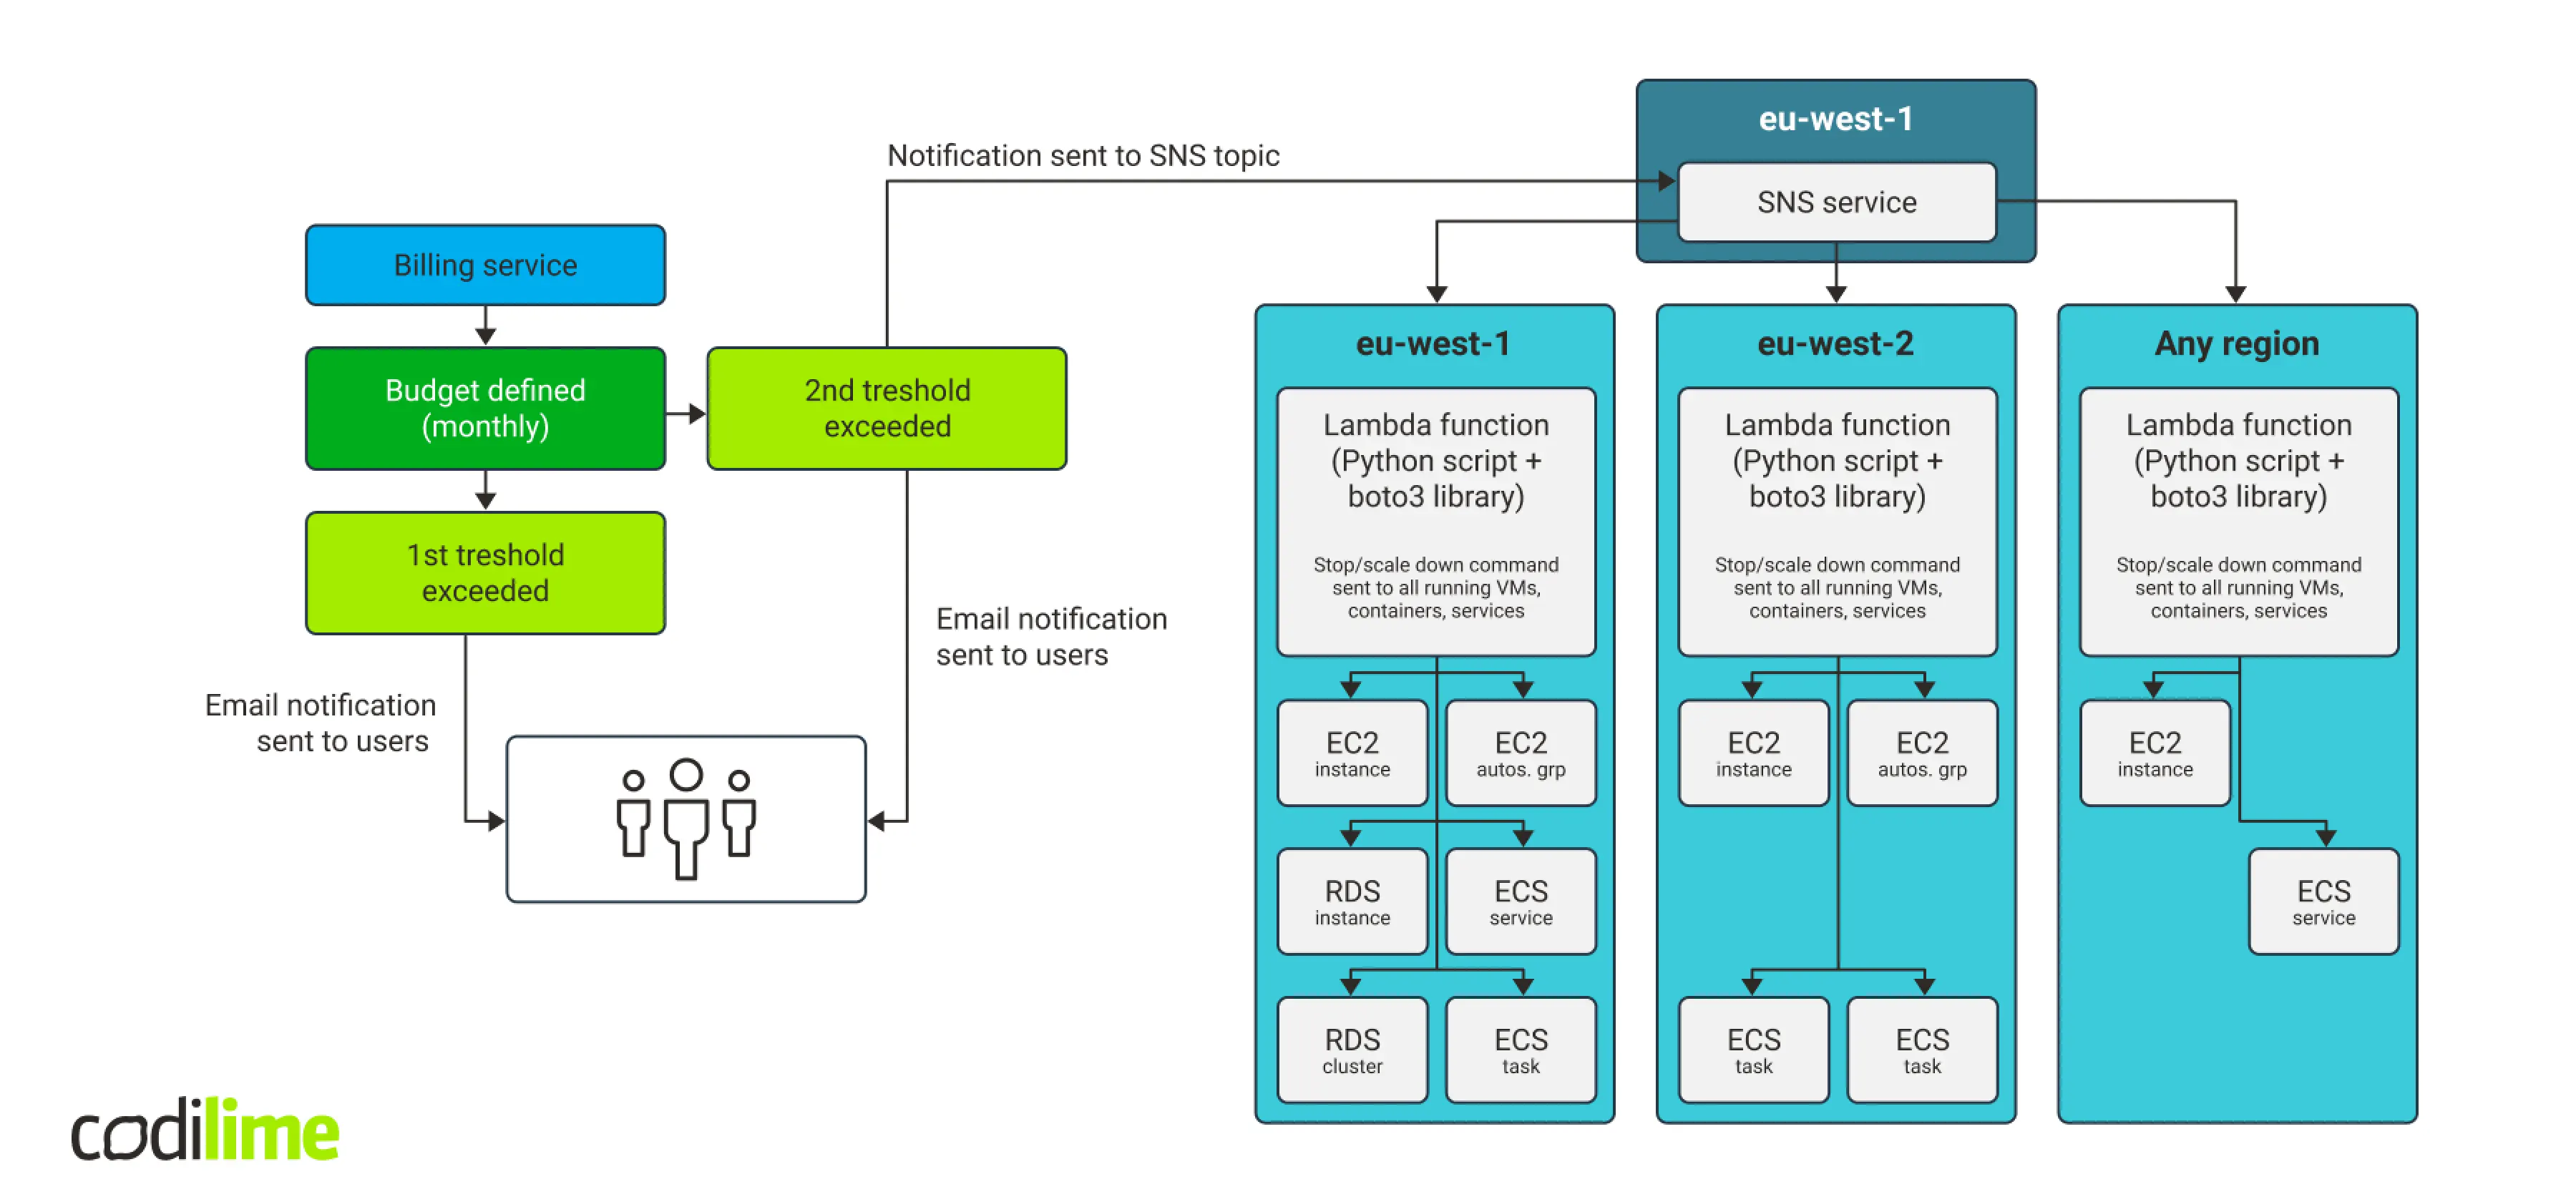
This solution costs virtually nothing. The two first budgets to use actions are free, while subsequent ones cost 0.10 USD per day. SNS service has a free-tier that is renewed every month. Even if the free-tier is exceeded by a few notifications monthly, its impact on the overall SNS cost will be negligible. This is also true for the AWS Lambda service. Our solution will be launched no more than a few times per month and cost essentially nothing, even if there is no free-tier.
Implementing the solution
Manual implementation in the AWS console would be time-consuming, as it would require numerous operations inducing the creation of roles and permission rights in the IAM service and work across many regions. We therefore decided to implement it using Terraform. We prepared a configuration file that can be easily adjusted to the AWS account for which the solution is to be implemented. The IAM account used for implementation needs to have administrator permission rights and an additional access to budget management (AWSBudget* policies).
Final remarks
For now, our solution manages only the most important resource types. But it is also flexible and can be expanded with other services, should the need arise. Basically, the solution enables you to turn off resources for the weekend or at night. It can be initiated fast by sending a message in the SNS service. This option is available in the AWS console. It can also be developed further to include other functionalities, e.g. turning on resources that have previously been turned off. Should you need more decisive actions, you can also use it to delete instances or data.
