


In the previous blog post, I briefly discussed what Envoy Proxy is and where it can be used. If you’re not familiar with Envoy I strongly suggest reading the previous piece first. This text is meant for developers or devops engineers who want to learn more about how to make the most of its functionality. We will discuss how Envoy Proxy actually works and how it should be configured.
Understanding Envoy Basics
Let’s start with a simple example.
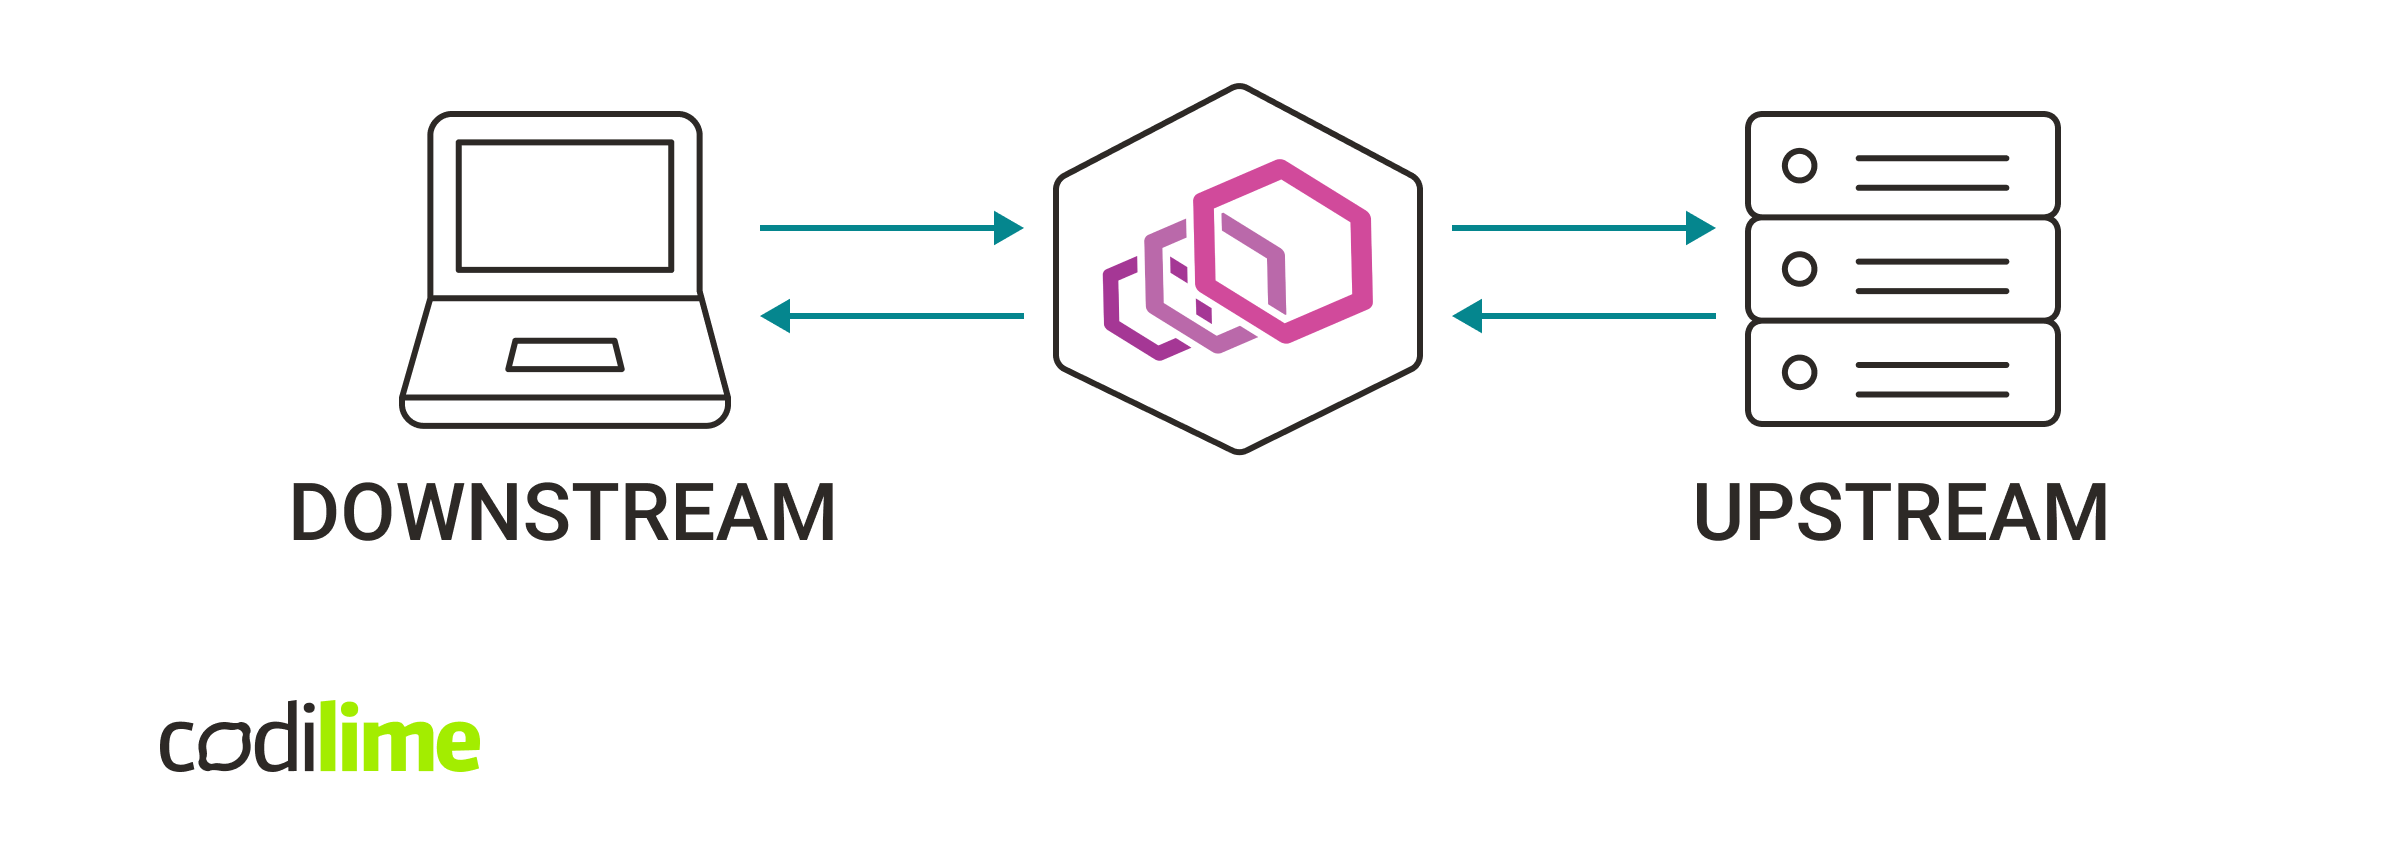
This demonstrates the most common situation when the client initiates a connection with Envoy Proxy as it tries to reach the server.
Envoy receives a connection request from the client (downstream) and then opens a new connection with the server (upstream). Let’s take a look at Envoy in action.
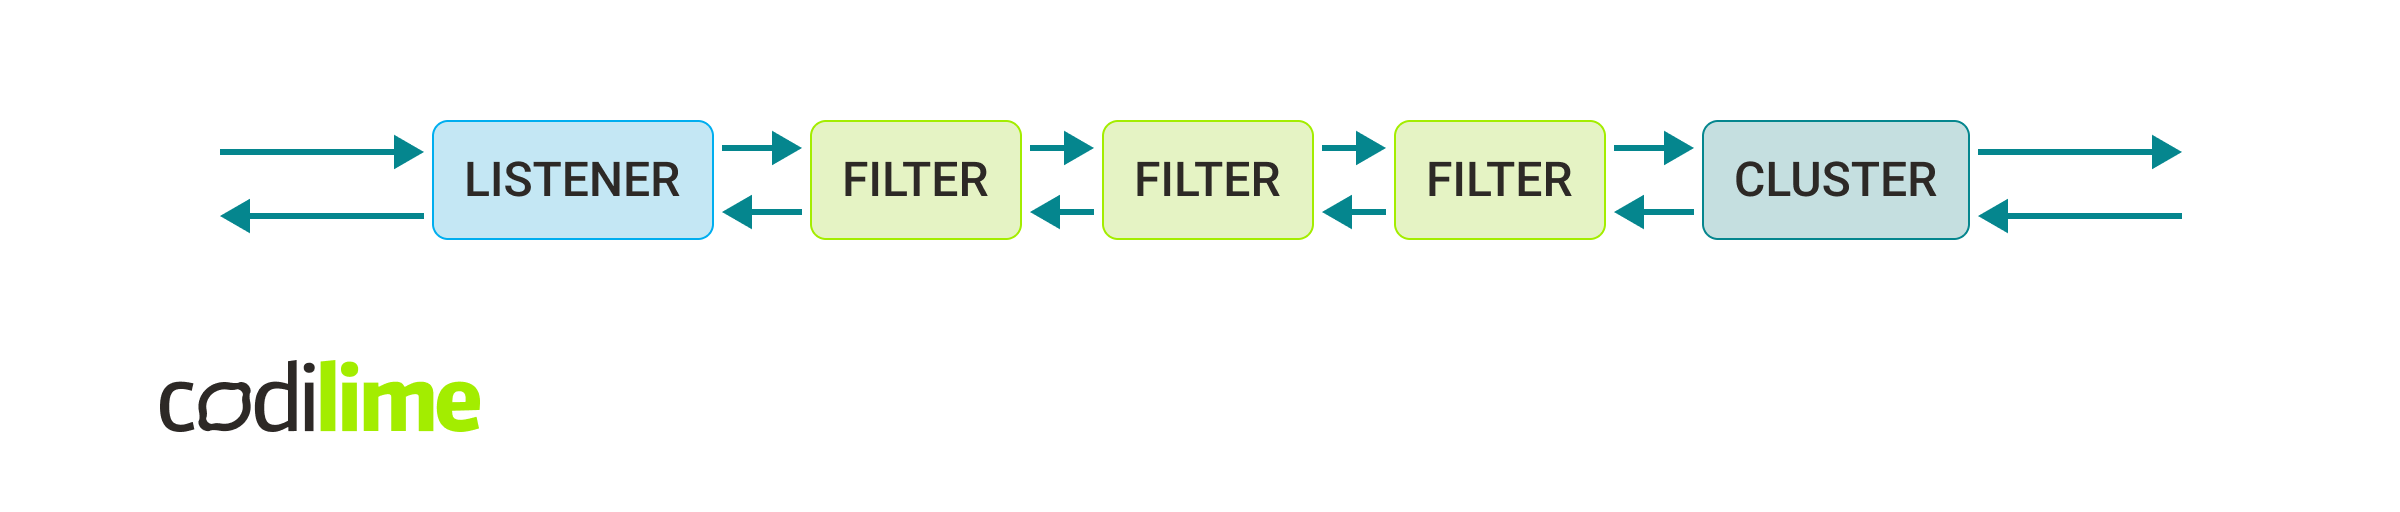
Below, there are described three elements that handle the majority of Envoy logic.
Listener
As the name suggests, this element listens for connections.
The connections are being sent from DOWNSTREAM. The listener binds to a port and awaits the connection. When the request appears, the listener analyzes the connection and decides which filter chain fits the conditions. The most simple case means that each request will be sent through the same set of filters.
Filter
This is Envoy’s main operational unit.
Configuring Envoy is mostly a case of choosing the right filters. Each fitler is usually tied up with a single functionality that may have an impact on the request/data. To name a few of them:
- Echo filter - a simple filter designed mostly for testing purposes. It sends back the received bytes.
- TCP proxy filter
 - a filter which allows us to specify the target cluster for the traffic.
 - HTTP connection manager filter - a special filter which allows us to specify a set of subfilters designed specifically for working with HTTP requests/responses - this is the most crucial filter for proxying REST API applications.
- Custom filter - as mentioned at the beginning, you can easily write your own logic, writing your own filters and applying them in the filter pipeline just like others. Custom filters will be described in detail in the next blog post.
Usually the last filter in the filter chain is a proxy filter or HTTP manager filter (as it contains routing options). An important thing to remember is that the response received from UPSTREAM will be processed in reverse order. Filters can be configured to work in only one direction.
Cluster
An abstraction for UPSTREAM. This describes the target location for the client’s connections. If the location consists of multiple addresses it also defines the load balancing algorithm, which will be used by Envoy to resolve where exactly the data should be sent. Apart from the location it also defines what IP version should be used, the timeout, etc.
Real use cases are usually not as straightforward as those shown in the figure above. Let’s take a look at a more complex scenario:
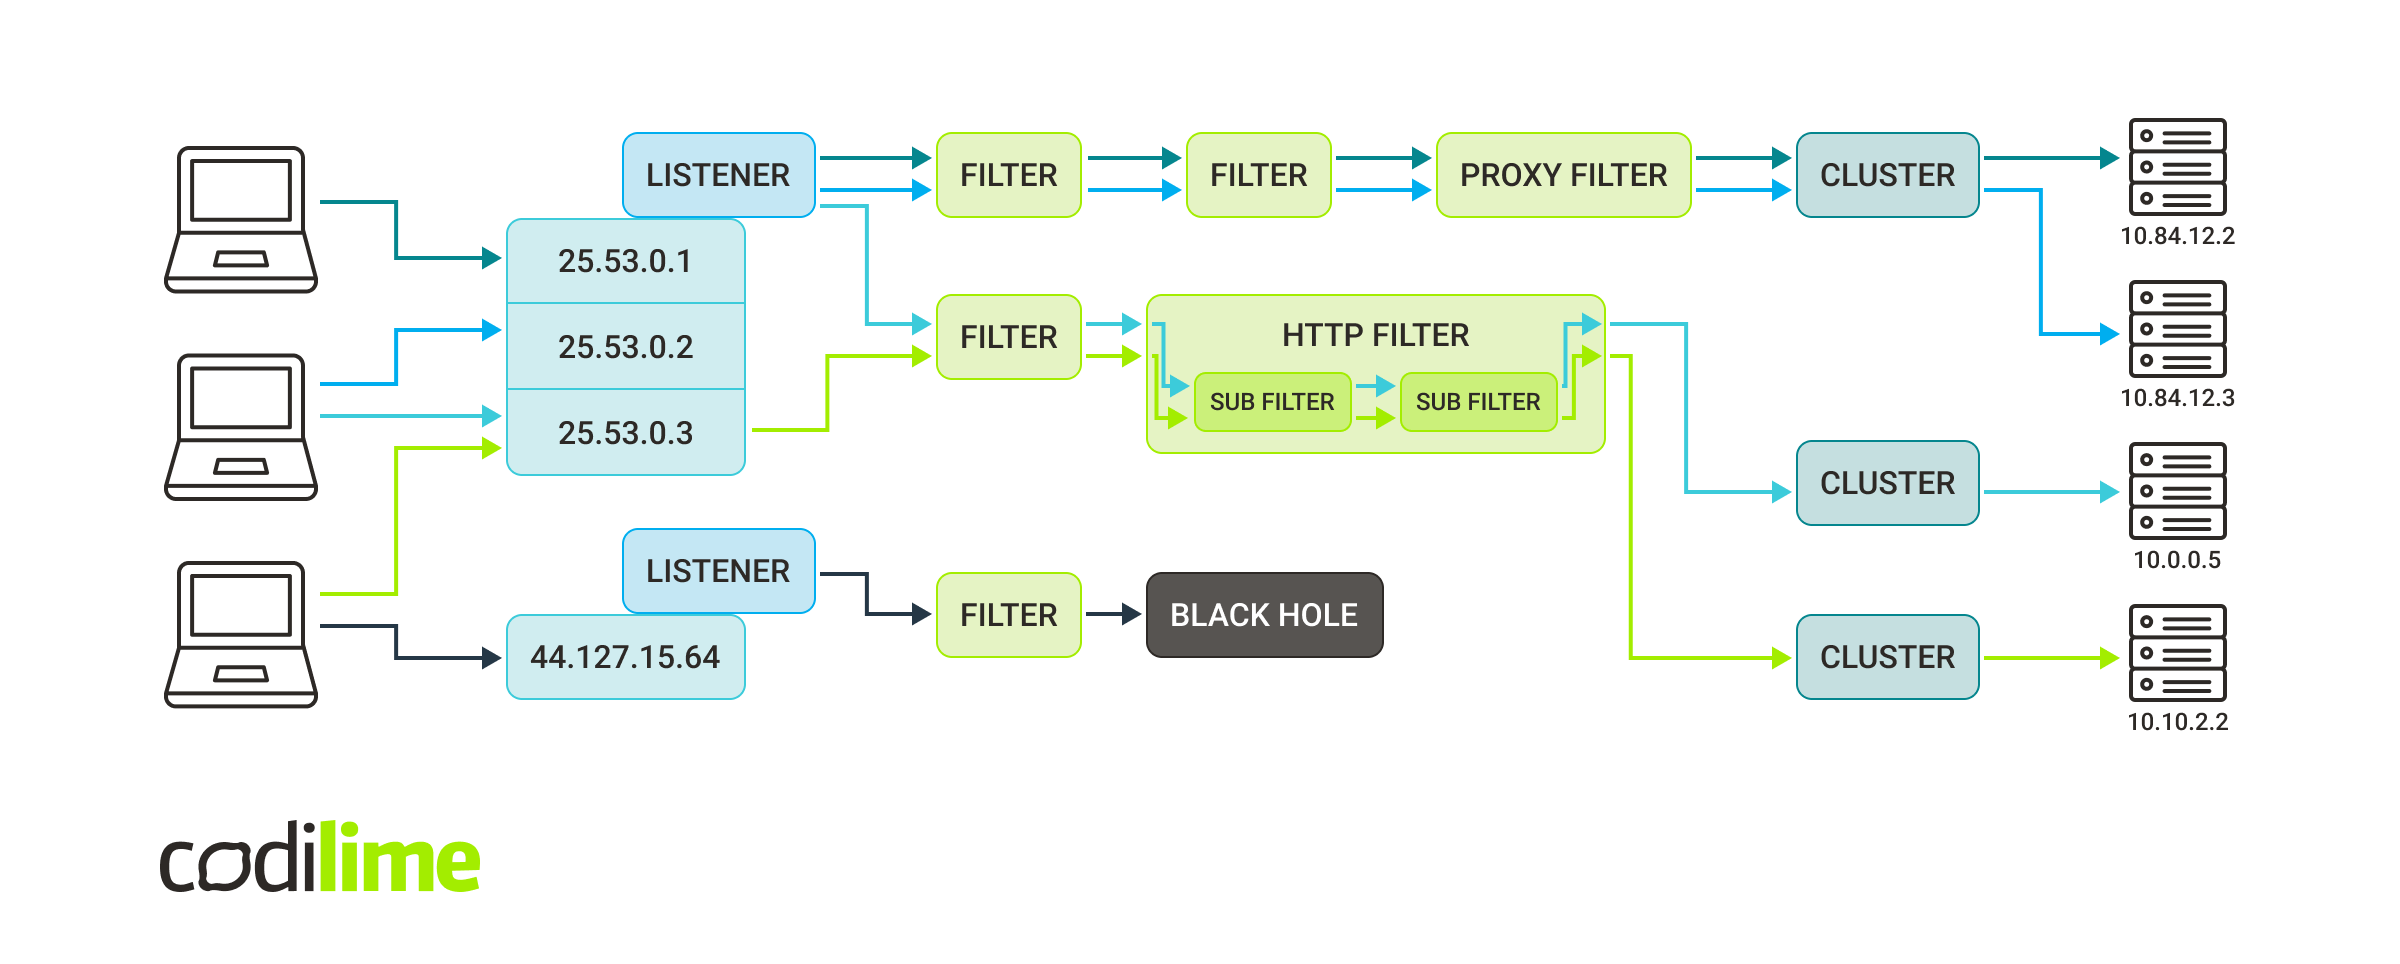
Now, this is something! To simplify the figure above we skipped a few details and didn’t draw responses. Let’s agree that all four servers replied to TCP/HTTP traffic and the response data went back via the same path as it came in. Now let’s talk about what this figure actually tells us. As you can see we have here:
- two listeners (the first one binds itself to three different socket addresses and the second one binds to single address),
- three clusters (two of them point to a single server but the first one sends the traffic to one of two servers randomly),
- and plenty of filters.
So what is going on exactly here?
- The first listener sends requests through two different filter chains. Depending on the request criteria, it sends it via three network filters or two network filters, where the last one is an HTTP filter containing two more sub filters.
- The second listener sends the request to the filter, which gathers statistics about the request and then simply drops it.
- The first filter chain proxies the TCP traffic to the cluster, which chooses one of two servers. The load balancing algorithm is a round robin so the green request goes to the first server and following blue request goes to the second server.
- The second filter chain uses an HTTP filter to decide which cluster is the target. It allows us to choose the cluster by inspecting the HTTP request endpoint.
This gives us some understanding of Envoy and its core concepts. A few additional things we can cover in the situation above:
- Listener configuration allows us to handle the TLS protocol - by providing certificates we can ensure that the connection between DOWNSTREAM and the listener will be considered secure (please note that specifying the TLS doesn’t mean the connection is 100% secure - specifying allowed cipher suites, generating correct certificates, etc. is your responsibility so don’t lose your focus here).
- Cluster configuration can be extended by providing health check options. This is a place where we can define our rules for inspecting whether the server is reliable or not.
This is a good moment to learn how to write an Envoy configuration. Remember, unless you need complex functionality, after the next section you can download an Envoy binary and cover your requirements with your own configuration file.

Configuring Listeners & Clusters
The core
One of the most crucial features of Envoy is the option for dynamic configuration of the data plane. We don’t need to restart the Envoy process, risking that our application won’t be working for a while. However, before we dive in, let’s start with a simpler configuration - using a static configuration file.
To start the configuration, we create the following YAML file:
static_resources:
    listeners:
      [LISTENER CONFIGURATION]
    clusters:
      [CLUSTER CONFIGURATION]
This is our starting point. We need to define our listeners and clusters. Both of these fields expect lists.
Clusters
Let’s start with the example cluster:
 clusters:
  - name: books-server
    connect_timeout: 8s
    type: STATIC
    lb_policy: ROUND_ROBIN
    load_assignment:
      cluster_name: service
      endpoints:
      - lb_endpoints:
          - endpoint:
              address:
                socket_address:
                    address: 127.0.0.1
                    port_value: 10100
          - endpoint:
              address:
                socket_address:
                    address: 127.0.0.1
                    port_value: 10101
This is an example for a single backend application which runs locally on two different ports.
The configuration consists of:
-
name - this is our identification for the following target and its configuration,
-
connect_timeout - allows us to specify how long the upstream connection should be maintained before we cut it off,
-
type - defines how the cluster information should be obtained/parsed - the static option means that we simply provide a list of IP addresses and ports, no DNS is used, no service discovery, etc.,
-
lb_policy - the load balancing policy - here we specify ROUND_ROBIN, which means continuous iteration over our list of endpoints. The next request is sent toward the next endpoint. It is worth mentioning that Envoy keeps its own session of UDP clients sent by the same client, so all UDP packets are forwarded to the same upstream destination to simulate TCP connection,
-
load_assignment - the field which defines our possible targets:
- cluster_name - required but not used in the following configuration, this is used for discovery purposes,
- endpoints - a list of locations where the traffic can be propagated. As we don’t use locality information here, we simply specify one endpoint which will contain an actual list of endpoints called lb_endpoints - a list of actual addresses.
This is a fairly simple configuration but it already brings us two functionalities - a dummy load balancing and a timeout. We could easily extend this configuration to add more endpoints and specify weights to these endpoints to focus more connections on a stronger machine and we could specify health-checking instructions to detect when the endpoint is down.
The entire cluster configuration schema can be found here ![]() .
.
Listeners
Having covered our targets, let’s now dig into a more complex part of this configuration - listeners section.
 listeners:
  - name: envoy_listener
    address:
      socket_address:
        address: 127.0.0.1
        port_value: 10000
    filter_chains:
      ...
Okay, it doesn’t seem that complex. We have specified here one listener called envoy_listener, which will listen to a certain address. The actual complex part is the filter chains, defining the filters that will be used in order to work with the traffic that was received by this listener.
filter_chains:
- filter_chain_match:
    application_protocols:
    - http/1.1
  filters:
    [LIST OF FILTERS]
- filters:
    [OTHER LIST OF FILTERS]
As the plural form suggests, there is a list of filter chains. As I mentioned earlier, each listener can have multiple filter chains. When the traffic begins, the listener verifies the criteria for each filter chain and decides which one matches the given traffic. The listener chooses the first match which applies, so the most common matches should be described at the bottom of the list.
But a simple filter chain configuration can consist of a single filter chain without any conditions. We mainly focus on providing certain filters and that’s what we will discuss now. The filters field is a list of Network Filters.
filter_chains:
  - filters:
      - name: envoy.filters.network.tcp_proxy
        typed_config:
          "@type": type.googleapis.com/envoy.[...].v3.TcpProxy
          stat_prefix: destination
          cluster: books-server
This is the simplest scenario. We have a single filter called tcp_proxy which will propagate the traffic to the cluster called books-server. This example will help us understand what is going on here.
We configure our filters by providing the typed_config field. This is a configuration that accepts a special field @type which points us to the proto definition of the configuration. All other fields mentioned here, like stat_prefix or cluster, must be defined in this proto definition - otherwise Envoy will reject such a configuration.
Our TCP proxy filter also has one special field called stat_prefix. It is an identifier for any statistics generated by this particular filter. I will cover more about statistics later in this blogpost.
In this example, we had only one filter but there are numerous situations where we will have more than one filter. What’s even more interesting, some of the filters are designed to fill the traffic metadata with certain values that will be later considered by other filters.
Let’s take a look at a configuration that is a bit more complex. Take a quick look at it and go back later after I explain what is going on in here:
filter_chains:
- filters:
  - name: envoy.filters.network.mysql_proxy
    typed_config:
      "@type": type.googleapis.com/envoy[...]v3.MySQLProxy
      stat_prefix: mysql

  - name: envoy.filters.network.rbac
    typed_config:
      "@type": type.googleapis.com/envoy[...]v3.RBAC
      stat_prefix: rbac
      rules:
        action: DENY
        policies:
          "product-viewer":
            permissions:
            - metadata:
                filter: envoy.filters.network.mysql_proxy
                path:
                - key: catalog.productdb
                value:
                  list_match:
                    one_of:
                      string_match:
                        exact: update
            principals:
            - any: true

  - name: envoy.filters.network.tcp_proxy
    typed_config:
      "@type": type.googleapis.com/envoy[...]tcp_proxy.v3.TcpProxy
      stat_prefix: tcp
      cluster: mysql
We have here three filters whose goal is to propagate the traffic to the mysql cluster. The complexity here comes with the special use case - we want to exclude requests that come from clients known as product-viewers, which try to perform an UPDATE SQL Query on catalog.productdb. Now let’s dig a little deeper:
-
The filter mysql_proxy doesn’t have any special configuration - it is a simple filter which scans the traffic and analyzes any SQL query that comes along. Then it does two things:
- gathers statistics in Envoy: the number of SQL sessions, the number of authentication failures (if the login doesn’t succeed), etc. - purely informational stuff,
- completes the filter metadata with both the resource it affects and the list of the SQL operations executed on this resource.
The metadata can be used by us within the logic of other filters in the chain. Remember that filters which provide us with certain metadata need to be placed before filters that use this metadata in the filter chain - otherwise the metadata won’t be resolved.
- The Role Based Access Control filter allows us to type certain rules which will either work as a block-list (if these are the DENY rules) or allow-list (specified with the action ALLOW). In this example, we specify a policy called product-viewer, which will be applied to every traffic (principals: any). This policy checks the metadata of the filter mysql_proxy for any attempt to update the resource catalog.productdb. If so, the connection will be intercepted.
- To make this work, we also need to specify our already-known TCP proxy, which will actually propagate the traffic to the SQL server.
As you can see, a properly defined filter chain can bring many functionalities to our product without the need for writing a line of code!
It would be a sin not to mention another very important Network Filter - HTTP Connection Manager.
- filters:
      - name: sending-to-server
        typed_config:
          "@type": type.googleapis.com/[...]v3.HttpConnectionManager
          stat_prefix: http_traffic
          route_config:
            [ROUTE CONFIGURATION]
          http_filters:
            [LIST OF HTTP FILTERS]
This filter allows us to operate our HTTP requests/responses just like Network Filters allow us to manage our UDP/TCP traffic. We can define not only where the request should be propagated but also we can do so conditionally, based on HTTP properties such as URL endpoint. Additionally, this provides us with numerous functionalities that are written specifically for HTTP traffic.
Let’s take a look at route configuration:
route_config:
            name: local_route
            virtual_hosts:
            - name: backend
              domains:
              - "*"
              routes:
              - match:
                  prefix: "/books/"
                route:
                  prefix_rewrite: "/"
                  cluster: books-server
              - match:
                  prefix: "/"
                direct_response:
                  status: 403
                  body:
                    inline_string: "Page does not exist!"
In the example above, we have a configuration which checks the URL path prefix. If it matches the /books/ endpoint, then it removes this prefix and propagates the request to the books-server cluster (this is pretty useful when we want our Envoy to act as middleware). Additionally, we created a match for empty prefixes with an option called direct_response, which allows us to quickly reject such requests.
After defining where and how our request is propagated, let’s configure what should be done with it:
 http_filters:
          - name: sample
            typed_config:
              "@type": type.googleapis.com/sample.SampleFilter
              key: DATA
              val: "123"
          - name: envoy.filters.http.router
            typed_config:
              "@type": "type.googleapis.com/envoy.[...].Router"
Just as with Network Filters, when we had the TCP proxy at the end of the filter chain, here we need to place the envoy.filters.http.router HTTP filter at the end. This is the filter which will propagate our request to the matching cluster.
In the example above, we also specified our own implemented HTTP filter with some exposed configuration by us. We could add here plenty of predefined Envoy HTTP filters, such as the Compression filter, which compresses the response if the client sends an accept-encoding header. However, I wanted to remind you that we can operate on the L4/L7 layers with our own code - and that’s why I will tell you later about writing your own filters.
This pretty much sums up our simple configuration.
The full listener’s API can be found here. ![]()
The documentation additionally provides the full list of filters that can be used by the listener.
Dynamic Configuration
One of the greatest advantages of Envoy is the possibility of providing a configuration without the need to restart Envoy. For this purpose, it uses a feature called xDS (x Discovery Service). This allows us to specify the HTTP or GRPC server, which is regularly called by the Envoy, in order to receive a configuration.
To name a few popular Discovery Services:
- LDS (Listener Discovery Service) - a service which provides the entire listener configuration to the Envoy instance. As we have already seen, the listener configuration is quite big, especially for larger environments. Providing an LDS is a good idea, as we can easily modify our configuration without the need to restart Envoy. However, in some cases it may be overkill and we would prefer to use RTS.
- RTS (Route Discovery Service) - a service which provides a route configuration for the HTTP Plugin Manager filter - this is a small part of the LDS configuration so if this is the only thing that you need to modify in a runtime, you may want to use this instead of LDS.
- CDS (Cluster Discovery Service) - as the configuration consists of listeners and clusters, there is also an option to provide a service which will support the configuration for clusters.
- EDS (Endpoint Discovery Service) - just like Route configuration is a part of Listener, the Endpoint configuration is a part of Cluster configuration, so you may want to use EDS without providing CDS if this is the only thing that you want to change at runtime.
Example configuration:
dynamic_resources:

  lds_config:
	api_config_source:
  	  transport_api_version: V3
  	  refresh_delay: 5s
  	  api_type: REST
  	  cluster_names: [ds-cluster]

  cds_config:
	api_config_source:
  	  transport_api_version: V3
  	  refresh_delay: 5s
  	  api_type: REST
  	  cluster_names: [ds-cluster]
This time instead of the root key called static_resources, we specify dynamic_resources. In this example, we specify two services: Listener Discovery Service and Cluster Discovery Service. Each of them calls the cluster specified in cluster_names every five seconds for a configuration using REST API (calling POST on /v3/discovery:clusters endpoint for Cluster configuration and on /v3/discovery:listeners for Listener configuration).
The ds-cluster in this example needs to be statically defined in the configuration just like any other cluster.
If Envoy receives a new configuration but it fails to process that, it will use the latest working configuration.
Administration Interface
With the configuration specified above, we already cover many neat features. The remaining part, however, is the possibility of managing our Envoy instance, checking its state and debugging potential issues. To do so, we define something called the Administration Interface.
The most simple configuration would look like this:
admin:
  address:
    socket_address:
      address: 0.0.0.0
      port_value: 15000
The full configuration can be found here ![]() .
.
The Administration Interface is specified at the root level of our Envoy configuration. With this definition, we can now call multiple endpoints on port 15000 including:
- /config_dump - returns the currently used configuration along with information that some configurations cannot be loaded (useful with dynamic configuration),
- /heap_dump - drops the current heap profile of the Envoy process; very helpful for detecting memory issues and tracking bugs,
- /logging - sets logging levels for different loggers,
- /stats - statistics gathered by the instance from Envoy and its filters.
The full list of available endpoints can be found here ![]() . Some of them require specially compiled Envoy binary in order to use them.
. Some of them require specially compiled Envoy binary in order to use them.
The administration interface is a very important tool for Envoy’s administrator but needs to be configured carefully. It cannot be accessed by someone unauthorized as it allows the performance of destructive operations.
Handling overload
When installing Envoy as an Edge Proxy, it is our responsibility to ensure that it won’t crash suddenly under the traffic load. One of our must-haves is to define an Overload Manager in our configuration. It allows us to define a set of actions for situations where our Envoy instance is under pressure.
overload_manager:
  refresh_interval:
    seconds: 0
    nanos: 250000000
  resource_monitors:
    - name: "envoy.resource_monitors.fixed_heap"
      typed_config:
        "@type": type.googleapis.[...].FixedHeapConfig
        max_heap_size_bytes: 2147483648
  actions:
    - name: "[...].disable_http_keepalive"
      triggers:
        - name: "envoy.resource_monitors.fixed_heap"
          threshold:
            value: 0.95
    - name: "[...].stop_accepting_requests"
      triggers:
        - name: "envoy.resource_monitors.fixed_heap"
          threshold:
            value: 0.99
The example above forces Envoy to monitor heap usage every 0.25 second and:
- if the heap usage reaches 95% of the size defined above as max_heap_size_bytes, the Envoy instance will disable the keep alive policy for all current HTTP connections,
- if the heap usage reaches 99% of the size defined above, the Envoy will reject all incoming requests.
This doesn’t guarantee that we are perfectly safe, as the refresh interval may be too big to detect a sudden memory heap, but it should detect most traffic overloads and handle them gracefully. This is not the only practice that we should take into consideration before going to production.
Before deploying an Envoy instance on a larger scale, take a look at the best practices described by the Envoy team ![]() and make sure you have them covered (make sure to choose your Envoy version).
and make sure you have them covered (make sure to choose your Envoy version).
Conclusion
Although we have included a few simple examples, Envoy configuration is a huge topic and depending on the use case it is important to dig deeper into the documentation. As Envoy Proxy gives us plenty of functionalities, it is very likely that it already covers the tasks you want to include in your application.
However, there may be use cases which are not covered by Envoy and for that reason in the next blog post we will cover writing your own filters so stay tuned!