


Virtual Network Functions (VNFs) are software network elements like routers, firewalls or load balancers that replace networking hardware. Network services are performed by dedicated software that runs on Virtual Machines (VMs) managed by Virtual Infrastructure Managers (VIMs). In this blog post, we describe how to configure VNFs using a Virtual Network Function Descriptor (VNFD) together with a Network Service Descriptor (NSD) and the Open Source MANO platform ![]() . Additionally, we will present an initial configuration of a new Virtual Machine (VM) instance using cloud-init.
. Additionally, we will present an initial configuration of a new Virtual Machine (VM) instance using cloud-init.
Why do we need VNFDs and NSDs?
VNFD is a component of a VNF package and has been designed by ETSI (the European Telecommunications Standards Institute). It makes it possible to standardize the operations of VNFs in a cloud environment. VNFD is used to describe the process of deploying, configuring and managing a VNF instance.
The VNFD defines all VNF properties including:
- Required resources (e.g. CPU, memory, interfaces, etc.)
- VNF image(s)
- External connectivity and connectivity between virtualized instances
- Lifecycle management and configuration
- Supported VNF-specific parameters
- Software metadata
A Network Service Descriptor (NSD) allows you to standardize the network operation of VNFs. It is used to define how VNFs are interconnected to provide the service.
Open Source MANO—an overview
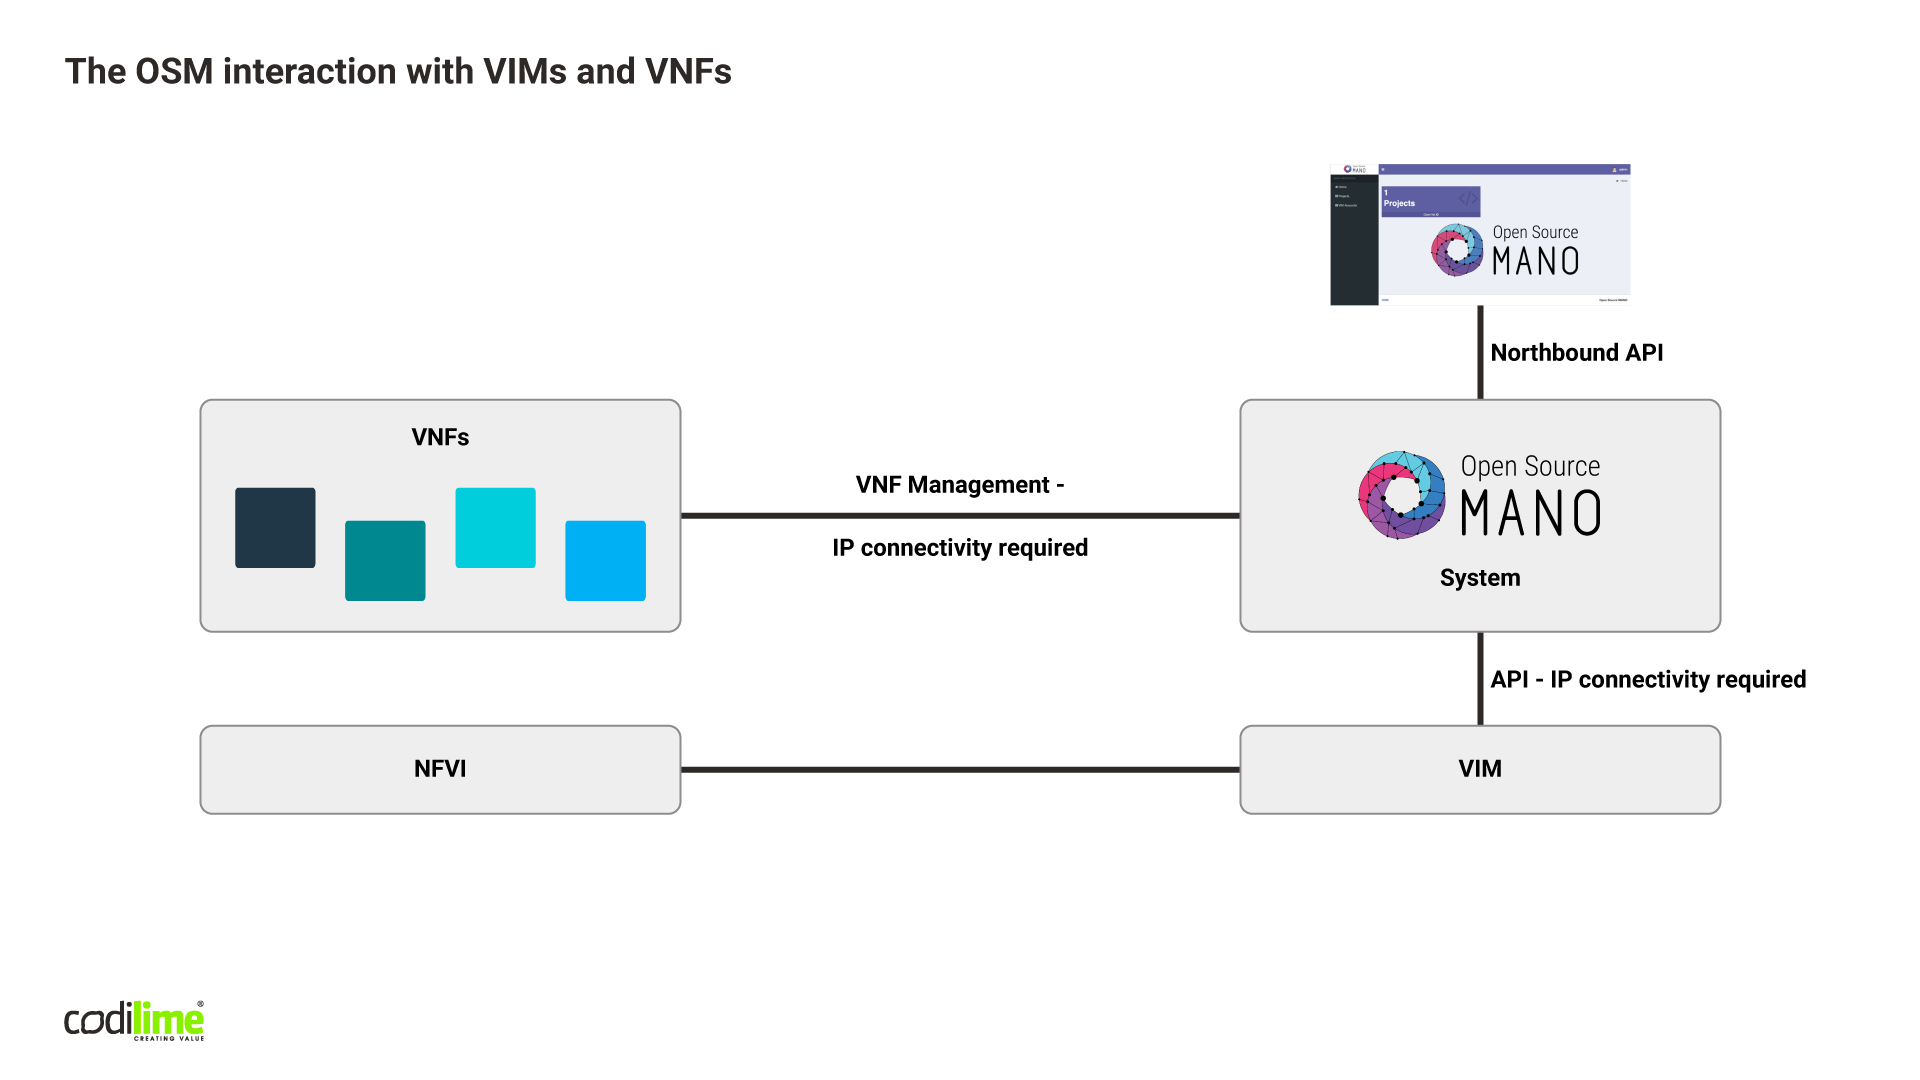
To illustrate how to create a VNFD template, we have chosen ETSI Open Source MANO (OSM) for NFV Management and Orchestration. In our example, OpenStack is used as a Virtual Infrastructure Manager (VIM). The following figure illustrates how OSM interacts with VIMs and VNFs:
A VNFD example—what we want to achieve
The final result of our VNFD template is to create one VM instance in the OpenStack environment with the following requirements:
-
CPUs: 2
-
RAM size: 2 GB
-
Hard disk size: 20 GB
-
Network interfaces: 2: 1 for inside the network, 1 for outside
-
System version: Ubuntu 16.04 (cloud image)
-
Cloud-init configuration to do the following:
- Set password for default user (Ubuntu)
- Force the above password to be changed after first login to the instance
- Disable ssh password authentication
- Add your public key for ssh authentication for default user (Ubuntu)
- Update apt database on the first boot
- Download and install nginx
How to configure an environment to build a VNF using Open Source MANO
Our OpenStack environment is configured with the following:
-
Ubuntu 16.04 (cloud image version) imported as a QCOW2 disk, named “ubuntu16.04”
-
Three networks:
- public with public subnet and floating IP pool assigned
- outside with subnet (10.10.0.0/24) will use floating IP
- inside with subnet (10.11.0.0/24)
-
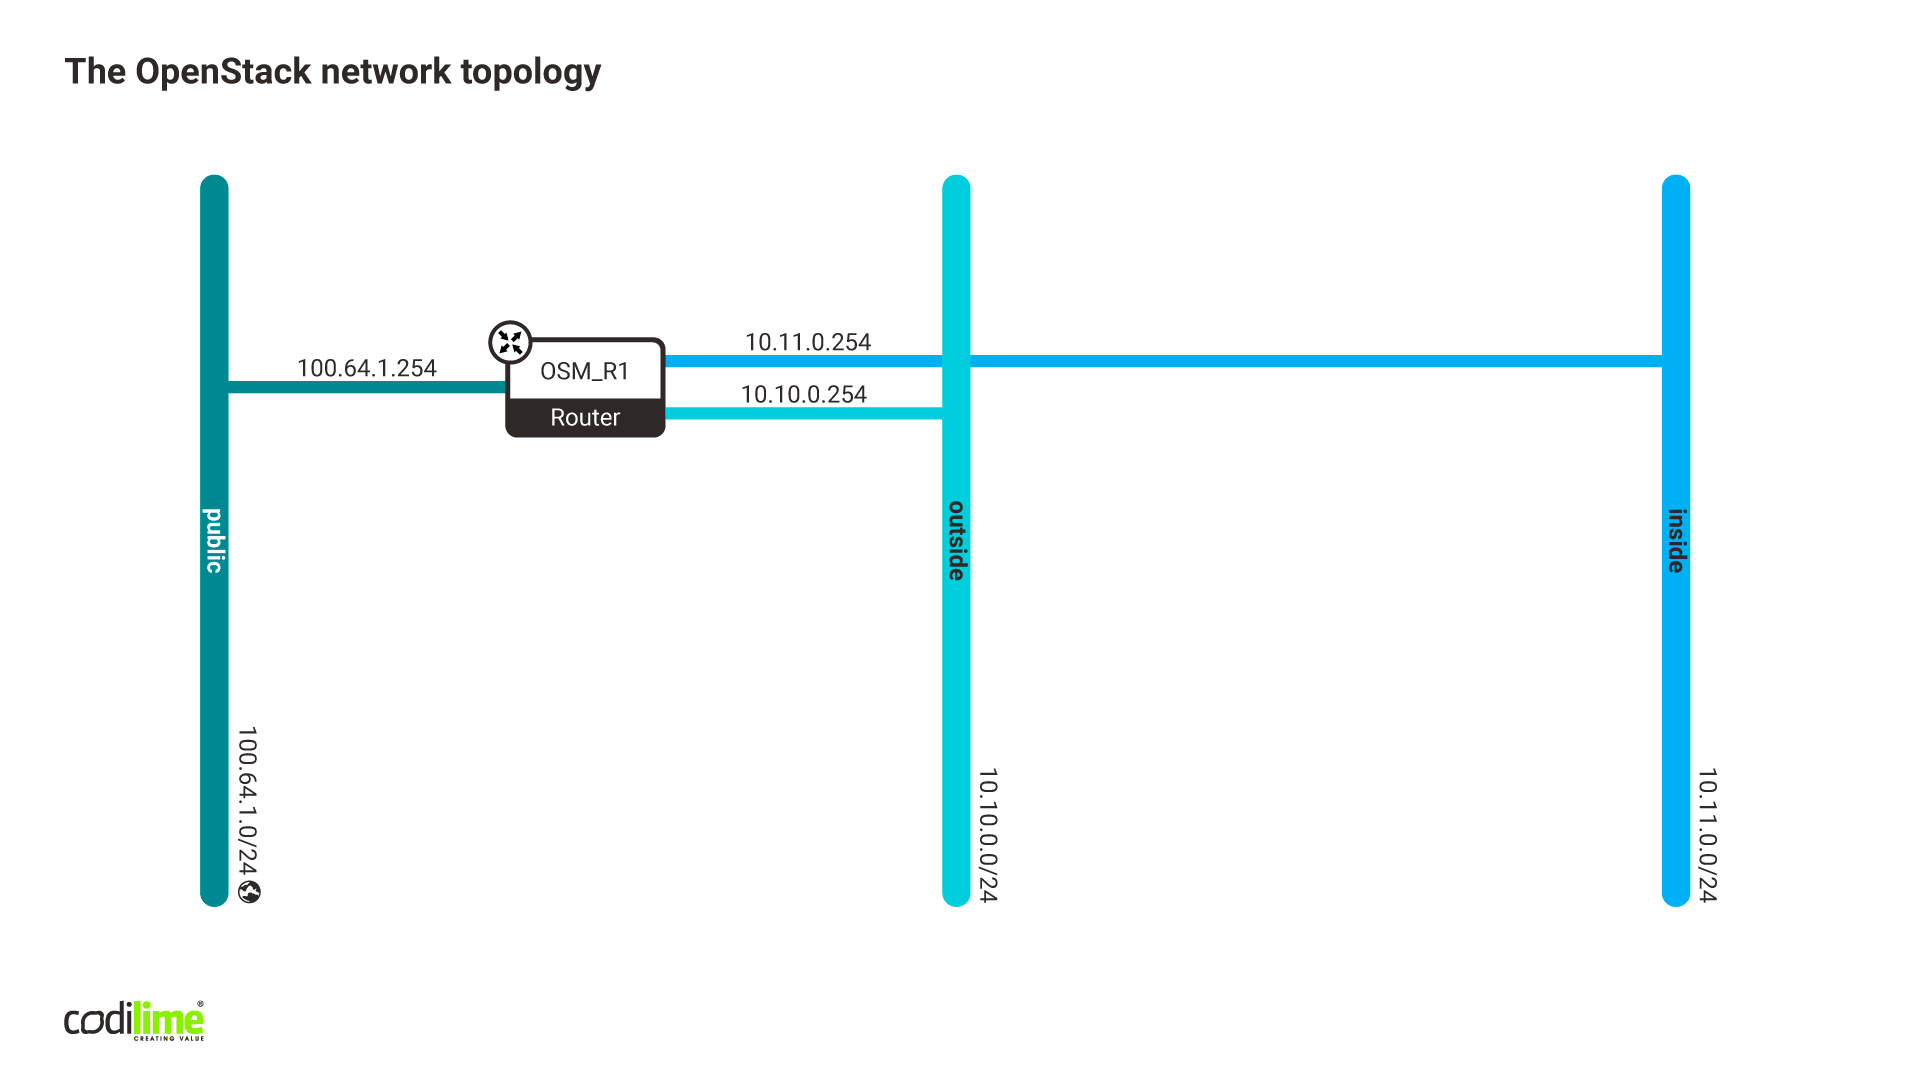
Virtual router with default route through public for the outside and inside networks (network topology below)
-
Default security group with additional rules to allow TCP ports: SSH (22), HTTP (80) and HTTPS (443)
The OpenStack network topology looks like this:
In OSM (the latest version 9), we define a VIM account for the OpenStack environment with option use_floating_ip set to true, so it ensures floating IP assignment for management network (in our case, an outside network).
How to create a VNFD template
To build a VNFD we need to define a package that contains a vnfd.yaml file and optional cloud-init.cfg file which will run post-deployment scripts to initialize the system. Our example focuses on quick VNF deployment using OSM and uses cloud-init to configure the system faster. In other cases, this feature may not be required.
We define the following folder structure:
cloud_init_example_VNF/
-
vnfd.yaml
-
cloud_init/
- cloud_init.cfg
Inside vnfd.yaml we define options to successfully deploy an instance in OpenStack. Please note that all values used to build vnfd.yaml are taken from the ETSI schema ![]() .
.
The first step is to define characteristics of VNF like a unique ID and version of the VNF descriptor.
vnfd:
  id: cloud_init_example_VNF    #identifier of the vnfd, must be globally unique value
  #below options are not mandatory, but they are helpful to distinguish VNF when using OSM GUI/CLI
  description: Example VNF with cloud-init feature
  product-name: cloud_init_example_VNF
  provider: CodiLime
  version: '1.0'
In the next step, we define the DF and VDU profiles. DF (Deployment Flavour) defines specific requirements for capacity and performance.
VDU (Virtual Deployment Units) represents an individual VM inside the VNF. In our case, we are deploying a single VNF with only one VDU but it is possible to define a single VNF that will contain multiple VDUs to provide a more advanced service. Please also note that VDU and its ID will be defined in the last step.
  df:
  - id: default_df #unique identifier of the deployment flavour
    instantiation-level:
    - id: default_instantiation_level #unique identifier of the a level within df
      vdu-level:
      - number-of-instances: 1
        vdu-id: cloud_init_example_VNF_VM #unique name of the VDU
    vdu-profile:
    - id: cloud_init_example_VNF_VM
      min-number-of-instances: 1
The next step is to configure ext-cpd (external-connection point descriptor), which specifies the characteristics of one or more external connection points (CP) exposed by VNF.
We configure two interfaces in our environment. It is also possible to describe internal CP, which enables connectivity between the VDU and internal VL (Virtual Link) or external CP. VLs are used to establish connections between VNF components.
  ext-cpd:
  - id: vnf_cp0_ext #identifier of the CPD
    int-cpd:
      cpd: eth0 #unique ID of int-cpd that will be described later under VDU
      vdu-id: cloud_init_example_VNF_VM #unique name of the VDU
  - id: vnf_cp1_int
    int-cpd:
      cpd: eth1
      vdu-id: cloud_init_example_VNF_VM

  mgmt-cp: vnf_cp0_ext #management interface
In our example, we use Ubuntu 16.04 and this is what we specify in VNFD. The image must exist in the VIM.
  sw-image-desc:
  - id: ubuntu16.04
    image: ubuntu16.04
    name: ubuntu16.04
We also need to define resources for the VM, memory, CPU and storage in this case.
  virtual-compute-desc:
  - id: cloud_init_example_VNF_VM_compute #unique compute ID used when creating VDU
    virtual-cpu:
      num-virtual-cpu: 2
    virtual-memory:
      size: 2.0 #2 GB RAM
  virtual-storage-desc:
  - id: cloud_init_example_VNF_VM_storage #unique storage ID referenced when creating VDU
    size-of-storage: 20 #20 GB of disk size
In the last step, we define the VDU. It contains a type of virtual interface, cloud init file name and reference to the resources we created earlier.
  vdu:
  - cloud-init-file: cloud_init.cfg #reference to the cloud init file with startup configuration for the system
    description: cloud_init_example_VNF_VM
    id: cloud_init_example_VNF_VM #unique value for the VDU
    int-cpd:
    - id: eth0 #unique ID of the interface
      virtual-network-interface-requirement:
      - name: eth0 #interface name of the interface to be presented on VIM (Openstack)
        virtual-interface:
          type: PARAVIRT #type of the interface, PARAVIRT is default value, more types are that are supported are mentioned in the schema
    - id: eth1
      virtual-network-interface-requirement:
      - name: eth1
        virtual-interface:
          type: PARAVIRT
    #when creating VDU, we reference image, storage and compute IDs created earlier
    name: cloud_init_example_VNF_VM
    sw-image-desc: ubuntu16.04
    virtual-compute-desc: cloud_init_example_VNF_VM_compute
    virtual-storage-desc: cloud_init_example_VNF_VM_storage
In the next stage, we prepare our cloud_init.cfg file. You can find documentation about the cloud-init feature and how to configure it here ![]() .
.
In our example, after creating and initializing the VM instance, we configure a password for the Ubuntu user that must be changed after the first login. In addition, we disable SSH password authentication allowing SSH access to the VM only with authorized public keys. Next, we get apt updates and install the nginx packages.
#cloud-config
password: ubuntuUserPassword
chpasswd:
  expire: true
ssh_pwauth: false
ssh_authorized_keys:
  - put your public rsa key for ssh connection (for default user ubuntu)
package_update: true
packages:
  - nginx
At the beginning of this paragraph, we have defined the folder structure. This structure is required by OSM to read the VNFD template. We need to pack our directory to tar.gz. We will be using OSM CLI to accomplish that.
$ tar -czvf cloud_init_example_VNF.tar.gz cloud_init_example_VNF/
cloud_init_example_VNF/
cloud_init_example_VNF/cloud_init_example_VNF.yaml
cloud_init_example_VNF/cloud_init/
cloud_init_example_VNF/cloud_init/cloud_init.cfg

$ osm vnfd-create cloud_init_example_VNF.tar.gz
4a78707d-9bec-4856-8e88-cb5d2c163729
Verify that our VNFD is imported correctly (some outputs have been omitted for brevity).
$ osm vnfd-list
+------------------------+--------------------------------------+-----------+
| nfpkg name             | id                                   | desc type |
+------------------------+--------------------------------------+-----------+
| cloud_init_example_VNF | 4a78707d-9bec-4856-8e88-cb5d2c163729 | sol006    |
+------------------------+--------------------------------------+-----------+

$ osm vnfd-show cloud_init_example_VNF
+----------------------+---------------------------------------------------------------------------------------------+
| field                | value                                                                                       |
+----------------------+---------------------------------------------------------------------------------------------+
| (...)                | (...)                                                                                       |
| onboardingState      | "ONBOARDED"                                                                                 |
| operationalState     | "ENABLED"                                                                                   |
| usageState           | "NOT_IN_USE"                                                                                |
| (...)                | (...)                                                                                       |
+----------------------+---------------------------------------------------------------------------------------------+
We can see that our VNFD has been successfully loaded into OSM based on the states from the above output.
How to create an NSD
After defining VNFD, the next step is to create an NSD. In the following case, we define a very simple Network Service (NS). The NSD can be used to model more advanced network topologies. We can define multiple VNFs and use the NSD to create connections between them. We are able to define how each of the VMs should communicate with each other and the outside world to provide service.
Building NSD is similar to the VNFD. It requires the .yaml file to be created with the descriptor for all connections. All values that are used to build nsd.yaml are taken from the ETSI schema ![]() .
.
In the first step, and similarly to the VNFD, we define the name and version of the configuration.
nsd:
  nsd:
  - id: cloud_init_example_NS #global, unique identifier of NS instance
#below options are not mandatory, but they are helpful to distinguish NS when using OSM GUI/CLI
    description: Example NS
    name: cloud_init_example_NS
    version: '1.0'
    designer: CodiLime
The next step is to define a virtual link to be used.
    virtual-link-desc:
    - id: outside #unique identifier of virtual link
      mgmt-network: true #boolean value to check if network is VIM management network
    - id: inside
      mgmt-network: false
We need to create a reference to the VNFD.
vnfd-id: cloud_init_example_VNF
In the last step, we define the DF (Deployment Flavour) for the network part. Virtual-link-profile-id is a reference to a network existing in OpenStack.
    df:
    - id: default-df #ID of configured DF
      vnf-profile:
      - id: '1' #unique identifier of vnf-profile
        virtual-link-connectivity: #configure relationship between VNF interface and VIM network, in our case it’s VNF and Openstack
        - constituent-cpd-id:
          - constituent-base-element-id: '1'
            constituent-cpd-id: vnf_cp0_ext #ID of ext-cpd from VNFD
          virtual-link-profile-id: outside #network in Openstack
        - constituent-cpd-id:
          - constituent-base-element-id: '1'
            constituent-cpd-id: vnf_cp1_int
          virtual-link-profile-id: inside
        vnfd-id: cloud_init_example_VNF #ID of the VNFD created earlier
As with the VNFD, tar.gz needs to be created in order to import the NSD to the OSM.
$ tar -czvf cloud_init_example_NS.tar.gz cloud_init_example_NS/
cloud_init_example_NS/
cloud_init_example_NS/cloud_init_example_NSD.yaml

$ osm nsd-create cloud_init_example_NS.tar.gz
936ae45c-a310-46d4-8ca3-5b3b2a315ec2
Now we verify that the VNFD was imported correctly.
$ osm nsd-show 936ae45c-a310-46d4-8ca3-5b3b2a315ec2

+----------------------+---------------------------------------------------------------------------------------------+
| field                | value                                                                                       |
+----------------------+---------------------------------------------------------------------------------------------+
| (...)                | (...)                                                                                       |
| onboardingState      | "ONBOARDED"                                                                                 |
| operationalState     | "ENABLED"                                                                                   |
| usageState           | "NOT_IN_USE"                                                                                |
| (...)                | (...)                                                                                       |
+----------------------+---------------------------------------------------------------------------------------------+
Deploying a simple VNF
After defining how NS and VNF should be deployed in OpenStack using the descriptors, we should be able to deploy the most basic VNF.
Because we want to show a simple example from an OSM perspective and not focus too much on the system configuration, we will use cloud config to configure the Linux. In our case, we will use cloud init to configure the root password and install the nginx package.
We can create the instance from the CLI. The VIM account references our OpenStack instance.
$ osm ns-create
Ns name: cloud_init_example_NS
Nsd name: cloud_init_example_NS
Vim account: openstack-vim
49dac8b9-4a12-4128-8b28-9d2735c90a6f

$ osm ns-list
+-----------------------+--------------------------------------+---------------------+----------+-------------------+---------------+
| ns instance name      | id   | date                | ns state | current operation | error details |
+-----------------------+--------------------------------------+---------------------+----------+-------------------+---------------+
| cloud_init_example_NS | 49dac8b9-4a12-4128-8b28-9d2735c90a6f | 2021-01-29T10:56:55 | READY    | IDLE (None)       | N/A           |
+-----------------------+--------------------------------------+---------------------+----------+-------------------+---------------+
Inside OpenStack, an instance is deployed by the OSM.
$ openstack server list
+--------------------------------------+---------------------------------------------+--------+-----------------------------------------+-------------+-------------------------------+
| ID                                   | Name                                        | Status | Networks                                | Image       | Flavor                        |
+--------------------------------------+---------------------------------------------+--------+-----------------------------------------+-------------+-------------------------------+
| 1214f2dc-fea4-4917-9f5c-f9453dec4833 | example_VNF-1-1-cloud_init_example_VNF_VM-0 | ACTIVE | inside=10.11.0.169; outside=10.10.0.192, PUBLIC_IP | ubuntu16.04 | cloud_init_example_VNF_VM-flv |
+--------------------------------------+---------------------------------------------+--------+-----------------------------------------+-------------+-------------------------------+
Once the VM instance has been initialized and cloud-init has performed all configuration settings, we should be able to log onto the VM instance using our ssh key. For the final test, we check if we can view a default web page of nginx:
$ curl http://PUBLIC_IP
<!DOCTYPE html>
<html>
<head>
<title>Welcome to nginx!</title>
<style>
    body {
        width: 35em;
        margin: 0 auto;
        font-family: Tahoma, Verdana, Arial, sans-serif;
    }
</style>
</head>
<body>
<h1>Welcome to nginx!</h1>
<p>If you see this page, the nginx web server is successfully installed and
working. Further configuration is required.</p>

<p>For online documentation and support please refer to
<a href="http://nginx.org/">nginx.org</a>.<br/>
Commercial support is available at
<a href="http://nginx.com/">nginx.com</a>.</p>

<p><em>Thank you for using nginx.</em></p>
</body>
</html>
And as we can see, nginx has been installed successfully.
When we decide to remove the NS we can do so with OSM cli. OSM will delete all of the VMs created in OpenStack.
Creating more complex network scenarios
The example of using VNFD we have presented is very simple, yes, but it allows you to create more complex scenarios including more than one VM instance or even VNFs within a single NSD template. You can also create your own scripts in the cloud-init configuration file and run them after the first boot of a VM instance. OSM provides support for other VIM types, e.g. AWS or Azure, so you would be able to create and instantiate your own VNFs for different platforms.
Moreover, here you can check our network solution services.


