Software development, testing and R&D activities very often require considerable cloud resources. At the same time, these are dynamic environments which can lead to ballooning cloud costs. Public clouds such as AWS, GCP or Microsoft Azure have native mechanisms to manage and optimize spend, but they can’t prevent you from incurring unwanted and uncontrolled costs. This led us to create our own cloud cost optimization solution. In this, the final part of our three-part series, we will show you how to build an Azure cost management solution.
Following up on our AWS and GCP features, we now turn to a third public cloud provider—Microsoft Azure. The solution we built for Azure was intended to meet the same requirements the other cloud solutions did:
- Work automatically
- Be easy to implement
- Be inexpensive to develop
- Enable the client to switch off or decrease the use of resources but not delete them.
Of course, we knew we would need to prepare a separate solution to match the infrastructure and available functionalities of each of the public clouds. Our solutions for AWS and GCP are, like the clouds themselves, nearly identical. In fact, they differ only in their implementation. With Azure, however, the challenge proved far thornier.
Azure infrastructure
It is enough to take a look at Azure’s web GUI to see that this public cloud is different. Perhaps Microsoft wanted to distinguish it from its competitors’ products, as it did with DOS and Windows in the past.
Of course, you still have a distributed structure with regions and availability zones. But not all Azure regions have such zones—Southern Europe (London), for example, does not have them. Additionally, Azure offers many more regions than its competitors and their distribution is also a little bit different. Some of them have been given a more general description (e.g. West Europe), while some have more precise geographical locations (e.g. France Central). The availability of some regions depends on the client’s geographical location.
Here, you can read more about our environment services.
The Azure structure consists of Management Groups that have several levels. Below Management Groups you can find Subscriptions, i.e. mainly containers for resources. Subscriptions are comparable to AWS accounts and GCP projects. When building our solution, we will be operating at the level of a single subscription because it allows us to control costs. It is also a static element of the structure, unlike the next level down—Resource Groups (RG). They are used to logically group resources. You can also control costs at the level of Resource Groups by creating budgets. But in the dynamic environments, which is our case, using this option to control cloud spending would be too complicated, as these budgets can be freely created and deleted at the subscription level.
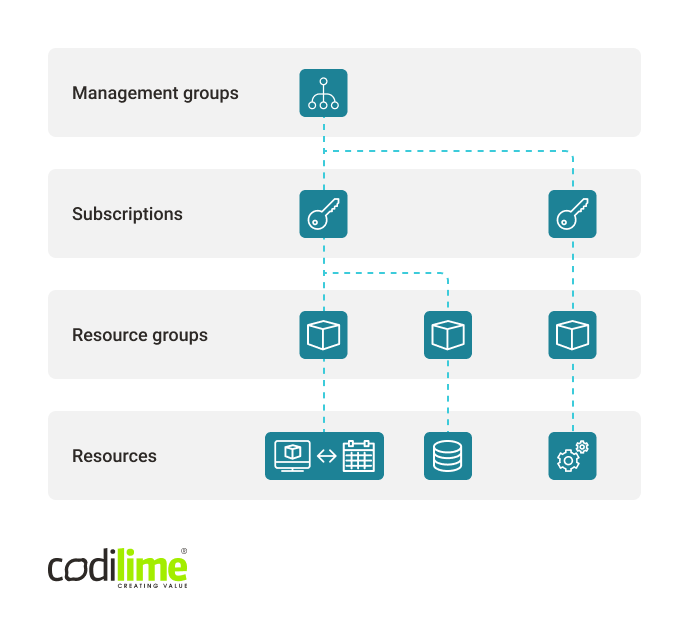
The concept of Resource Groups is interesting and does not have a counterpart in AWS and GCP. In the documentation, it is recommended that a resources group be created for resources that have a common lifecycle, i.e. are deployed, updated and deleted together. Resources can be freely moved between Resource Groups. They can communicate with one another, even if they are not located in the same group. They can also belong to different regions regardless of the region in which the group was originally created and regardless of the regions to which other resources in the group belong.
Given all this, you might want to know why one would assign a Resource Group to a region, if this does not impact the location of the resources in this group. Well, the Resource Group metadata, including the information about the resources belonging to this RG, is stored in the region where it was originally created. If a failure occurs and the Region becomes unavailable, it will not be possible to update the resources from the group. Resources from the group located in other Regions will be still available and you will be able to use them, but there will be no option to update them. If you remove the Resource Group, all its resources will be also removed.
Resource Providers, such as Microsoft.Compute or Microsoft.Storage, are the Azure counterparts of services in GCP and AWS. Azure Resource Manager (ARM) manages the Azure infrastructure. ARM allows you to create, update and delete resources. Azure Portal (web Gui), Azure CLI, Azure PowerShell and REST clients use ARM to operate on resources.
Our solution in Azure
The very first thing we did when working with Azure was to check if our solution from AWS could be applied here too. To be sure we are on the same page, let’s take a look at our AWS and GCP solution schemata:


As you can see, the above solutions are a linear series of events occurring between defined resources. After doing several tests, we came to the conclusion that the general schema for Azure will be similar, but with one crucial exception: to send messages, we will not use the Azure service that is the counterpart of SNS in AWS and PubSub in GCP. Instead, we will use Action Groups, which are owned by the Monitoring service provider.
The Action Group can be called by the budget when a threshold is crossed. For the Action Group, it is possible to define an action to launch a programmatic function in the Function App resource.

Whereas in AWS and GCP it was quite easy to build a solution, the same could not be said for Azure cloud. Before coding and creating automation, we also wanted to check the entire solution in web GUI. This involved:
- creating a budget,
- defining alarm thresholds,
- defining the Action Group and connect it with the budget alarm threshold,
- creating the function “Hello World” that will be called by the Action Group.
Unfortunately, Microsoft policy prevented us from realizing the last step (creating a Python function). In fact, functions can be created and edited for Microsoft environments only. The Azure Portal, however, showed us a short tutorial on how to create a Python function at the workstation side and deploy it in Azure.
A function is a resource that belongs to a higher level called a Function App, which is, as the name suggests, an application. On the workstation side, we need to create an application locally first and then a function in this application. We then create the same app in the cloud and send our local function to this cloud application. If that sounds complex, that’s because it is! In AWS and GCP, you can add a function together with its code in the web GUI. The code can also be easily edited. In Azure things look different.
Let’s go through the entire procedure. Our workstation will be Linux or MacOS. We will need Azure Functions Core Tools and Azure CLI. Both tool sets have for some time now been available in the Azure CLI package. The installation procedure can be found here . The below steps are performed on a local workstation. In our case, this is Linux with bash as the CLI. Before proceeding, please remember to first create and launch a Python virtual environment (we have omitted this step here).
# Install azure-functions for Python; this feature will be useful later
user@linux AZURE$ pip3 install azure-functions

user@linux AZURE$ func init cloud_cost_control_app --python

user@linux AZURE$ cd cloud_cost_control_app

user@linux AZURE$ func new --name cl-cloud-cost-control-func --template "HTTP trigger" --authlevel “function"
Once the above steps have been performed, a folder “cloud_cost_control_app” is created. It contains the auxiliary files for the Python environment and inside another folder “cl-cloud-cost-control-func” containing two files “__init__.py” and “function.json”. The first one contains a Python function “main” with a few lines of code allowing you to handle an HTTP request that triggers the function. It is important to remember that the Action Group calls the function using an HTTP request, so it must be supported.
As we already have our application with a function locally, it can now be sent to the cloud:
# Azure authentication which will redirect us to the login page in the web browser
#
user@linux AZURE$ az login

# after logging in correctly, we return to the CLI and create a storage account in Azure
# it is necessary to store the code and function auxiliary files
#
user@linux AZURE$ az storage account create --name costcontrolstorage --location westeurope --resource-group cost-control-rg --sku Standard_LRS

# create an application in Function App in Azure
#
user@linux AZURE$ az functionapp create --resource-group cost-control-rg --consumption-plan-location westeurope --runtime python --runtime-version 3.8 --functions-version 3 --name cl-cloud-cost-control-app --storage-account costcontrolstorage --os-type linux
At this stage, we have our application in the cloud, but our function is not there yet. So, let’s send it to the cloud:
user@linux AZURE$ cd cloud_cost_control_app

# download the application settings including the Azure authentication token

user@linux AZURE$ func azure functionapp fetch-app-settings cl-cloud-cost-control-app

# Deploying a function in the cloud
user@linux AZURE$ func azure functionapp publish cl-cloud-cost-control-app
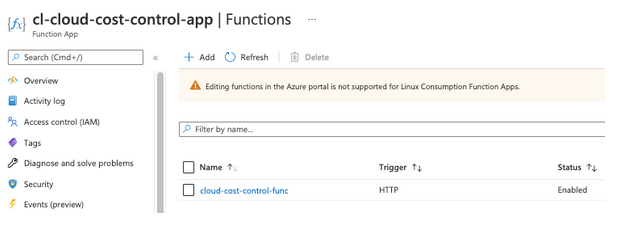
A command “func azure functionapp publish cl-cloud-cost-control-app” will be repeated every time we change something in our function code. After implementing code changes locally, you need to run the above command that will deploy new code in Azure by first removing the entire function runtime environment in the cloud (a container with Python interpreter, pip packages and the function code) and then building this environment from scratch. The entire operation takes a few minutes, but it is not possible to edit the Python function code directly in the Azure portal:
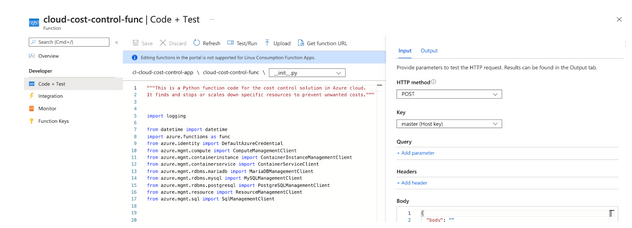
It is however possible to do the testing directly from web GUI:
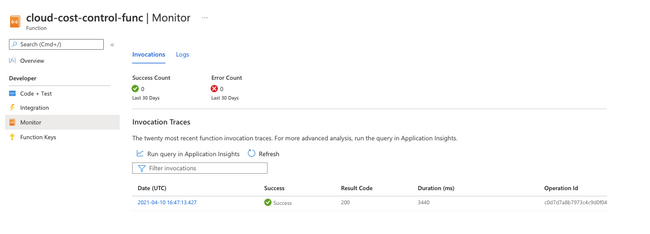
The function execution logs can be viewed in the “Monitor” tab. Unfortunately, they appear with a delay. Observation suggests they are probably transferred in cycles between Function App and Monitor services. There is a 10-15-minute break between cycles, which is why you’ll need to wait for them so long:
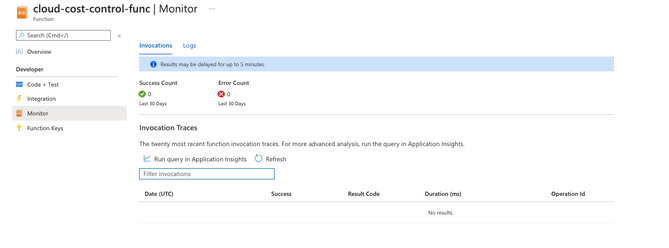
A few minutes later:
Stopping resources in Azure
Below we’ll have a look at how we can stop different types of resources in Azure.
-
Stopping standalone VM instances
Standard virtual machine instances can be stopped using the simple “begin_power_off” method. The name of the Resource Group and the VM names should be given as call parameters:
compute_client.virtual_machines.begin_power_off(resource_group_name, vm_name)
The VM names can be found by searching each of the Resource Groups with the “list” method:
compute_client.virtual_machines.list(resource_group_name)
The up-to-date list of Resource Groups can be found through an API query:
resource_client.resource_groups.list()
-
Stopping VM instance scale sets
Autoscaling is supported by a service called “Virtual Machine Scale Sets.” “Scale set” can be stopped by means of deallocation. It switches off virtual machines that are part of a scale set and frees up the resources allocated for these virtual machines. Deallocation can be done using the “begin_deallocate” method:
compute_client.virtual_machine_scale_set_vms.begin_deallocate(resource_group_name, scaleset_name, "*")
This method requires us to invoke the third argument, as in the example above.
-
Stopping containers in the Container Instances service
Container instances of the Container Instances service are treated by Azure as groups, even if they are single containers. Interestingly, the Azure Portal does not allow you to create a group composed of more than one container. If you need to create a group composed of several containers, you need to do it by means of the Resource Manager and using a JSON deployment template file. Alternatively, you can use the Azure CLI and construct a YAML template beforehand.
Because containers are always treated as a group, it is enough to use the API call to stop the group. There is no need to check if this is a single instance or many containers in the group.
container_client.container_groups.stop(resource_group_name, container_group_name)
-
Stopping Kubernetes service clusters
In the case of the Kubernetes service, you can stop a cluster. This is impossible, for example, in the Google Cloud’s GKS service. Stopping will switch off all cluster nodes that are virtual machines:
k8s_service_client.managed_clusters.begin_stop(resource_group_name, k8s_cluster_name)
Interestingly, web GUI does not contain an option to stop a cluster. It can be done only on the API side:

-
MariaDB instances
When creating a MariaDB instance, you choose the type and parameters of a virtual machine on which the instance will be launched. The VM itself is not visible either in the “Virtual machines” service or in the “Virtual Machine Scale Set.” MariaDB instances are managed in the “Azure Database for MariaDB servers” service where you can stop them at the level of web GUI and API:
mariadb_client.servers.begin_stop(resource_group_name, mariadb_server.name)
-
MySQL instances
MySQL instances are supported by the “Azure Database for MySQL servers” service and, similarly to MariaDB instances, can be stopped using the following method:
mysql_client.servers.begin_stop(resource_group_name, mysql_server.name)
-
PostgreSQL instances
PostgreSQL database instances can’t be stopped, but instance parameters can be updated by changing the number of its vCore and lowering the compute tier to the lowest setting possible (the price of one vCore depends on the compute tier). However, web GUI will flash a warning:
"Please note that changing to and from the Basic compute tier or changing the backup redundancy options after server creation is not supported."
So, we need to include tier in our solution that should check our current tier and based on this information use specific parameter values in the update operation:
postgresql_client.servers.begin_update(resource_group_name, postgresql_server.name, sku)

# if sku plan = ‘Basic’
sku = {'Sku': {'name': 'B_Gen5_1', 'tier': 'Basic', 'capacity': '1'}}

# if sku plan other than ‘Basic’
sku = {'Sku': {'name': 'GP_Gen5_2', 'tier': 'GeneralPurpose', 'capacity': '2'}}
-
MSSQL instances
MSSQL database usage is charged in two models: DTU (database compute unit) for the basic, standard and premium tiers and vCore for other compute tiers. In this case, we decided to force the change to the “Standard” tier and to 10 as the number of DTU. This is the smallest value for this tier and by our estimations should reduce the monthly cost of database usage to around $13 (excluding storage costs). If a current tier is “Basic”, scalability is not possible, as the DTU value is set for five and cannot be changed. The estimated monthly cost is under $5 (excluding storage).
sql_client.databases.begin_update(resource_group_name, sql_server.name, sql_database.name, sku)

# if sku plan other than ‘Basic’
sku = {'Sku': {'name': 'Standard', 'tier': 'Standard', 'capacity': '10'}}
Overview of the final solution
As in the case of GCP, we do not need to use separate scripts for each region. Figure 10 shows the schema of the solution:
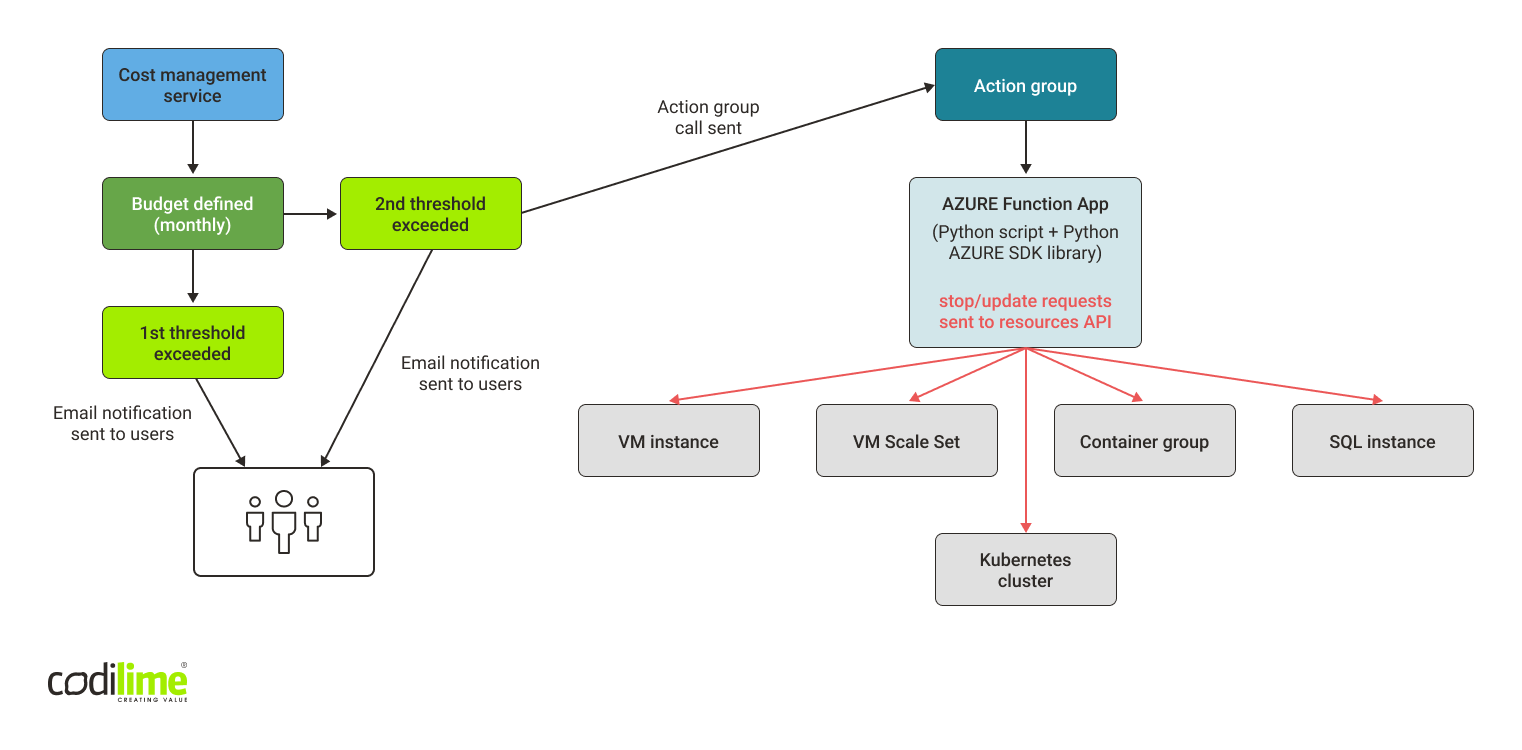
Like our AWS and GCP solutions, our Azure solution costs virtually nothing. For the Function App service, Azure offers a free tier based on time and number of executions: 400,000 GB-s and one million executions. After reaching these values, the cost is $0.000016/GB-s and $0.20 per one million executions. Additionally, you need to add storage account costs. But when testing our solution, the storage usage was minimal and generated negligible costs below €0.01 for the entire period we were using the storage account. Using the budget function in the cost management services is free of charge.
Implementing the solution
Here too we decided to implement the solution using Terraform. As with GCP, the budget resource was a problem. For reasons only Microsoft can provide:
“Cost Management supports only Enterprise Agreement, Web direct and Microsoft Customer Agreement offer types.”
In practice, this means you can’t create budgets via CLI in other contracts. This perhaps explains why Terraform does not support budget creation at all. But we managed to find a workaround: create a budget using Python SDK. Yet it has a pitfall: this can be done on the condition that none of the alarm threshold set points to a specific Action Group. Otherwise, the action is blocked. Nor can it be done by creating a budget and then updating it by adding the specific Action Group.
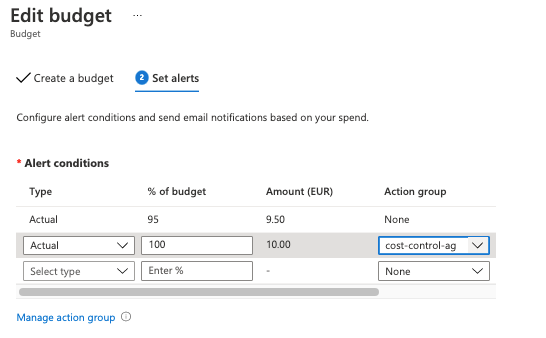
Ultimately, our solution can be implemented using Terraform, but it needs an additional Python script to create a budget and the Azure CLI to deploy a function in the cloud. Unfortunately, we have to do one thing manually: edit alarm threshold settings in web GUI and, with the threshold at 100%, choose from a list the group called “cost-control-ag”.
We are pretty sure that this small inconvenience can be addressed with a bit more research.
Final remarks
As you can see, creating a cloud cost optimization solution with Azure Cloud was trickier. Azure differs considerably from AWS and GCP. Still, we managed to build one that works automatically and costs virtually nothing. This definitely will reward the effort we put into setting it up.


