


DNSSEC (Domain Name System Security Extension) is a security feature that introduces data integrity and origin verification to the legacy DNS protocol. By enabling DNSSEC for a domain, we are able to tell if DNS communication related to that domain hasn't been corrupted or altered.
In another article, we cover the general principles of DNSSEC. However, this article focuses on a real-life implementation of this solution using BIND as a DNS server installed on a machine running Ubuntu. We are going to provide a step-by-step guide on how to set up a DNS server with enabled DNSSEC functionalities, starting from nothing more than a fresh, “vanilla” Ubuntu installation and a newly purchased domain.
BIND (Berkeley Internet Name Domain) is the oldest, but still the most commonly deployed DNS system in the world. Up to this day it is the gold standard when it comes to feature set and conformability to norms. It’s also released under an open-source license. All that makes BIND a perfect candidate for showing a real-life DNS and DNSSEC configuration.
Architecture
In this article, we are going to cover two main scenarios:
- Authoritative DNS server with a DNSSEC-enabled domain,
- DNS recursive server (resolver) performing DNSSEC validation on behalf of clients.
In all discussed cases, we will use BIND 9.18 as the DNS service, running on the Ubuntu 22.04.4 operating system.
Authoritative DNS
In this scenario, we are going to configure two DNS servers to host the ns-testing.com domain (figure 1). This will provide redundancy in case any of those servers fail. The first server is going to be configured as the primary DNS server. The second server will be configured as the secondary DNS device. Only the primary server will contain a Read-Write copy of the DNS configuration. The secondary server will maintain a Read-Only version of the configuration and synchronize with the primary DNS at regular intervals, using a zone transfer mechanism.
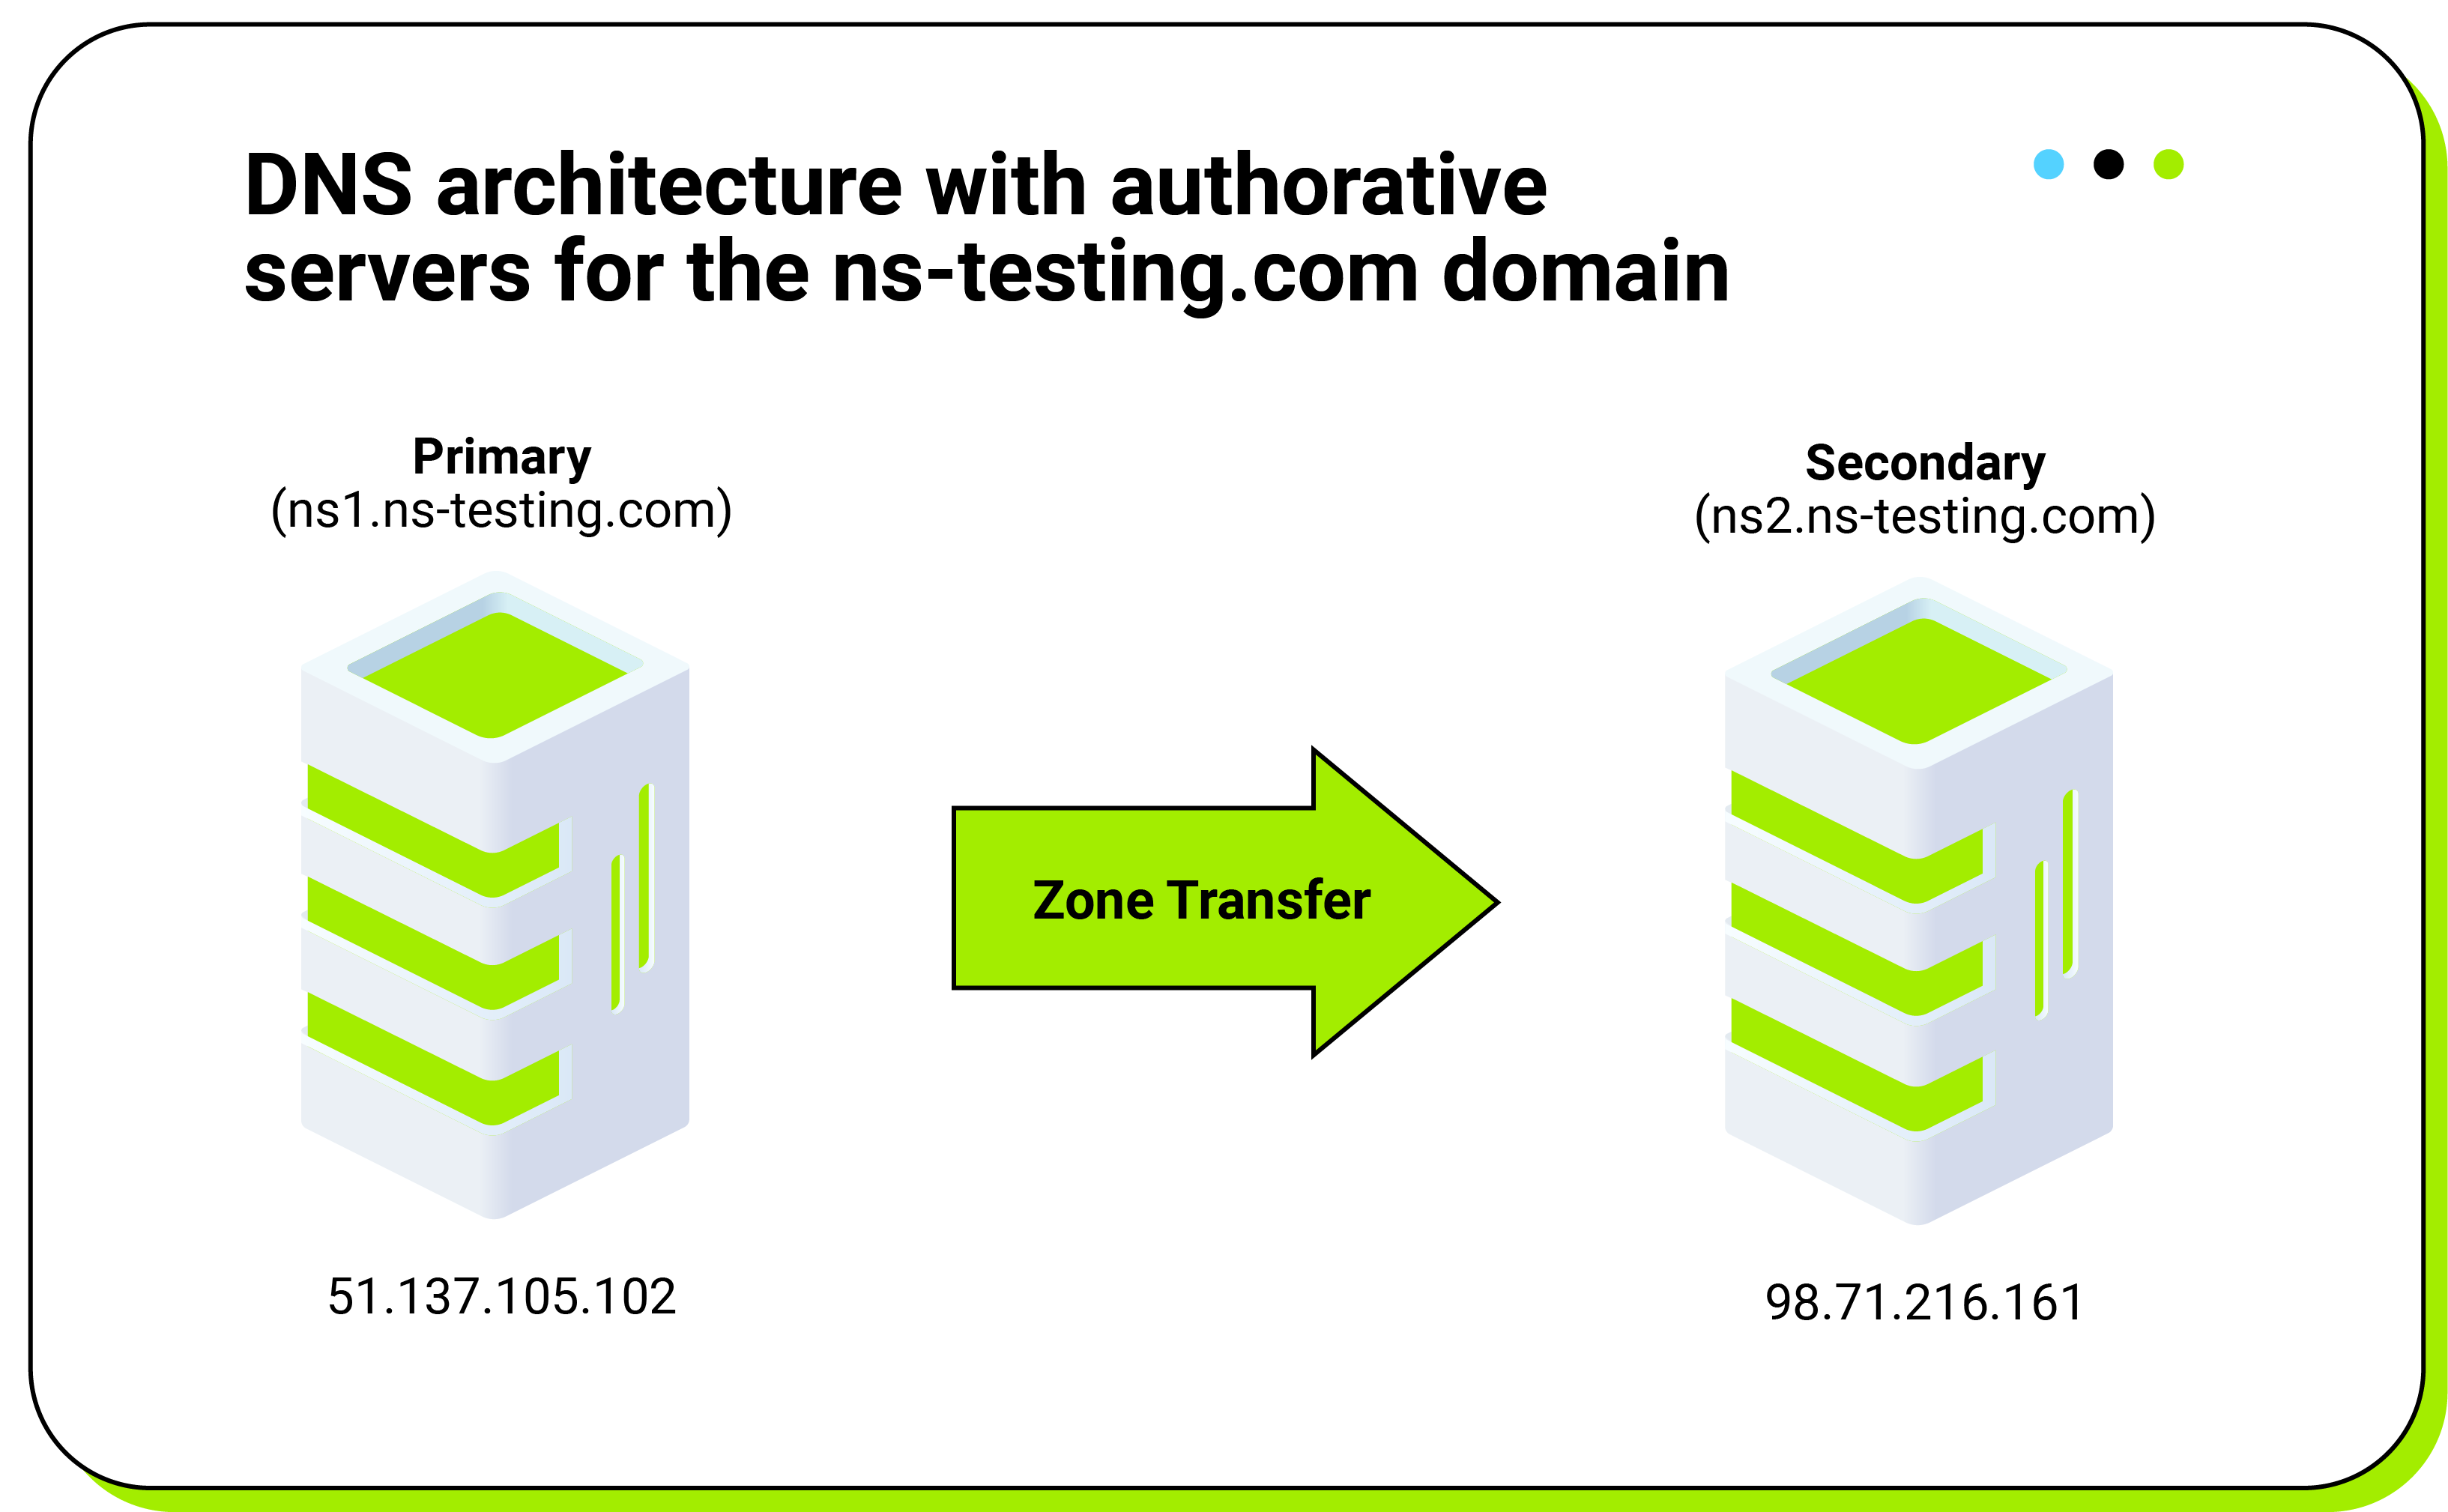
After completing this task, we will sign the zone and establish trust with the parent domain so that the domain can be correctly resolved by servers with DNSSEC validation enabled.
Recursive DNS
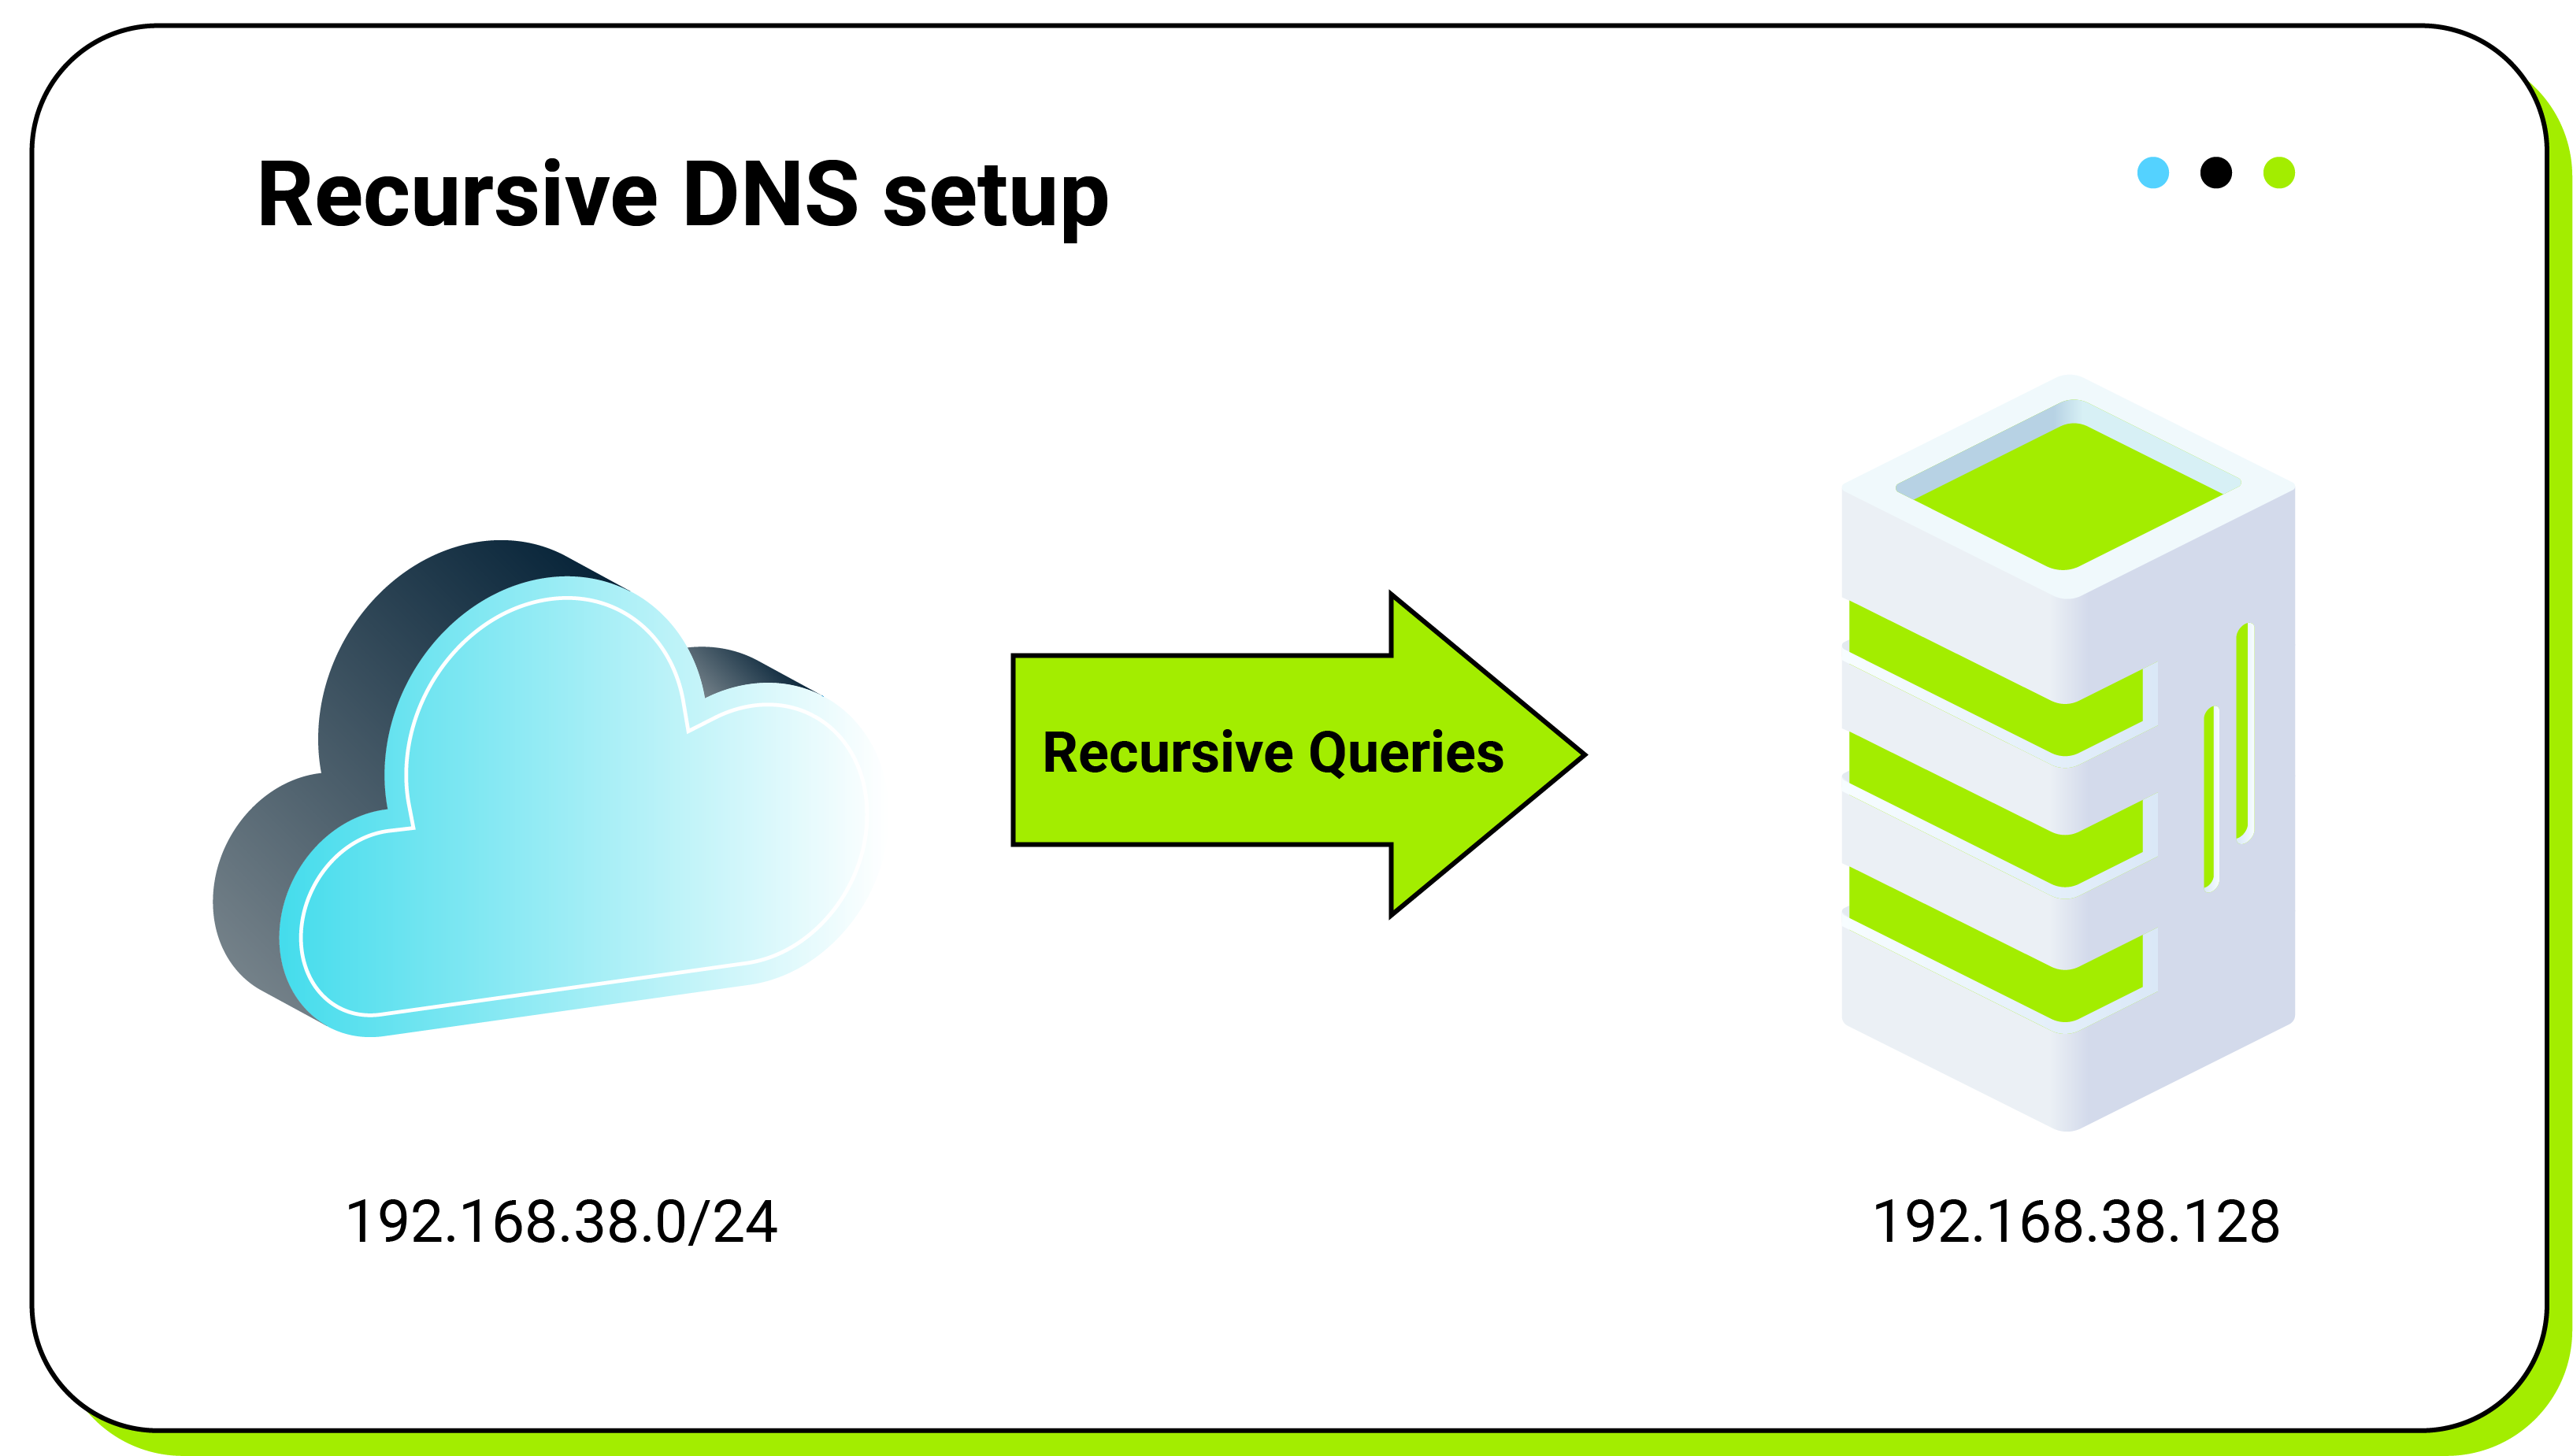
In this part, we will configure a separate recursive DNS server allowing queries only from a specific network (192.168.38.0/24), and then we are going to enable DNSSEC validation on that server:
DNS service implementation
Installing BIND
The first step for both scenarios is to install BIND on an Ubuntu server. To do that, you can use the apt tool:
$ sudo apt update
$ sudo apt install bind9 bind9-doc
Besides BIND itself (and all its required dependencies), we are also going to install additional documentation. And that’s it. After running the commands presented above, BIND is installed and ready to be configured.
By default, BIND works for both IPv4 and IPv6. In our case, we are going to use only IPv4, so optionally, we can disable IPv6 by editing the following file and adding the “-4” parameter in the OPTIONS section:
$ sudo vim /etc/default/named
#
# run resolvconf?
RESOLVCONF=no

# startup options for the server
OPTIONS="-u bind -4"
To apply these changes, restart the BIND service:
$ sudo systemctl restart bind9
Depending on the Linux distribution, a BIND configuration may be organized in different ways. On Ubuntu/Debian, for instance, configuration is stored in the /etc/bind/ folder and consists of the following main components:
- named.conf – Main configuration file with references to more specific files. Usually, no changes are made here.
- named.conf.default-zones – Configuration file with definitions of standard default zones like “localhost” or broadcast ("255.in-addr.arpa"), as per recommendations described in RFC1912
 .
. - named.conf.options – Configuration file containing settings of the DNS server itself (e.g., enable/disable recursion, configure forwarders, etc.).
- named.conf.local – The file where we declare zones associated with the DNS server (in other words - authoritative zones).
Configuring authoritative DNS servers
The Primary DNS server
Let’s start with some general settings and add two statements within the options section located in the named.conf.options file:
$ sudo vim /etc/bind/named.conf.options
options {
        listen-on-v6 { none; };
        allow-transfer { none; };
};
The first option disables listening on any IPv6 address. The second option globally disables zone transfers (otherwise, they are enabled by default). Generally, it is a bad idea to expose the content of our zones to anyone on the Internet. We will allow zone transfers only for the specific IP address of the secondary member.
As mentioned in the previous section, zone declarations are located in the named.conf.local file. Content of zones (specific records), on the other hand, are stored in separate zone files, typically using the following naming convention: db.
According to the Ubuntu documentation ![]() , static zone files (updated only by administrators) should normally be placed directly within the /etc/bind/ folder. However, in our case, the created zones will be automatically signed and updated with DNSSEC records. The right place to store such dynamic zones is the /var/lib/bind/ folder. If you want to use the default location, you will have to modify the AppArmor settings
, static zone files (updated only by administrators) should normally be placed directly within the /etc/bind/ folder. However, in our case, the created zones will be automatically signed and updated with DNSSEC records. The right place to store such dynamic zones is the /var/lib/bind/ folder. If you want to use the default location, you will have to modify the AppArmor settings ![]() (the Linux kernel security module used on Ubuntu).
(the Linux kernel security module used on Ubuntu).
In our case, we need to declare the ns-testing.com zone in the named.conf.local file and create a db.ns-testing.com file with the zone’s content. Let’s start with the zone definition:
$ sudo vim /etc/bind/named.conf.local
//
// Do any local configuration here
//

// Consider adding the 1918 zones here, if they are not used in your
// organization
//include "/etc/bind/zones.rfc1918";

zone "ns-testing.com" {
        // Zone type
        type primary;
        // Zone file
        file "/var/lib/bind/db.ns-testing.com";
        // Secondary server allowed to transfer the zone
        allow-transfer { 98.71.216.161; };
        // Notify secondary servers about changes (default)
        notify yes;
};
In the example above, we define the type of our zone (“primary”), a file with zone records (db.ns-testing.com), and a host that is allowed to receive zone transfers (98.71.216.161 – the secondary server). By default, the primary DNS server is also configured to send a NOTIFY message (RFC1996 ![]() ) whenever there is a change in the configuration to speed up the synchronization process. This behavior is controlled by the notify statement. Without the notify feature enabled, the secondary server will only perform a zone transfer at a regular interval defined in the SOA record.
) whenever there is a change in the configuration to speed up the synchronization process. This behavior is controlled by the notify statement. Without the notify feature enabled, the secondary server will only perform a zone transfer at a regular interval defined in the SOA record.
In the next step, we are going to create a file with all zone records:
$ sudo vim /var/lib/bind/db.ns-testing.com
$TTL    3600
@       IN      SOA     ns1.ns-testing.com. admin.ns-testing.com. (
                                2         ; Serial
                             3600         ; Refresh
                              300         ; Retry
                            86400         ; Expire
                             3600 )       ; Negative Cache TTL

        IN      NS      ns1.ns-testing.com.
        IN      NS      ns2.ns-testing.com.

ns1     IN      A       51.137.105.102
ns2     IN      A       98.71.216.161
www     IN      A       51.137.105.102
        IN      A       98.71.216.161
The Resource Record (RR) format used in a zone file is as follows:
- Name (optional) – The domain name where the Resource Record is found. If not provided, the name is taken from the previous record.
- TTL (optional) – A 32-bit integer defining the time-to-live of the RR. It informs resolvers how long they can cache the record (in seconds) before it should be discarded. If not provided, the value from the $TTL directive is used.
- Class (mandatory) – Value identifying a protocol family. In practical implementations, it is always set to “IN” value (The Internet).
- RR Type (mandatory) – Record type (e.g., NS, A, SOA).
- RR Data (mandatory) – Record data. Each record type has its own structure in this field.
Besides Resource Records, a zone file can also contain so-called directives - special keywords starting with the “$” sign. For example, you can see at the beginning of the zone file the $TTL directive that specifies the default TTL for Resource Records. Another important directive is $ORIGIN, which sets the domain name that is appended to any unqualified/not-absolute name (without a dot at the end). Usually, we don’t see this directive in the configuration file; however, it is always implicitly set to the zone name (in our case, that would be: $ORIGIN ns-testing.com.). You can use multiple $ORIGIN directives in the same zone file, affecting Resource Records defined below these directives.
In the example above, we can also see the “@” sign. When used in the name field of a specific Resource Record, it represents the current origin.
Having all that in mind, we can now dissect each item from the zone file presented above:
$TTL 3600
This directive, located at the top of the file, defines the default time-to-live (in seconds) for the whole zone, which is then used for records that don’t have their own TTL defined. Other time formats (and their combinations) are supported as well:
- #s – seconds
- #m – minutes
- #h – hours
- #d – day
- #w – week
We can have the TTL set to, e.g., 2d12h (2 days and 12 hours).
@       IN      SOA     ns1.ns-testing.com. admin.ns-testing.com. (
                                2         ; Serial
                             3600         ; Refresh
                              300         ; Retry
                            86400         ; Expire
                             3600 )       ; Negative Cache TTL
The next entry is the SOA (Start of Authority) Resource Record, the most important and complex record in the zone file. The “@” sign indicates that the record refers to the whole ns-testing.com domain. The SOA record defines the authoritative name server and global parameters of the zone. Only one SOA record can exist in the zone file, and it must be the first record that is defined. The table below describes all components of the SOA record:
| Field | Value | Description |
|---|---|---|
| Name | @ (ns-testing.com) | Domain name. |
| TTL | None (3600s taken from the $TTL directive) | TTL of the SOA record. |
| Class | IN | Protocol family. |
| RR Type | SOA | Record type. |
| Name Server | ns1.ns-testing.com. | A name server that will respond authoritatively for the domain. |
| admin.ns-testing.com. | An email address of the person/group responsible for the domain. Because the “@” sign has another meaning in the zone file, it should be replaced by a dot here. | |
| Serial Number | 2 | A 32-bit number identifying the current revision of the zone configuration. It should be increased after every change in the zone file (not necessarily by 1). This is very important when secondary servers are used. A common way to format the SN is by adding information about the date of the change: YYYYMMDDSS where YYYY = year, MM = month, DD = day, and SS = a sequence number (in case of multiple changes in one day). |
| Refresh | 3600 | A 32-bit value in seconds indicating zone refreshment frequency by secondary servers. |
| Retry | 300 | A 32-bit value (in seconds) defining the time between consecutive attempts to perform a zone transfer by secondary servers after the initial refresh timer expires. |
| Expire | 86400 | A 32-bit value (in seconds) indicating when the zone data on a secondary server is no longer authoritative after unsuccessful attempts to perform the zone transfer. Secondary servers stop responding authoritatively after this timer expires. |
| Negative Cache TTL | 3600 | A 32-bit value (in seconds) defining the time NXDOMAIN responses should be cached on a resolver. |
Table 1: SOA record fields
Note that timers defined in the SOA record can also use the same time formats as the $TTL directive.
IN      NS      ns1.ns-testing.com.
IN      NS      ns2.ns-testing.com.
The two NS (Name Server) records presented above define authoritative DNS servers for the domain. Note that they don’t have a name field. In this case, the name is taken from the previous record (SOA), which refers to the ns-testing.com domain.
ns1     IN      A       51.137.105.102
ns2     IN      A       98.71.216.161
Next, we have two A records defining IPv4 addresses for both name servers. These names don’t have a dot at the end, which means that the name defined by the $ORIGIN directive should be appended (ns-testing.com. in our case).
www     IN      A       51.137.105.102
        IN      A       98.71.216.161
Another two A records define IPv4 addresses for a host (www.ns-testing.com ![]() ). Also in this case the record without its own name refers to the name defined in the previous record.
). Also in this case the record without its own name refers to the name defined in the previous record.
In order to make your configuration active on a DNS server, you can simply restart the BIND service:
$ sudo systemctl restart bind9
Note that this operation causes a short outage (usually a couple of seconds). However, there is a tool that provides far more control over the configuration reloading process. It’s called rndc (Remote Name Daemon Control) and, in general, is a command line tool used to manage the operations of the BIND server. It provides quite a lot of options (see the man page ![]() ). In our case, we will be using two options: reconfig and reload.
). In our case, we will be using two options: reconfig and reload.
$ sudo rndc reconfig
This command reloads the named.config file and loads any new zones. Existing zones, even if they contain pending changes, are not reloaded.
$ sudo rndc reload ns-testing.com
To reload the configuration of an already existing zone (ns-testing.com in this case), use the command above. If no zone is specified, all zones are reloaded.
The Secondary DNS server
Configuring the secondary DNS server is much easier since we don’t have to provide a zone file. Instead, all Resource Records are being synchronized with the primary server. Besides adding the same options in the named.conf.options file like for the primary server, the only thing that needs to be done is to define the zone in the named.conf.local file:
$ sudo vim /etc/bind/named.conf.local
//
// Do any local configuration here
//

// Consider adding the 1918 zones here, if they are not used in your
// organization
//include "/etc/bind/zones.rfc1918";

zone "ns-testing.com" {
        type secondary;
        file "db.ns-testing.com";
        masters { 51.137.105.102; };
};
As with the primary server, we define the ns-testing.com zone, but this time as type “secondary”. We also specify a file name, however, on the secondary server, it only stores cached zone data transferred from the primary server. This allows the secondary server to quickly load zone data after a restart without waiting for the zone transfer to happen. The file is stored in a binary format in the /var/cache/bind/ folder. The masters statement defines the IP address of the primary DNS server.
After reloading the configuration, the secondary server should immediately start responding to queries:
> nslookup www.ns-testing.com 98.71.216.161
Server:  UnKnown
Address:  98.71.216.161

Name:    www.ns-testing.com
Addresses:  98.71.216.161
            51.137.105.102
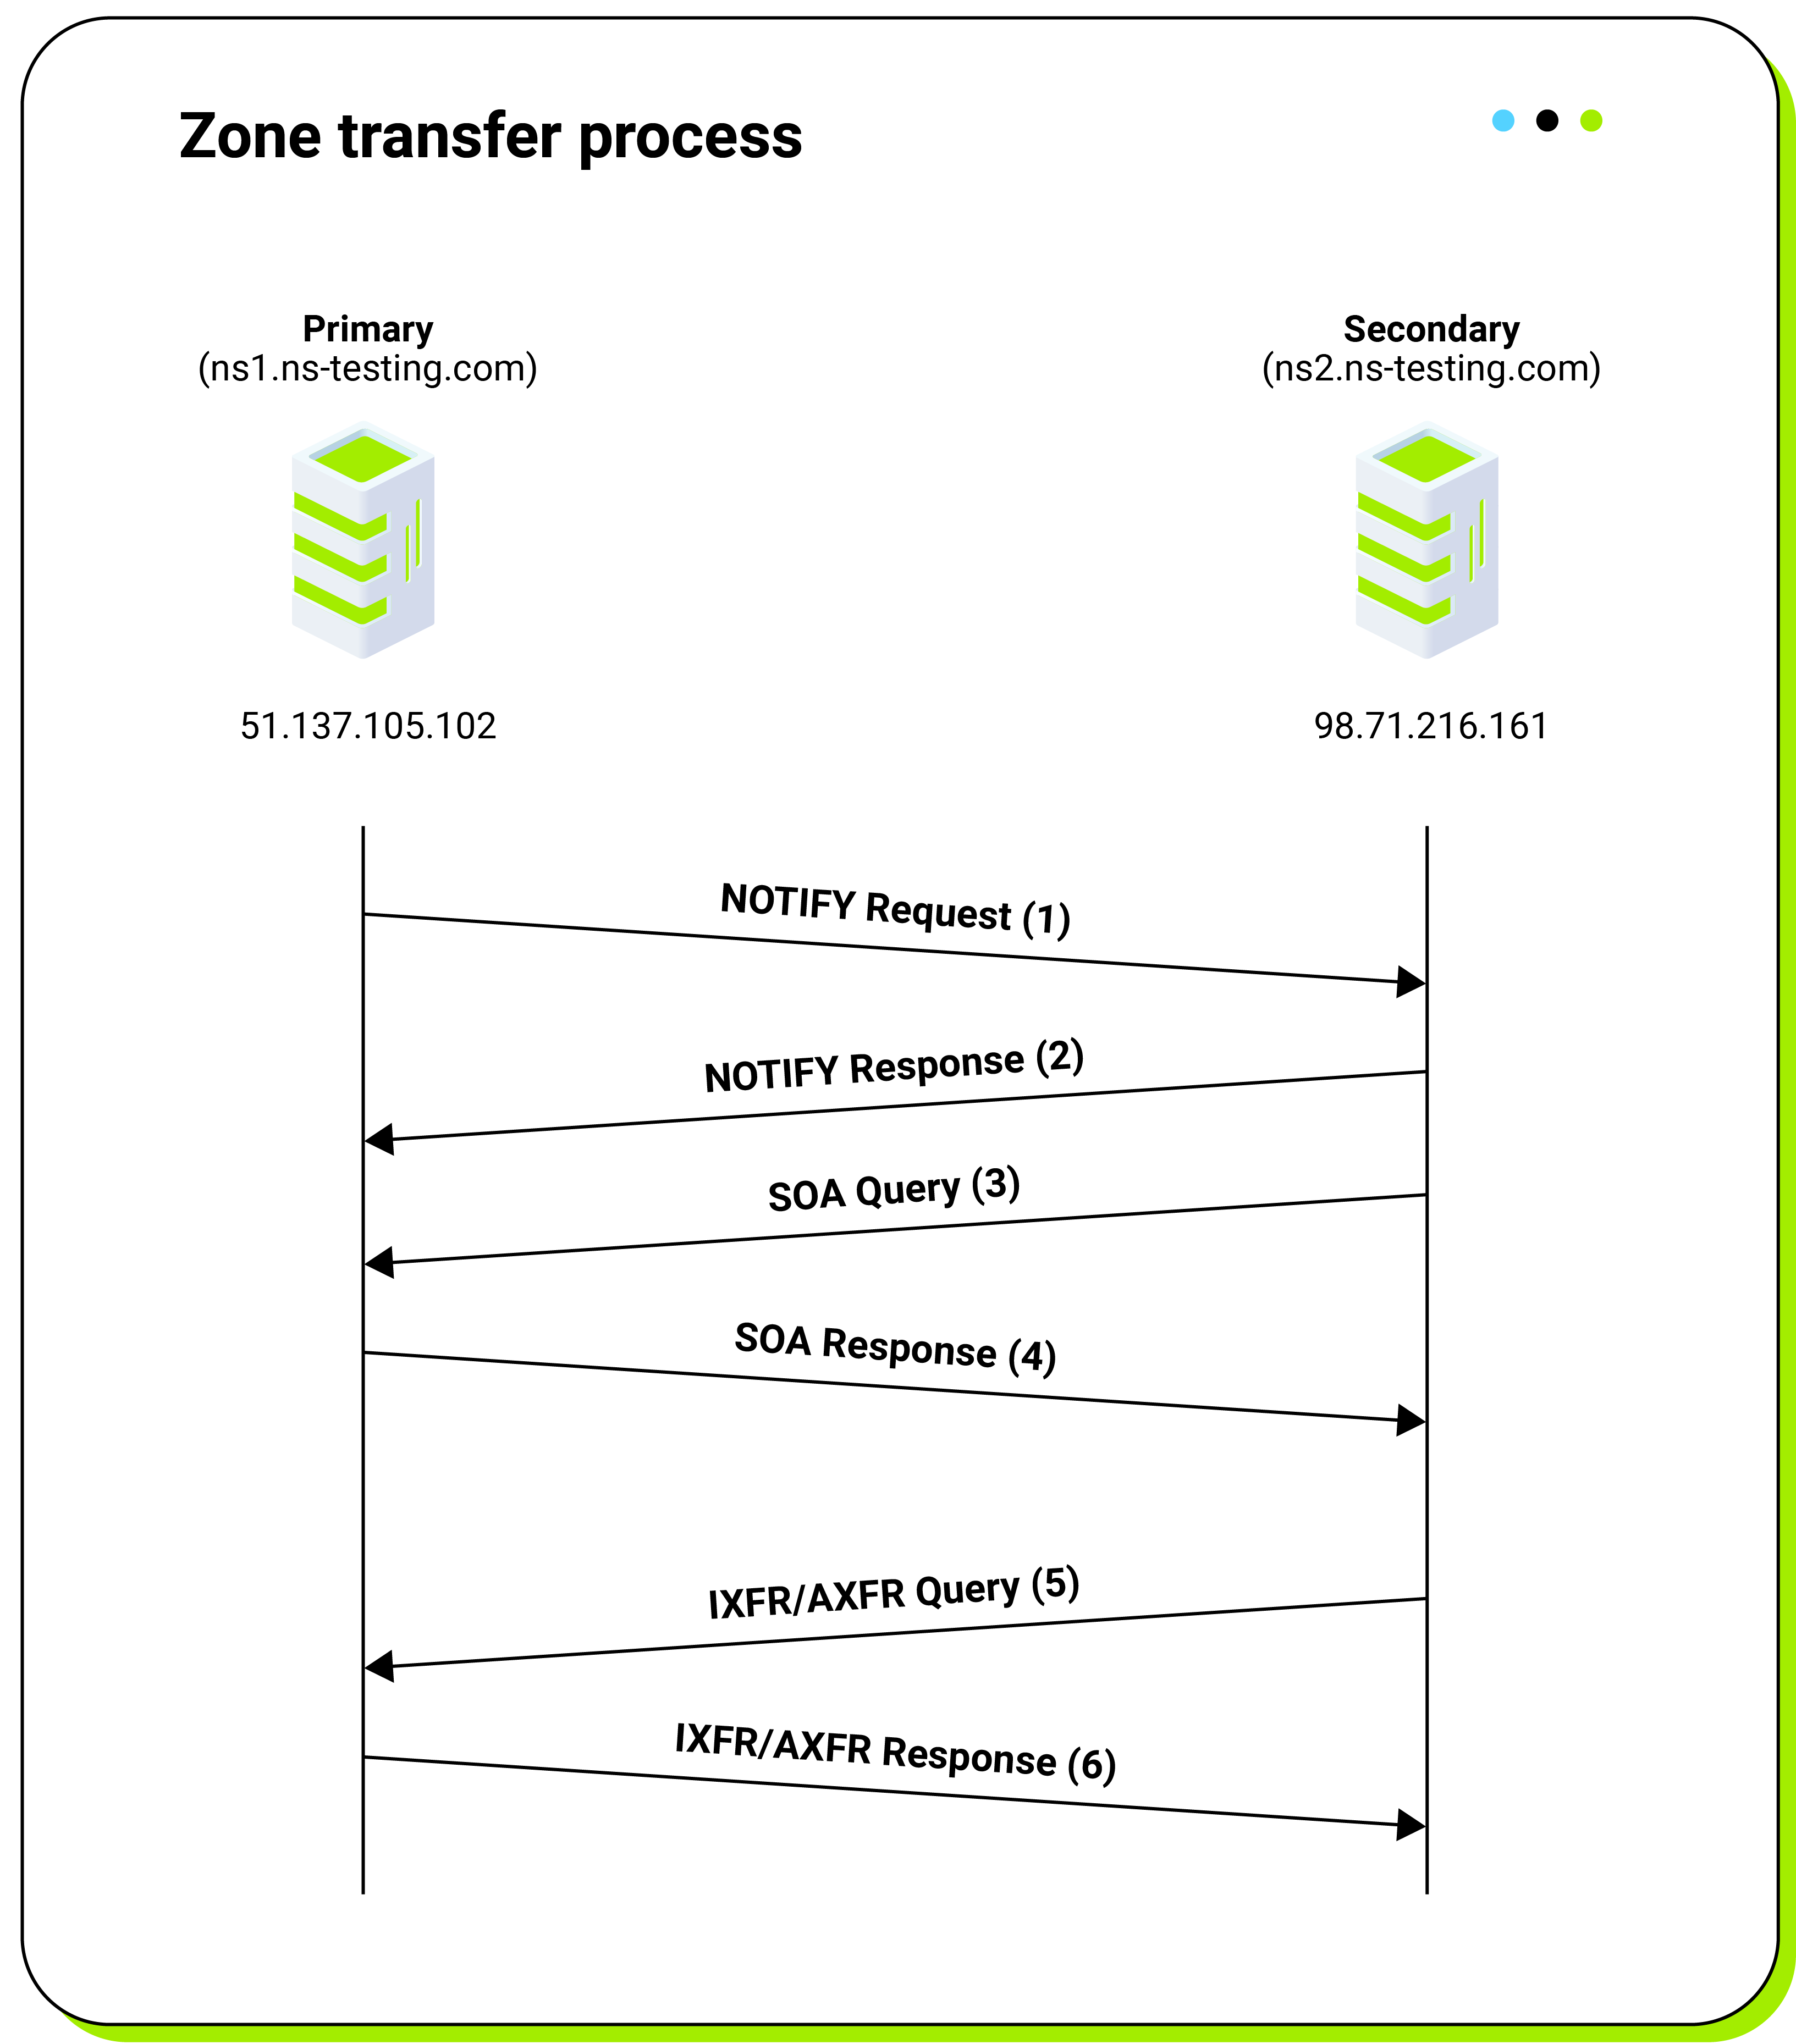
Zone transfer process between the primary and secondary server
After configuring both the primary and secondary DNS servers, whenever there is a change in the zone file on the primary server, it will be automatically replicated to the secondary device. Figure 3 shows the zone transfer process in detail:
- If there is any change in the zone file and the configuration is reloaded, the primary server sends a NOTIFY message to the secondary server. The message refers to the SOA record in the “Query” section. In the “Answer” section, we can find the SOA record data.
- The secondary server acknowledges the notification by sending a response NOTIFY message. At this stage, the secondary server decides whether to proceed with the zone transfer or ignore the notification. It checks the serial number from the received message and compares it with the current serial. If the received number is larger, the secondary server continues with the next step.
- The secondary server sends a standard query for the SOA record. This is done as a result of a received NOTIFY message. In addition to that, the secondary server also periodically sends SOA queries with intervals defined by the Refresh timer in the SOA record.
- A response with the SOA record is sent by the primary server. The actual zone transfer is performed only if the serial number in the received SOA record is greater than the one currently held on the secondary server.
- The secondary server switches to TCP and queries either for the IXFR (incremental zone transfer) or AXFR (full zone transfer). The incremental zone transfer is preferred as it only contains actual changes in the configuration. If this is not possible, a full zone transfer is performed, and all records are read.
Updating the serial number in the SOA record after every change is crucial for the zone transfer process to work correctly. If a change is made within the zone file but the serial number is not incremented, the primary server will send the NOTIFY message, but there won’t be any reaction from the secondary server. The secondary server will also not trigger the zone transfer after periodically querying the SOA record (see points 3 and 4).
Configuring zone delegation
At this stage, both the primary and the secondary servers are fully functional. We can directly query these servers for any record configured for the ns-testing.com domain. However, if we try to resolve any records from that domain using a public resolver, we will still receive a NXDOMAIN (non-existent domain) response:
> nslookup www.ns-testing.com
Server:  dns.mhlan.local
Address:  192.168.1.201

*** dns.mhlan.local can't find www.ns-testing.com: Non-existent domain
This is because there is no relationship between the com domain and ns-testing.com. To create such a relationship, we must create a zone delegation. This is done by a domain registrar (an organization that handles the reservation of domain names). Usually it is possible to perform such an operation using a convenient web interface to manage registered domains.
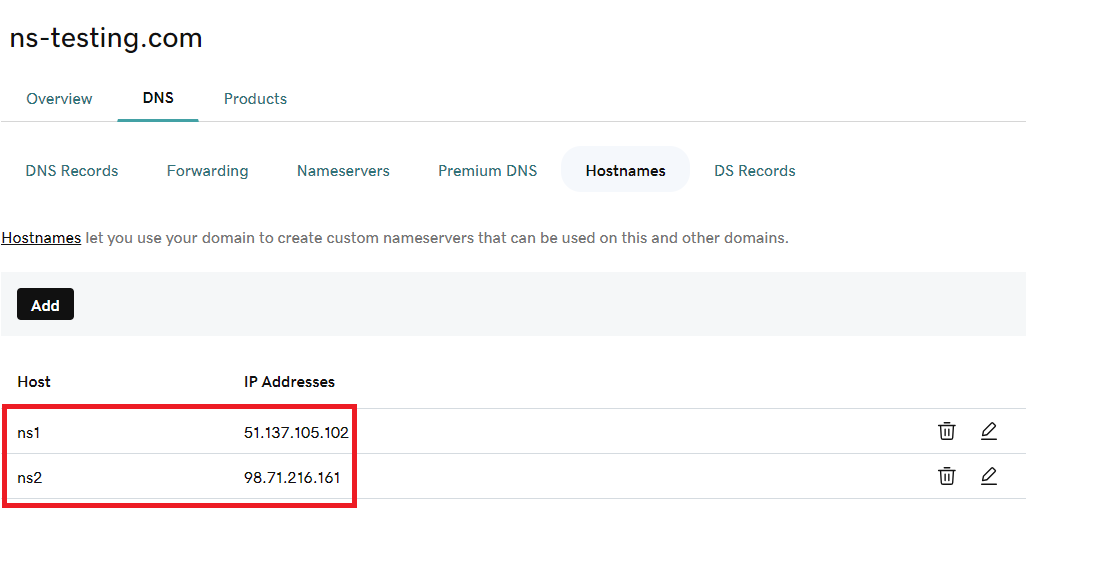
In the figure below, you can see both previously configured servers being added to the list of name servers hosting the ns-testinig.com domain.
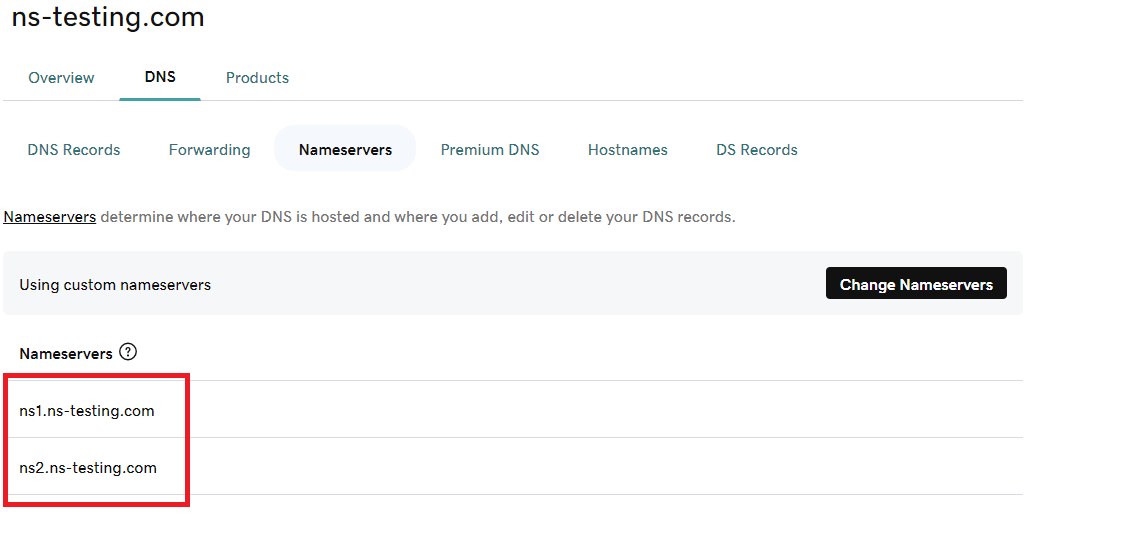
This creates two NS records at the com level, indicating that both servers mentioned above are authoritative for the ns-testing.com domain.
At this point we are almost done, but there is still one important step to be made. NS records always contain FQDNs of DNS servers and not their IP addresses. But how will a resolver know what are the IP addresses of authoritative name servers for a specific domain if the names of those servers are also within that domain? In order to resolve this “chicken and egg” problem we must create so-called “glue” records – defined at the parent domain level, specifying IP addresses of a child domain’s name servers.
After completing these tasks (and waiting a little bit for this information to be propagated on the Internet), we will be able to resolve names within our domain using any resolver with Internet access:
> nslookup www.ns-testing.com
Server:  dns.mhlan.local
Address:  192.168.1.201

Non-authoritative answer:
Name:    www.ns-testing.com
Addresses:  98.71.216.161
            51.137.105.102
This is possible because the parent domain’s DNS servers send IP addresses of authoritative servers for the ns-testing.com domain within every response related to that domain (“Additional” section). In the example below, you can see a response sent by one of the authoritative .com servers. Note that there is no “Answer” section (the server is not authoritative for ns-testing.com and doesn’t allow recursive queries), only the “Authority” and “Additional” sections:
$ dig @a.gtld-servers.net. www.ns-testing.com.

; <<>> DiG 9.11.5-P4-5.1-Debian <<>> @a.gtld-servers.net. www.ns-testing.com.
; (2 servers found)
;; global options: +cmd
;; Got answer:
;; ->>HEADER<<- opcode: QUERY, status: NOERROR, id: 50175
;; flags: qr rd; QUERY: 1, ANSWER: 0, AUTHORITY: 2, ADDITIONAL: 3
;; WARNING: recursion requested but not available

;; OPT PSEUDOSECTION:
; EDNS: version: 0, flags:; udp: 4096
;; QUESTION SECTION:
;www.ns-testing.com.            IN      A

;; AUTHORITY SECTION:
ns-testing.com.         172800  IN      NS      ns1.ns-testing.com.
ns-testing.com.         172800  IN      NS      ns2.ns-testing.com.

;; ADDITIONAL SECTION:
ns1.ns-testing.com.     172800  IN      A       51.137.105.102
ns2.ns-testing.com.     172800  IN      A       98.71.216.161

;; Query time: 53 msec
;; SERVER: 192.5.6.30#53(192.5.6.30)
;; WHEN: Tue Jun 25 19:22:44 CEST 2024
;; MSG SIZE  rcvd: 115
Setting up a recursive DNS server
Recursion settings can be changed in the named.conf.options file. By default, BIND doesn’t resolve any names on behalf of clients. We have to explicitly set it up:
acl "trusted" {
        192.168.38.0/24;
};

options {
        listen-on-v6 { none; };
        recursion yes;
        allow-recursion { trusted; };
};
All changes that need to be introduced to the configuration file are in the code above.
The first section defines an access list called “trusted” with IP addresses of clients that will be allowed to recursively resolve DNS queries. In the options section, there are three statements defined:
- listen-on-v6 – here, we declare that we don’t want to listen on any IPv6 address,
- recursion yes – this option enables recursion on the server,
- allow-recursion – in this option, we define which clients are allowed to perform recursive queries (in our case, from the “trusted” acl).
After reloading the configuration using the rndc reconfig command, we can verify that the newly configured DNS resolver works correctly:
> nslookup codilime.com. 192.168.38.128
Server:  UnKnown
Address:  192.168.38.128

Non-authoritative answer:
Name:    codilime.com
Addresses:  2606:4700:20::681a:bb0
            2606:4700:20::681a:ab0
            2606:4700:20::ac43:4a2b
            104.26.10.176
            172.67.74.43
            104.26.11.176
Note: It’s never a good idea to mix recursion with publicly available authoritative zones on the same server. Even if we limit recursion queries only to specific internal hosts, it’s always possible to spoof source IP addresses. This opens up the possibility for performing different attacks using DNS protocol, e.g. amplification attack ![]() .
.
DNSSEC configuration
DNSSEC on authoritative servers
Maintaining DNSSEC signed zones is a complicated task when done manually, and requires many different steps to be performed at specific times. Any missed or misconfigured step may make the whole domain unavailable. Over the years, there have been many different ways to simplify DNSSEC configuration and management on BIND servers. Each method presented below provides one step forward toward making the DNSSEC maintenance process less troublesome.
Let’s examine those methods in the order they were introduced:
-
Manual – This was the first method to be introduced into BIND, and as the name suggests, all tasks related to DNSSEC maintenance must be done manually. This includes:
- generating keys,
- signing zones (both during the initial setup and then after every change in the zone file),
- rolling keys and making sure that they don’t expire.
A good example of a fully manual DNSSEC configuration can be found here ![]() .
.
- Semi-Automatic – First introduced in BIND 9.7. Allows automatic signing and re-signing of resource records while still leaving keys generation to a DNS administrator. Although fully automatic methods are available, you may still require semi-automatic to cover some more complex scenarios, e.g. with DNSSEC keys stored in an HSM module (Hardware Security Module).
- Fully Automatic – In this case, all tasks are done automatically, including creating and rolling DNSSEC keys. The first version, introduced in BIND 9.11, used a separate utility written in Python called dnssec-keymgr, which was expected to be run on a regular basis (e.g. via cron). Only an initial key was required. All other operations were performed based on a policy file and timing information from DNSSEC key files. In BIND 9.17, all those features have been integrated with the main DNS service, and now they can be configured using dnssec-policy. The latest method also handles the initial creation of keys.
BIND setup
In our example, we will use the latest method (dnssec-policy). In order to quickly sign a zone using predefined settings, we need to add these two statements to the zone declaration from the named.conf.local file and reload the configuration:
zone "test.com" {
        // Enable DNSSEC and use a default policy
        dnssec-policy default;
        // Enable inline signing
        inline-signing yes;
};
The dnssec-policy statement causes the zone to be signed and enables automatic DNSSEC maintenance for that zone according to the built-in “default” policy. The second statement is mandatory with the DNSSEC policy. The inline-signing option allows BIND to automatically create and maintain a signed version of the zone file (with the .signed extension) in addition to the original, unsigned zone. When the file with the unsigned zone is changed, and the configuration is reloaded, BIND updates the signed copy as well.
The default DNSSEC policy provides only a basic set of options: a combined key (CSK) with an unlimited lifetime instead of a separate pair of ZSK/KSK keys and NSEC for denial of existence. More information about the default policy can be found here ![]() . If we want to have something more than that, or we want to be sure that the policy won’t change on upgrade, we have to create our own policy. This way, we can have full control over all aspects of DNSSEC management, including:
. If we want to have something more than that, or we want to be sure that the policy won’t change on upgrade, we have to create our own policy. This way, we can have full control over all aspects of DNSSEC management, including:
- types of DNSSEC keys,
- cryptographic algorithms used when creating keys,
- key rollover frequency,
- RRSIG (Resource Record Signature) refreshment frequency.
Let’s create a new custom DNSSEC policy that we are going to use for our test domain ns-testing.com. The policy should be placed in the named.conf.options file.
dnssec-policy custom {
        dnskey-ttl 600;
        keys {
                ksk lifetime 365d algorithm ecdsap256sha256;
                zsk lifetime 60d algorithm ecdsap256sha256;
        };
        max-zone-ttl 3600;
        parent-ds-ttl 6h;
        parent-propagation-delay 2h;
        publish-safety 2d;
        retire-safety 2d;
        signatures-refresh 5d;
        signatures-validity 15d;
        signatures-validity-dnskey 15d;
        zone-propagation-delay 2h;
        nsec3param;
};
The dnssec-policy section starts with a name (“custom” in our case) followed by a set of specific parameters enclosed within braces. A brief description of those parameters can be found in the table below:
| Parameter | Value(s) | Description |
|---|---|---|
| dnskey-ttl | 600 | TTL for the DNSKEY records (in seconds). |
| keys | ksk lifetime 365d algorithm ecdsap256sha256 zsk lifetime 60d algorithm ecdsap256sha256 | Defines key types, lifetimes (365 days for KSK and 60 days for ZSK), and cryptographic algorithms. |
| max-zone-ttl | 3600 | Specifies the maximum permissible TTL (in seconds) for a zone that uses the policy. Any encountered record with a higher TTL will cause the zone to fail to be loaded. |
| parent-ds-ttl | 6h | TTL of the DS record, defined within the parent zone. |
| parent-propagation delay | 2d | Expected propagation delay from the time when the parent zone is updated with a new DS record to the time when the new version of the record is served by all of the zone’s name servers. |
| publish-safety | 2d | Additional time between publishing keys and making them active. This is an extra margin to cover any unforeseen events. |
| retire-safety | 2d | Additional amount of time a key remains published after it’s no longer active, to cover any unforeseen events. |
| signatures-refresh | 5d | Specifies a time interval between RRSIG records expiration and signature renewal. In other words, the signature is renewed when the time until the expiration is less than the specified interval. |
| signatures-validity | 15d | Specifies the validity period of RRSIG records. |
| singatures-validity-dnskey | 15d | Specifies the validity of signatures attached to DNSKEY records |
| zone-propagation-delay | 2h | Expected propagation delay from the time when a zone is updated to the time when the new version of the zone is published on all secondary servers. |
| nsec3param | None (iterations 0, optout no, salt-length 0 by default) | Enable NSEC3 for denial of existence instead of default NSEC. |
Table 2: DNSSEC policy
It is important to remember that the lifetime of a key should be longer than the time needed for a rollover. In particular, it needs to be longer than the publication interval (dnskey-ttl + publish-safety + zone-propagation-delay) and the retire interval (max-zone-ttl + retire-safety + zone-propagation-delay for ZSK and parent-ds-ttl + retire-safety + parent-propagation-delay for KSKs and CSKs).
A full description of DNSSEC policy syntax can be found here ![]() .
.
To configure DNSSEC for our authoritative domain, first place the DNSSEC policy within the named.conf.options file. Next, in the named.conf.local file, add options to enable this policy for the ns-testing.com zone:
//
// Do any local configuration here
//

// Consider adding the 1918 zones here, if they are not used in your
// organization
//include "/etc/bind/zones.rfc1918";

zone "ns-testing.com" {
        type primary;
        file "/var/lib/bind/db.ns-testing.com";
        allow-transfer { 98.71.216.161; };
        dnssec-policy custom;
        inline-signing yes;
};
Reload the configuration using the following command:
$ sudo rndc reconfig
After reloading the configuration, BIND should generate a new KSK/ZSK key pair for that zone and sign all resource records within that zone. Note that when DNSSEC policies are used, new keys are created separately for every signed zone. We can verify if everything went fine by viewing the logs (/var/log/syslog by default):
named[579]: scheduled loading new zones
named[579]: zone ns-testing.com/IN (unsigned): loaded serial 5
named[579]: zone ns-testing.com/IN (signed): loaded serial 5
named[579]: zone ns-testing.com/IN (signed): could not get zone keys for secure dynamic update
named[579]: zone ns-testing.com/IN (signed): receive_secure_serial: unchanged
named[579]: zone ns-testing.com/IN (signed): sending notifies (serial 6)
named[579]: zone ns-testing.com/IN (signed): reconfiguring zone keys
named[579]: keymgr: DNSKEY ns-testing.com/ECDSAP256SHA256/54249 (KSK) created for policy custom
named[579]: keymgr: DNSKEY ns-testing.com/ECDSAP256SHA256/11836 (ZSK) created for policy custom
named[579]: Fetching ns-testing.com/ECDSAP256SHA256/54249 (KSK) from key repository.
named[579]: DNSKEY ns-testing.com/ECDSAP256SHA256/54249 (KSK) is now published
named[579]: DNSKEY ns-testing.com/ECDSAP256SHA256/54249 (KSK) is now active
named[579]: Fetching ns-testing.com/ECDSAP256SHA256/11836 (ZSK) from key repository.
named[579]: DNSKEY ns-testing.com/ECDSAP256SHA256/11836 (ZSK) is now published
named[579]: DNSKEY ns-testing.com/ECDSAP256SHA256/11836 (ZSK) is now active
named[579]: zone ns-testing.com/IN (signed): zone_addnsec3chain(1,INITIAL|CREATE,0,-)
named[579]: zone ns-testing.com/IN (signed): next key event: 23-Jun-2024 13:47:55.844
named[579]: any newly configured zones are now loaded
named[579]: running
named[579]: client @0x77e818163398 98.71.216.161#44137 (ns-testing.com): transfer of 'ns-testing.com/IN': IXFR version not in journal, falling back to AXFR
named[579]: client @0x77e818163398 98.71.216.161#44137 (ns-testing.com): transfer of 'ns-testing.com/IN': AXFR-style IXFR started (serial 11)
named[579]: client @0x77e818163398 98.71.216.161#44137 (ns-testing.com): transfer of 'ns-testing.com/IN': AXFR-style IXFR ended: 1 messages, 29 records, 2096 bytes, 0.001 secs (2096000 bytes/sec) (serial 11)
named[579]: managed-keys-zone: Key 20326 for zone . is now trusted (acceptance timer complete)
named[579]: zone ns-testing.com/IN (signed): sending notifies (serial 11)
An important thing to take note of is that the SOA serial number for the signed version of the zone has been automatically incremented (from 5 to 11), which allows for automatic replication to the secondary server. We can actually see in the logs above, an entry confirming a successful zone transfer. In fact, nothing needs to be done on the secondary server.
We can also check the status of the signed zone by using the following command:
$ sudo rndc dnssec -status ns-testing.com
dnssec-policy: custom
current time:  Fri Jun 21 11:40:17 2024

key: 11836 (ECDSAP256SHA256), ZSK
  published:      yes - since Fri Jun 21 11:37:55 2024
  zone signing:   yes - since Fri Jun 21 11:37:55 2024

  Next rollover scheduled on Sun Aug 18 09:27:55 2024
  - goal:           omnipresent
  - dnskey:         rumoured
  - zone rrsig:     rumoured

key: 54249 (ECDSAP256SHA256), KSK
  published:      yes - since Fri Jun 21 11:37:55 2024
  key signing:    yes - since Fri Jun 21 11:37:55 2024

  Next rollover scheduled on Thu Jun 19 09:27:55 2025
  - goal:           omnipresent
  - dnskey:         rumoured
  - ds:             hidden
  - key rrsig:      rumoured
When you run this command just after signing the zone, the key states should be set to “rumoured”. This means that the keys are fresh, and not all resolvers on the Internet may have heard about them. Eventually, they should change their state to “omnipresent”, which means that they are now used by all resolvers.
Let’s see what other changes have been made after signing the zone. First of all, a signed version of the zone file (.signed) has been created, accompanied by a transient file used by BIND (.jbk) and a journal file (.jnl):
$ ls -al /var/lib/bind/
total 28
drwxrwxr-x  2 root bind 4096 Jun 21 11:37 .
drwxr-xr-x 41 root root 4096 May 20 20:19 ..
-rw-r--r--  1 root root  363 Jun 21 10:56 db.ns-testing.com
-rw-r--r--  1 bind bind  512 Jun 21 11:37 db.ns-testing.com.jbk
-rw-r--r--  1 bind bind 1299 Jun 21 11:37 db.ns-testing.com.signed
-rw-r--r--  1 bind bind 5913 Jun 21 11:37 db.ns-testing.com.signed.jnl
In /var/cache/bind/, you can also find KSK and ZSK keys created for the recently signed zone. Public parts are stored in .key files, whereas private keys can be found in the .private files. The last number in the name represents the key ID.
$ ls -al /var/cache/bind/
total 40
drwxrwxr-x  2 root bind 4096 Jun 21 11:38 .
drwxr-xr-x 12 root root 4096 May 20 20:19 ..
-rw-r--r--  1 bind bind  458 Jun 21 11:37 Kns-testing.com.+013+11836.key
-rw-------  1 bind bind  235 Jun 21 11:37 Kns-testing.com.+013+11836.private
-rw-r--r--  1 bind bind  552 Jun 21 11:37 Kns-testing.com.+013+11836.state
-rw-r--r--  1 bind bind  514 Jun 21 11:37 Kns-testing.com.+013+54249.key
-rw-------  1 bind bind  263 Jun 21 11:37 Kns-testing.com.+013+54249.private
-rw-r--r--  1 bind bind  675 Jun 21 11:37 Kns-testing.com.+013+54249.state
-rw-r--r--  1 bind bind  821 Jun 21 11:38 managed-keys.bind
-rw-r--r--  1 bind bind 2528 Jun 21 11:37 managed-keys.bind.jnl
Configuring trust with the parent domain
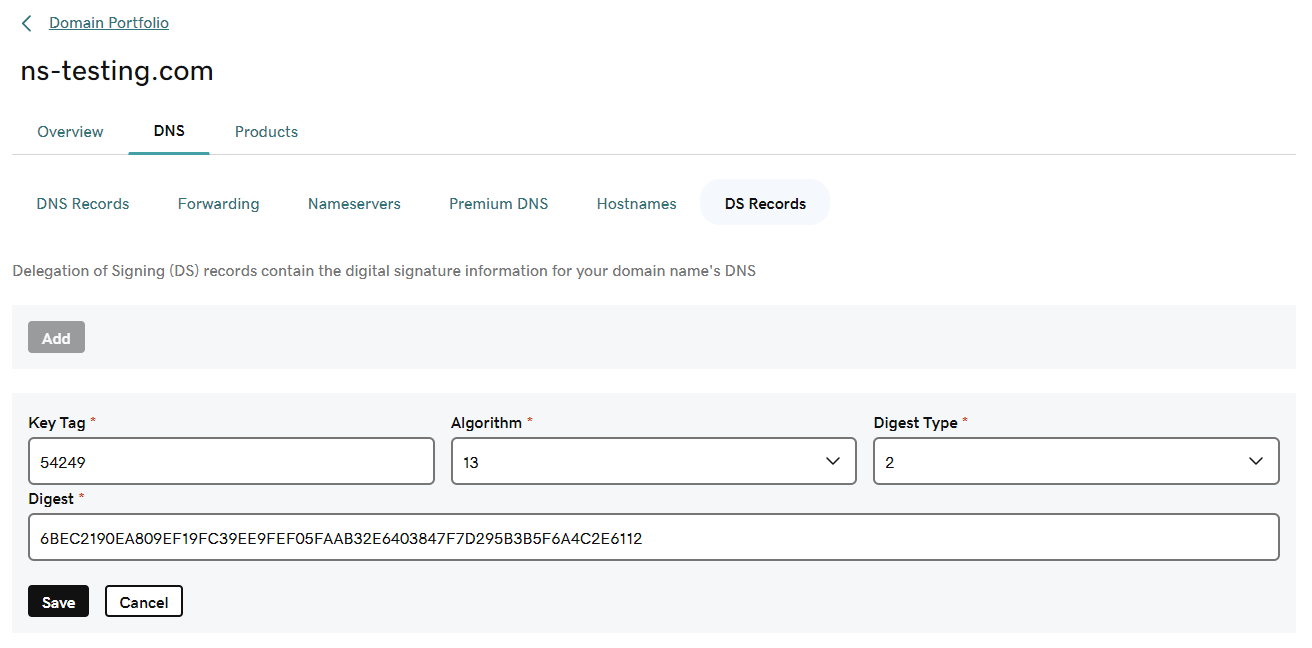
At this point, both the primary and the secondary servers should be able to provide DNSSEC records. However, the chain of trust is not yet established. In order to do that, we need to add to the parent domain (.com) additional information about the KSK being used by the zone. Let’s generate a DS record that can be added to the parent domain based on the public KSK. We can use the dnssec-dsfromkey tool for that purpose:
$ dnssec-dsfromkey /var/cache/bind/Kns-testing.com.+013+54249.key
ns-testing.com. IN DS 54249 13 2 6BEC2190EA809EF19FC39EE9FEF05FAAB32E6403847F7D295B3B5F6A4C2E6112
Each DS record stores the following information:
- Key Tag – identifier of the public KSK key (54249 in our case),
- Algorithm – identifies an algorithm associated with the key (13 – ECDSA Curve P-256 with SHA-256),
- Digest Type – the algorithm used to construct the digest (2 – SHA-256),
- Digest – cryptographic hash of the KSK public key (6BEC2190E…6A4C2E6112).
Next, we have to log in to the registrar’s management portal and add the proper information that would allow us to create the DS record:
After waiting for the time needed to propagate the newly created record, our DNSSEC-signed domain should be fully functional.
Verification of the signed zone
We can start the verification by just checking if the signed zone contains the expected DNSSEC records. Both the primary and the secondary servers should respond with DNSKEY records containing both KSK (id = 54249) and ZSK (id = 11836):
$ dig @ns1.ns-testing.com ns-testing.com. DNSKEY +multiline

; <<>> DiG 9.11.5-P4-5.1-Debian <<>> @ns1.ns-testing.com ns-testing.com. DNSKEY +multiline
; (1 server found)
;; global options: +cmd
;; Got answer:
;; ->>HEADER<<- opcode: QUERY, status: NOERROR, id: 44726
;; flags: qr aa rd; QUERY: 1, ANSWER: 2, AUTHORITY: 0, ADDITIONAL: 1
;; WARNING: recursion requested but not available

;; OPT PSEUDOSECTION:
; EDNS: version: 0, flags:; udp: 1232
; COOKIE: 1d14a390423970ac010000006675c55095b85438b564ac25 (good)
;; QUESTION SECTION:
;ns-testing.com.                IN DNSKEY

;; ANSWER SECTION:
ns-testing.com.         600 IN DNSKEY 256 3 13 (
                                KTUPpPEyYbKzWAaL8+4dxuisGm0gkkghwwizM6zZa1aN
                                gLi3XdTDl3rIQMwU/Qr3W8K/kJlIAkzhK+AwkM+MXA==
                                ) ; ZSK; alg = ECDSAP256SHA256 ; key id = 11836
ns-testing.com.         600 IN DNSKEY 257 3 13 (
                                xStQGvplWIM7roZyXLyKfkMWOSgVs5qcbwCoP0B0tlLW
                                dG+/pai0CPNu6Bs4UJaJtA1Q+YEpglSo/txjOGtzHg==
                                ) ; KSK; alg = ECDSAP256SHA256 ; key id = 54249

;; Query time: 34 msec
;; SERVER: 51.137.105.102#53(51.137.105.102)
;; WHEN: Fri Jun 21 20:24:16 CEST 2024
;; MSG SIZE  rcvd: 231
All resource records should also have associated signatures in the form of an RRSIG record:
$ dig @ns1.ns-testing.com www.ns-testing.com. +dnssec +multiline

; <<>> DiG 9.11.5-P4-5.1-Debian <<>> @ns1.ns-testing.com www.ns-testing.com. +dnssec +multiline
; (1 server found)
;; global options: +cmd
;; Got answer:
;; ->>HEADER<<- opcode: QUERY, status: NOERROR, id: 60047
;; flags: qr aa rd; QUERY: 1, ANSWER: 3, AUTHORITY: 0, ADDITIONAL: 1
;; WARNING: recursion requested but not available

;; OPT PSEUDOSECTION:
; EDNS: version: 0, flags: do; udp: 1232
; COOKIE: a86157b909914d78010000006675c8c7ea2cd0b4eda65603 (good)
;; QUESTION SECTION:
;www.ns-testing.com.    IN A

;; ANSWER SECTION:
www.ns-testing.com.     3600 IN A 51.137.105.102
www.ns-testing.com.     3600 IN A 98.71.216.161
www.ns-testing.com.     3600 IN RRSIG A 13 3 3600 (
                                20240627202038 20240621103755 11836 ns-testing.com.
                                UgtgrggT4vkoPtk0CVPG3MD8WXk95Vapsc5hXCgFGZ8S
                                9ksVR1e6oyd2M4umtsFUKF++T1tLqyeJ1L8cVztUmg== )

;; Query time: 31 msec
;; SERVER: 51.137.105.102#53(51.137.105.102)
;; WHEN: Fri Jun 21 20:39:03 CEST 2024
;; MSG SIZE  rcvd: 217
We should also be able to query for the DS record installed at the parent domain level:
$ dig ns-testing.com. DS +multiline

; <<>> DiG 9.11.5-P4-5.1-Debian <<>> ns-testing.com. DS +multiline
;; global options: +cmd
;; Got answer:
;; ->>HEADER<<- opcode: QUERY, status: NOERROR, id: 24047
;; flags: qr rd ra ad; QUERY: 1, ANSWER: 1, AUTHORITY: 0, ADDITIONAL: 1

;; OPT PSEUDOSECTION:
; EDNS: version: 0, flags:; udp: 4096
; COOKIE: 6fe41bccb325ab71c38f2db66675ca2ed4ade77723f463c6 (good)
;; QUESTION SECTION:
;ns-testing.com.                IN DS

;; ANSWER SECTION:
ns-testing.com.         550 IN DS 54249 13 2 (
                                6BEC2190EA809EF19FC39EE9FEF05FAAB32E6403847F
                                7D295B3B5F6A4C2E6112 )
A good method of checking if all DNSSEC components are correctly configured and the chain of trust is established for the tested domain is to use dedicated online tools. Let’s check out both tools mentioned in the previous article:
- DNSSEC Analyze (https://dnssec-analyzer.verisignlabs.com/ )

- DNSViz (https://dnsviz.net/ )
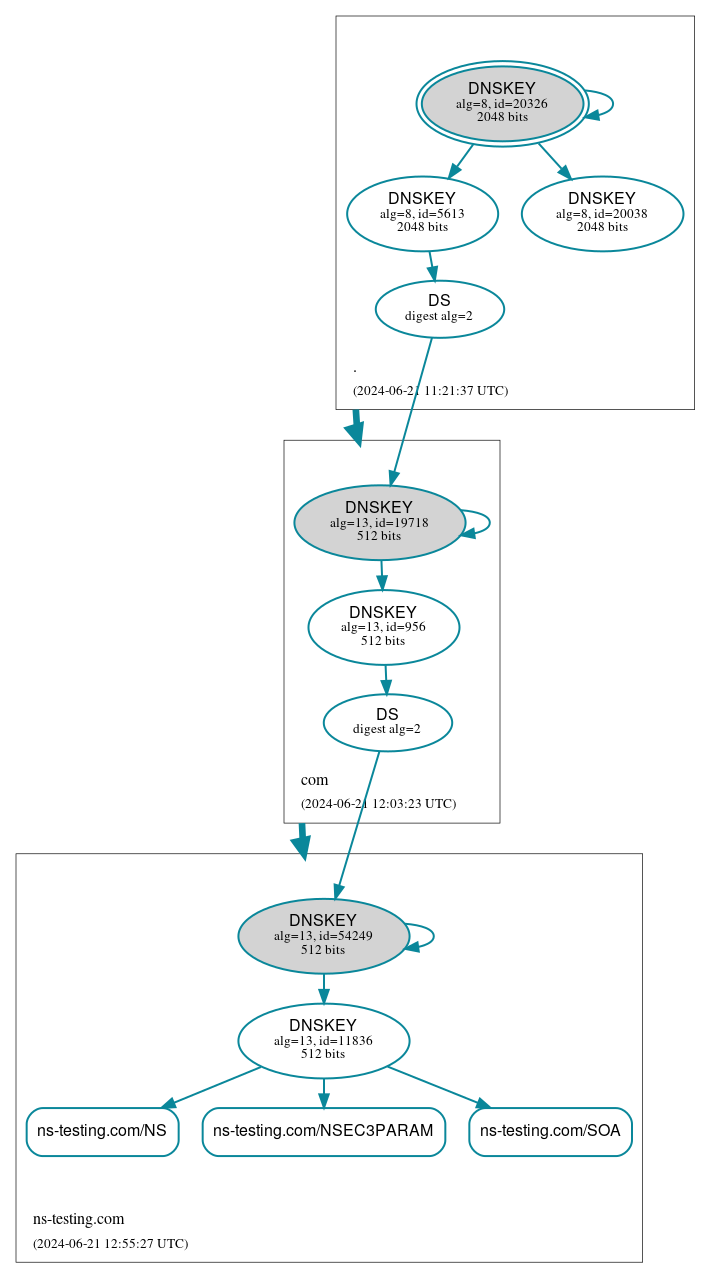
In the first diagram (figure 7), all green “ticks” indicate that the domain passed the test and all components within the DNSSEC chain are correctly configured. In the second diagram (figure 8), we can see a graph showing all the relationships between different DNSSEC records at all levels of the DNS tree. Solid blue arrows between DNSKEY records and other records indicate that RRSIG signatures for those records are valid. Solid blue arrows between DS and DNSKEY records indicate that hashes of particular keys from the DNSKEY records match with information found in their respective DS records. Solid bold blue arrows between rectangles representing particular domains show that delegations are secure from a DNSSEC standpoint. Detailed instructions on how to read the diagram can be found here ![]() .
.
Finally, we can just use a resolver that performs DNSSEC validation and check if we can get a proposer response. One such server is Google Resolver at 8.8.8.8:
$ dig @8.8.8.8 www.ns-testing.com.

; <<>> DiG 9.11.5-P4-5.1-Debian <<>> @8.8.8.8 www.ns-testing.com.
; (1 server found)
;; global options: +cmd
;; Got answer:
;; ->>HEADER<<- opcode: QUERY, status: NOERROR, id: 17595
;; flags: qr rd ra ad; QUERY: 1, ANSWER: 2, AUTHORITY: 0, ADDITIONAL: 1

;; OPT PSEUDOSECTION:
; EDNS: version: 0, flags:; udp: 512
;; QUESTION SECTION:
;www.ns-testing.com.            IN      A

;; ANSWER SECTION:
www.ns-testing.com.     3600    IN      A       51.137.105.102
www.ns-testing.com.     3600    IN      A       98.71.216.161

;; Query time: 79 msec
;; SERVER: 8.8.8.8#53(8.8.8.8)
;; WHEN: Fri Jun 21 21:26:46 CEST 2024
;; MSG SIZE  rcvd: 79
As we can see in the output above, we are able to receive a valid response, which means that the DNSSEC validation must have been successful. Otherwise, we would get a response with the “SERVFAIL” error code.
DNSSEC validation on a recursive server
If we want to do the standard validation of publicly available domains using the root DNSSEC key, there is actually nothing to be done on the server. BIND 9.18 has DNSSEC validation enabled by default, with the root key as the default trust anchor. The respective statement can be found in the named.conf.options file:
options {
        dnssec-validation auto;
};
There are three available options:
-
auto (the default since BIND 9.13) – Perform validation using a built-in root DNSSEC key (can be found in the predefined /etc/bind/bind.keys file).
-
yes – Perform validation but using a custom trust anchor, defined by the trust-anchors statement stored in the named.conf.options file. Example:
trust-anchors { # This key (20326) was published in the root zone in 2017. . static-key 257 3 8 "AwEAAaz/tAm8yTn4Mfeh5eyI96WSVexTBAvkMgJzkKTOiW1vkIbzxeF3 +/4RgWOq7HrxRixHlFlExOLAJr5emLvN7SWXgnLh4+B5xQlNVz8Og8kv ArMtNROxVQuCaSnIDdD5LKyWbRd2n9WGe2R8PzgCmr3EgVLrjyBxWezF 0jLHwVN8efS3rCj/EWgvIWgb9tarpVUDK/b58Da+sqqls3eNbuv7pr+e oZG+SrDK6nWeL3c6H5Apxz7LjVc1uTIdsIXxuOLYA4/ilBmSVIzuDWfd RUfhHdY6+cn8HFRm+2hM8AnXGXws9555KrUB5qihylGa8subX2Nn6UwN R1AkUTV74bU="; }; -
no – Disable validation.
To learn more about trust anchors and the concept of the DNSSEC chain of trust, please check out our previous article.
Let’s check if the validation really works, first by querying for a domain that has a correct DNSSEC signature:
$ dig @192.168.38.128 www.dnssec-tools.org.

; <<>> DiG 9.11.5-P4-5.1-Debian <<>> @192.168.38.128 www.dnssec-tools.org.
; (1 server found)
;; global options: +cmd
;; Got answer:
;; ->>HEADER<<- opcode: QUERY, status: NOERROR, id: 34288
;; flags: qr rd ra ad; QUERY: 1, ANSWER: 1, AUTHORITY: 0, ADDITIONAL: 1

;; OPT PSEUDOSECTION:
; EDNS: version: 0, flags:; udp: 1232
; COOKIE: d7bb995104596d4d0100000066731ebfa26e72bfeed85372 (good)
;; QUESTION SECTION:
;www.dnssec-tools.org.          IN      A

;; ANSWER SECTION:
www.dnssec-tools.org.   300     IN      A       107.220.113.177

;; Query time: 455 msec
;; SERVER: 192.168.38.128#53(192.168.38.128)
;; WHEN: Wed Jun 19 20:09:03 CEST 2024
;; MSG SIZE  rcvd: 93
We get a proper response with an IP address associated with a queried name. Now let’s try doing the same thing, but this time for a domain that has a broken DNSSEC trust chain:
$ dig @192.168.38.128 www.dnssec-failed.org.

; <<>> DiG 9.11.5-P4-5.1-Debian <<>> @192.168.38.128 www.dnssec-failed.org.
; (1 server found)
;; global options: +cmd
;; Got answer:
;; ->>HEADER<<- opcode: QUERY, status: SERVFAIL, id: 62482
;; flags: qr rd ra; QUERY: 1, ANSWER: 0, AUTHORITY: 0, ADDITIONAL: 1

;; OPT PSEUDOSECTION:
; EDNS: version: 0, flags:; udp: 1232
; COOKIE: e48697e957a8592e0100000066731e98bb0eed9e630aae18 (good)
;; QUESTION SECTION:
;www.dnssec-failed.org.         IN      A

;; Query time: 1464 msec
;; SERVER: 192.168.38.128#53(192.168.38.128)
;; WHEN: Wed Jun 19 20:08:24 CEST 2024
;; MSG SIZE  rcvd: 78
Now we get a response with a “SERVFAIL” error code. To confirm that this error is strictly related to the DNSSEC validation, we can send another request with the CD flag set, which disables validation (see our other article on DNSSEC for details):
$ dig @192.168.38.128 www.dnssec-failed.org. +cd

; <<>> DiG 9.11.5-P4-5.1-Debian <<>> @192.168.38.128 www.dnssec-failed.org. +cd
; (1 server found)
;; global options: +cmd
;; Got answer:
;; ->>HEADER<<- opcode: QUERY, status: NOERROR, id: 14305
;; flags: qr rd ra cd; QUERY: 1, ANSWER: 2, AUTHORITY: 0, ADDITIONAL: 1

;; OPT PSEUDOSECTION:
; EDNS: version: 0, flags:; udp: 1232
; COOKIE: fb06837cacb8b32a0100000066732293297b452fea733131 (good)
;; QUESTION SECTION:
;www.dnssec-failed.org.         IN      A

;; ANSWER SECTION:
www.dnssec-failed.org.  6181    IN      A       68.87.109.242
www.dnssec-failed.org.  6181    IN      A       69.252.193.191

;; Query time: 1 msec
;; SERVER: 192.168.38.128#53(192.168.38.128)
;; WHEN: Wed Jun 19 20:25:23 CEST 2024
;; MSG SIZE  rcvd: 110
Key takeaways
In this article, we covered the following topics:
- Installation of BIND 9.18 on an Ubuntu 22.04.4 LTS server.
- BIND configuration as an authoritative name server.
- Zone transfer configuration between the primary and secondary DNS servers.
- Setting up BIND as a recursive server.
- DNSSEC configuration of an authoritative name server using a custom DNSSEC policy.
- Enabling DNSSEC validation on a recursive DNS server.
- Verification of deployed DNS setup, including DNSSEC configuration.
At the end of this guide, you should now have a solid understanding of how to secure your DNS infrastructure using DNSSEC. You’ve gained the knowledge to install and configure both primary and secondary DNS servers, along with setting up zone transfers, delegating zones, and implementing DNSSEC to ensure data integrity and authenticity.
By following these step-by-step instructions, you can now confidently manage DNSSEC configuration and avoid some of the common issues that lead to potential service disruptions. This guide has also introduced practical tools available to help you to build a secure DNS infrastructure.


