


There are countless situations in which a network, be it a service provider, data center, or even enterprise infrastructure, grows so large that the ability to onboard new devices to that network becomes a huge burden for the network operations team.
As time passes, various solutions have been implemented by network and DevOps engineers to mitigate this issue based on open-source and vendor-specific solutions: in-house developed Python/Bash scripts, Ansible playbooks, vendor-specific network orchestrators, etc. The main target of these solutions is to simplify day zero operations - day zero provisioning to be exact.
One of the possible choices is implementation of zero-touch provisioning (or ZTP for short). Read on to learn more about ZTP and check out the possible usage cases.
Zero-touch provisioning - a short introduction
Zero-touch provisioning is a method of onboarding new devices without actually interacting with the device that requires provisioning in any form or manner - more precisely without any human interaction (without “touching” the device).
When can you use ZTP?
There are many situations where zero-touch provisioning can be of amazing help - particularly in reducing operational costs for on-site engineers/technicians while at the same time making sure that the configuration that would be pushed to the onboarded devices is consistent.
For automatic CPE onboarding
One example would be in a service provider network where lots of CPEs (customer premises equipment) are installed on client premises. Right now, the on-site technician requires some basic knowledge of connecting to the CPE via a serial or ethernet connection in order to carry out basic configuration of the device. Using zero-touch provisioning, this additional step is no longer required - the specified CPE could be sent to the client directly with just plug-and-play instructions and the entire bootstrapping process will be automatically handled by ZTP function, thus reducing the cost compared to having a more qualified technician in the field. Or, it allows for not having a technician at all on site - the CPE is simply sent to the end user, who just plugs it according to a simple instruction.
For reducing operational errors
Another strong-point for zero-touch provisioning would be the consistency and human error protection capabilities. Here, bootstrapping will be much less error prone due to the fact that the ZTP-enabled device will actually pull its entire configuration from some repository instead of being configured line by line locally or remotely (we have all heard horror stories of misconfiguration of an uplink port and having our console freeze in front of us…)
There are a few ways to implement ZTP and there is no limitation or exclusive recommendation on how this can be achieved (bearing in mind security considerations, of course). Check how integrating this with our network automation services ensures seamless and efficient network management.

Zero-touch provisioning in data center infrastructure
Here is an example diagram of how ZTP can help out with day zero operations in a data center infrastructure:

In Figure 1 - a new access switch is added to an existing layer 2 infrastructure in a data center. As you would expect, the switch still needs to be physically installed and connected to the rest of the infrastructure. The main difference in this scenario with using ZTP is that the field engineer’s job finishes right here - there is no need to physically connect to the switch via serial console or ethernet interface in order to put in some basic configuration so that the network administrator can then connect remotely.
In the above example, the new switch is configured at the factory with a default configuration on its management interface (be it in-band or dedicated out-of-band ethernet-based) to automatically obtain an IP address via Dynamic Host Configuration Protocol (DHCP) - and it does receive an offer from the local DHCP Server in the data center - (1) flow.
When the switch obtains an IP address offer, within that same offer there will also be some additional information sent by the DHCP server that will tell the switch, “Hey! You can also get your configuration from a TFTP server - here’s the address!“ In which case our newly-deployed switch will do just that - trigger a TFTP connection to the local TFTP server in the data center and pull its configuration file - (2) flow.
That all sounds and looks nice on paper but I bet a practical example would actually show things a lot better than just the pure theory!
>> Watch our webinar VNF automated deployment in the cloud ![]() , where our experts showed how to automate the deployment of VNFs in a public cloud to save time and resources on your daily operations. Moreover, you can check our article about configuration as code to dive into topic even deeper.
, where our experts showed how to automate the deployment of VNFs in a public cloud to save time and resources on your daily operations. Moreover, you can check our article about configuration as code to dive into topic even deeper.
ZTP for provision of a virtual data center switch
In this next section, we’ll demonstrate how we can provision a Nexus 9000V virtual data center switch using ZTP and an open-source Ubuntu server running isc-dhcp-server and tftpd-hpa daemons. From a high level perspective, the infrastructure we’ll be using for this lab will be quite simple although mechanisms such as a DHCP relay can separate the to-be-provisioned switch and the DHCP/TFTP server by miles of different networks. As long as there is IP connectivity between the switch management interface and the DHCP/TFTP server there is a way to provision it using ZTP.

The lab infrastructure consists of single Nexus switch that will act as a ZTP client and a single Ubuntu server that will hold both the DHCP and TFTP server functions on the same box, connected to each other by a layer 2 fabric (one or more layer 2 switches so the broadcast works between the two nodes).
In the case of Cisco Nexus devices, ZTP is implemented using a mechanism called POAP (PowerOn Auto Provisioning) and how it works is high-level based on the following flow:

Since the Nexus virtual switch doesn’t require any configuration at all just to power it up, in the next section we’ll describe the configurations required for the DHCP and TFTP servers.
Linux server configuration for the DHCP and TFTP servers
First of all we’ll install the DHCP server and configure it accordingly on the Ubuntu VM:
apt-get install isc-dhcp-server

##Configure /etc/dhcp/dhcpd.conf in a similar manner##

subnet 192.168.20.0 netmask 255.255.255.0 {
range 192.168.20.100 192.168.20.110;
 host my_switch {
  fixed-address 192.168.20.100;
  hardware ethernet 50:00:00:02:00:00;
  option routers 192.168.20.1;
  option domain-name-servers 8.8.8.8;
  option bootfile-name "bootstrapscript.py";
  option tftp-server-name "192.168.20.20";
 }
}

## Start the isc-dhcp-server and make sure the daemon loaded the configuration properly

systemctl start isc-dhcp-server
systemctl status isc-dhcp-server
● isc-dhcp-server.service - ISC DHCP IPv4 server
     Loaded: loaded (/lib/systemd/system/isc-dhcp-server.service; enabled; vendor preset: enabled)
     Active: active (running) since Wed 2023-03-08 12:19:25 UTC; 7h ago
       Docs: man:dhcpd(8)
   Main PID: 107338 (dhcpd)
      Tasks: 4 (limit: 4579)
     Memory: 4.9M
        CPU: 44ms
     CGroup: /system.slice/isc-dhcp-server.service
             └─107338 dhcpd -user dhcpd -group dhcpd -f -4 -pf /run/dhcp-server/dhcpd.pid -cf /etc/dhcp/dhcpd.conf
In the DHCP configuration file, we create a subnet and range for allocation in the 192.168.20.0/24 network in which our switch will reside (with its management). Notice also that we’ve also created a “host” configuration - also known as a DHCP binding - which means that whatever is inside that configuration block will apply only to the equipment with that specific hardware address, commonly known as a MAC address. This is the only piece of information that the network operations team would require from the switch in order to properly configure the correct binding.
In the same host configuration block, a few DHCP options are given :
- Routers - aka - the default gateway (option 3)
- DNS servers (option 6)
- bootfile-name (option 67)
- tftp-server-name (option 66)
A full list of DHCP options can be found here ![]() .
.
TFTP server configuration files on the Ubuntu VM
The next step is to install and configure the TFTP server on the Ubuntu VM:
apt-get install tftpd-hpa

## Parametrise tftpd /etc/default/tftpd-hpa :
# /etc/default/tftpd-hpa

TFTP_USERNAME="tftp"
TFTP_DIRECTORY="/srv/tftp"
TFTP_ADDRESS=":69"
TFTP_OPTIONS="--secure --create -l"

## Start the tftpd-hpa and make sure the daemon loaded the configuration properly

systemctl start tftpd-hpa

systemctl status tftpd-hpa
● tftpd-hpa.service - LSB: HPA's tftp server
     Loaded: loaded (/etc/init.d/tftpd-hpa; generated)
     Active: active (running) since Tue 2023-03-07 20:59:16 UTC; 23h ago
       Docs: man:systemd-sysv-generator(8)
      Tasks: 1 (limit: 4579)
     Memory: 408.0K
        CPU: 167ms
     CGroup: /system.slice/tftpd-hpa.service
             └─6355 /usr/sbin/in.tftpd --listen --user tftp --address :69 --secure --create -l /srv/tftp
The TFTP server is now running on port 69 (default) and will expose files from the /srv/tftp/ directory.
The next step would be to configure the bootscript.py file and the configuration file that we will actually push to the device. Here they are:
## bootflash.py

#!/bin/env python
from cli import *
import sys

cli('copy tftp://192.168.20.20/ztp-switch-config.cfg bootflash:ztp.cfg vrf management ; end')
cli('copy bootflash:ztp.cfg  scheduled-config ; end')
cli('copy bootflash:ztp.cfg running-config ; end')
cli('copy running-config  startup-config ; end')
## ztp-switch-config.cfg

!
hostname ZTP_SWITCH
feature ssh
!
interface loopback100
description Test Loopback Interface
ip address 1.1.1.1 255.255.255.255
!
no password strength-check
!
username admin password 5 $5$ebsob3oG$AS8/mT3v3AJxGooipOZqk/SOO0sVNR446YuLZ3n7jF9 role network-admin
!
boot nxos bootflash:/nxos.9.3.3.bin
The bootstrapscript.py file contains a few instructions that the switch will need to follow once it obtains an IP address from the DHCP server:
- Copy the configuration file from the TFTP server.
- Apply the configuration for the next boot.
- Save the configuration to the startup configuration file.
The configuration file itself contains just a few parameters like the already-hashed password for the admin user and a test loopback interface along with an appropriate hostname for the device. Also remember that both of these files need to reside in the folder you expose on your TFTP server (/srv/tftp/ in this case).
Before we actually start the boot process, we can actually check one last thing to make sure our server has all the necessary opened ports:
netstat -tupln
Active Internet connections (only servers)
Proto Recv-Q Send-Q Local Address           Foreign Address         State       PID/Program name
tcp        0      0 0.0.0.0:22              0.0.0.0:*               LISTEN      5919/sshd: /usr/sbi
tcp        0      0 127.0.0.53:53           0.0.0.0:*               LISTEN      11474/systemd-resol
tcp6       0      0 :::22                   :::*                    LISTEN      5919/sshd: /usr/sbi
udp        0      0 127.0.0.53:53           0.0.0.0:*                           11474/systemd-resol
udp        0      0 0.0.0.0:67              0.0.0.0:*                           107338/dhcpd
udp        0      0 0.0.0.0:69              0.0.0.0:*                           6355/in.tftpd
udp6       0      0 :::69                   :::*                                6355/in.tftpd
Among other things we find our ports of interest opened on the server - UDP port 67 for DHCPD and UDP port 69 for TFTPD.
Now that everything is prepared, let’s fire up the switch and see what’s going on!
Switch boot process
Here are a few logs from the switch’s serial interface during the boot process:
Abort Power On Auto Provisioning [yes - continue with normal setup, skip - bypass password and basic configuration, no - continue with Power On Auto Provisioning] (yes/skip/no)[no]: 2023 Mar  8 20:35:57 switch %$ VDC-1 %$ %POAP-2-POAP_INITED: [97289U8AKKW-50:02:00:00:1B:08] - POAP process initialized
2023 Mar  8 20:37:39 switch %$ VDC-1 %$ %POAP-2-POAP_DHCP_DISCOVER_START: [97289U8AKKW-50:02:00:00:1B:08] - POAP DHCP Discover phase started
2023 Mar  8 20:37:39 switch %$ VDC-1 %$ %POAP-2-POAP_INFO:   - Abort Power On Auto Provisioning [yes - continue with normal setup, skip - bypass password and basic configuration, no - continue with Power On Auto Provisioning] (yes/skip/no)[no]:
2023 Mar  8 20:37:40 switch %$ VDC-1 %$ %POAP-2-POAP_INFO: Recieved DHCP offer from server ip  - 192.168.20.20
2023 Mar  8 20:38:12 switch %$ VDC-1 %$ %POAP-2-POAP_INFO: [97289U8AKKW-50:02:00:00:1B:08] - Using DHCP, valid information received over mgmt0 from 192.168.20.20
2023 Mar  8 20:38:12 switch %$ VDC-1 %$ %POAP-2-POAP_INFO: [97289U8AKKW-50:02:00:00:1B:08] - Assigned IP address: 192.168.20.100
2023 Mar  8 20:38:12 switch %$ VDC-1 %$ %POAP-2-POAP_INFO: [97289U8AKKW-50:02:00:00:1B:08] - Netmask: 255.255.255.0
2023 Mar  8 20:38:12 switch %$ VDC-1 %$ %POAP-2-POAP_INFO: [97289U8AKKW-50:02:00:00:1B:08] - DNS Server: 8.8.8.8
2023 Mar  8 20:38:12 switch %$ VDC-1 %$ %POAP-2-POAP_INFO: [97289U8AKKW-50:02:00:00:1B:08] - Default Gateway: 192.168.20.1
2023 Mar  8 20:38:12 switch %$ VDC-1 %$ %POAP-2-POAP_INFO: [97289U8AKKW-50:02:00:00:1B:08] - Script Server: 192.168.20.20
2023 Mar  8 20:38:12 switch %$ VDC-1 %$ %POAP-2-POAP_INFO: [97289U8AKKW-50:02:00:00:1B:08] - Script Name: bootstrapscript.py
2023 Mar  8 20:38:23 switch %$ VDC-1 %$ %POAP-2-POAP_INFO: [97289U8AKKW-50:02:00:00:1B:08] - The POAP Script download has started
2023 Mar  8 20:38:23 switch %$ VDC-1 %$ %POAP-2-POAP_INFO: [97289U8AKKW-50:02:00:00:1B:08] - The POAP Script is being downloaded from [copy tftp://192.168.20.20/bootstrapscript.py bootflash:scripts/script.sh vrf management ]
2023 Mar  8 20:38:24 switch %$ VDC-1 %$ %POAP-2-POAP_SCRIPT_DOWNLOADED: [97289U8AKKW-50:02:00:00:1B:08] - Successfully downloaded POAP script file
2023 Mar  8 20:38:24 switch %$ VDC-1 %$ %POAP-2-POAP_INFO: [97289U8AKKW-50:02:00:00:1B:08] - Script file size 296, MD5 checksum 156638328d20d340af23f729f4fc9a27
2023 Mar  8 20:38:24 switch %$ VDC-1 %$ %POAP-2-POAP_SCRIPT_STARTED_MD5_NOT_VALIDATED: [97289U8AKKW-50:02:00:00:1B:08] - POAP script execution started(MD5 not validated)
2023 Mar  8 20:39:02 switch %$ VDC-1 %$ %POAP-2-POAP_INFO: [97289U8AKKW-50:02:00:00:1B:08] - POAP script execution success
2023 Mar  8 20:39:02 switch %$ VDC-1 %$ %POAP-2-POAP_INFO: [97289U8AKKW-50:02:00:00:1B:08] - Rebooting
Our switch has successfully pulled its configuration - we can also confirm this from the logs in our DHCPD process on the Ubuntu VM:
## journalctl -u isc-dhcp-server -f

Mar 08 20:37:44 ubuntu22-server dhcpd[107688]: Server starting service.
Mar 08 20:37:45 ubuntu22-server dhcpd[107688]: DHCPDISCOVER from 50:00:00:02:00:00 via ens3
Mar 08 20:37:45 ubuntu22-server dhcpd[107688]: DHCPOFFER on 192.168.20.100 to 50:00:00:02:00:00 via ens3
Mar 08 20:37:46 ubuntu22-server dhcpd[107688]: DHCPDISCOVER from 50:00:00:02:00:00 via ens3
Mar 08 20:37:46 ubuntu22-server dhcpd[107688]: DHCPOFFER on 192.168.20.100 to 50:00:00:02:00:00 via ens3
Let’s also look at some packet captures to dive deeper into the process:
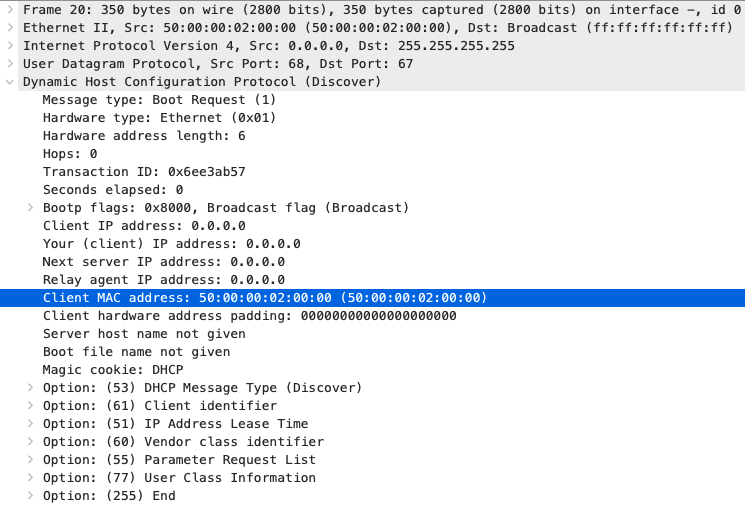
- DHCP Discover from the switch (notice the MAC address in the “Client MAC address field” is the same as in the previously shown DHCPD logs)
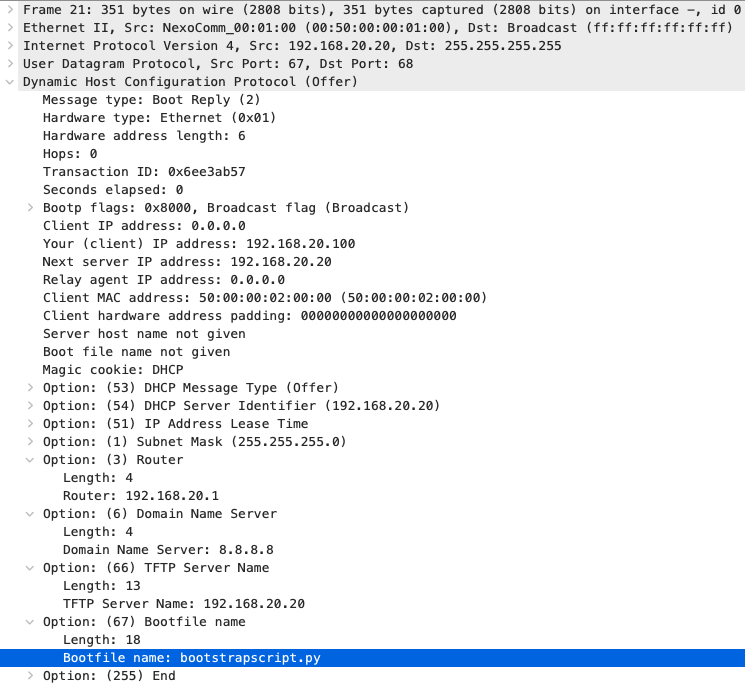
DHCP Offer from the server, along with the appropriate DHCP options we have configured.
TFTP Request of the initial bootstrapscript.py file:

TFTP Request of the aforementioned ztp-switch-config.cfg file:

Based on our analyzed data - everything looks good - let’s check if our switch is actually configured correctly:
ZTP_SWITCH login: admin
Password:

ZTP_SWITCH# show interface desc | include Loop
Lo100                    Test Loopback Interface

ZTP_SWITCH# sh run interface loop100

!Command: show running-config interface loopback100
!Running configuration last done at: Wed Mar  8 20:45:18 2023
!Time: Wed Mar  8 21:04:43 2023

version 9.3(3) Bios:version

interface loopback100
  description Test Loopback Interface
  ip address 1.1.1.1/32

ZTP_SWITCH# dir bootflash:
       4096    Mar 08 20:33:38 2023  .rpmstore/
       4096    Mar 08 20:34:01 2023  .swtam/
      23122    Mar 08 20:39:26 2023  20230308_203557_poap_4262_init.log
          0    Mar 08 20:33:55 2023  bootflash_sync_list
       4096    Mar 08 20:34:04 2023  eem_snapshots/
 1688180224    Dec 22 14:39:08 2019  nxos.9.3.3.bin
          0    Mar 08 21:03:18 2023  platform-sdk.cmd
         94    Mar 08 20:37:34 2023  poap_retry_debugs.log
       4096    Mar 08 20:39:26 2023  scripts/
       4096    Mar 08 20:34:23 2023  virtual-instance/
        336    Mar 08 20:38:25 2023  ztp.cfg

Usage for bootflash://sup-local
 1705897984 bytes used
 2480812032 bytes free
 4186710016 bytes total
Login worked with the appropriate credentials, our loopback interface is there and we can also still find the ztp.cfg file within bootflash.
All that being said, we can consider the day zero operations concluded and this switch successfully onboarded!
Keep in mind that in real-life scenarios, the DHCP server would not actually be in the same layer 2 broadcast domain as the network device’s management interface - in a lot of cases you can solve this issue by leveraging the DHCP relay functionality.
Here, you can watch a video that provides practical insights and innovative approaches to tackling complex network firewall upgrades by presenting a real-world case study involving the automation of firewall upgrades:
Conclusion
In conclusion, zero-touch provisioning is a solution that simplifies the process of day zero deployment and device onboarding in both enterprise and service provider environments. Using this method, organizations can significantly reduce time to market of delivered solutions and operational costs while at the same time minimizing human errors.
Zero-touch provisioning streamlines the initial setup of devices, allowing IT teams to focus on more strategic tasks that can drive business growth. With the rise of remote working and the increasing complexity of modern IT environments, ZTP can be an essential tool for IT teams to manage and secure their networks effectively.


