


In today's dynamic IT landscape, it is a rarity to find organizations that do not leverage or plan to leverage network automation. Given the rapid advancements in technology and the complexities introduced in recent years, manual management of network and IT infrastructure has become increasingly untenable.
As complexity in the IT landscape has amplified, so too has the demand for network automation. Consequently, this rapidly increasing need has spurred the development of a myriad of networking tools, each tailored with specific features and functionalities to assist network engineers in their daily operations and challenges. Notably, a significant portion of these tools is available under open-source licenses, granting engineers free-to-use immediate access to begin their automation endeavors.
The scenario
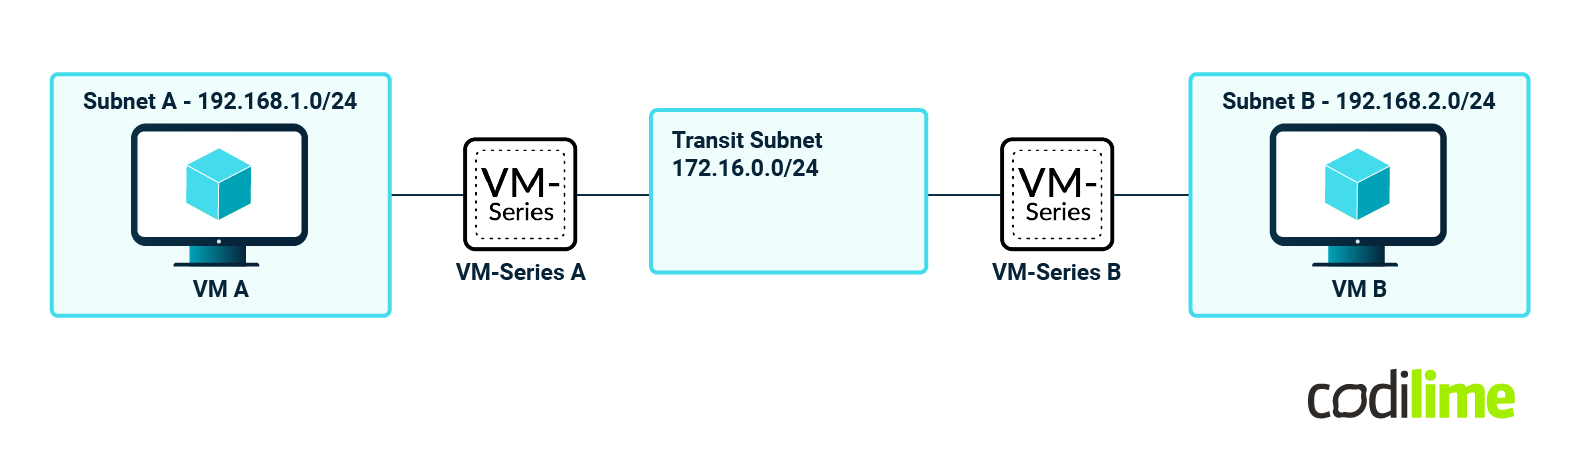
In order to showcase how some of the well-known network automation tools out there work and interact with a real environment, we will be testing out how automation can help in a simple network environment composed of two Palo Alto VM-Series virtual firewalls, each with their own local subnets. The scope of the automation tools will be to configure the minimum amount of items so that reachability between the local subnets is achieved successfully. In the case of Palo Alto VM-Series firewalls this includes (but is not limited to) the following:
- Interface configuration
- Zone configuration
- Virtual Router (VR) configuration
- Policy configuration
The assessment will gauge the automation tools' effectiveness in harmonizing these elements and ensuring successful reachability among the local subnets.
See our article about why network automation matters.
The following high-level design can be referenced for this test environment:
In this specific evaluation, we will leverage three of the industry's most popular network automation solutions:
- Ansible
- Terraform
- Python in conjunction with SDK (PAN-OS-Python)
Our investigation will delve into the intricacies of employing each of these network automation tools to accomplish the aforementioned objectives.
As far as metrics and characteristics go, we will compare and contrast the following:
- Ease of Installation
- Ease of development
- Amount of available information/examples/community support (e.g. how easily we can access the information required to achieve our goal)
- Learning curve
- Versatility (in terms of automation this pertains to the extensiveness of the tool's reach across a diverse range of network devices and infrastructures)
- Scalability (from a device perspective - the number of devices that can be configured at once)
- Statefulness
If you're looking to automate your network operations, see our network automation services.
Ansible
Ansible is an open-source automation tool that simplifies configuration management, application deployment and task automation. It’s an agentless tool which means that it does not require any agents installed on the servers/appliances that it’s operating on.
Ansible uses YAML (Yet Another Markup Language or more recently the recursive YAML Ain’t a Markup Language) framework to define the necessary tasks along with but not limited to an inventory that contains the list of nodes on which to run the tasks on, and hostvars and groupvars definitions.
The tool is written in the Python programming language and thus this is a mandatory requirement for its deployment.
The Ansible code itself is written in files called “playbooks”. An Ansible playbook is a structured configuration file that defines a set of tasks and plays to automate specific IT operations, such as server provisioning, application deployment, configuration management, and more. Playbooks are written in the previously mentioned YAML format, making them easy to read and write. Ansible playbooks are a fundamental part of Ansible's automation framework and are used to describe the desired state of a system.
Ansible can also make use of roles that are reusable in the playbooks for a cleaner code according to the DRY (don’t repeat yourself) principle. Note that we will not be using this within the demo.
For device connection, Ansible mainly uses SSH (Secure Shell) and at its core can be both a declarative and procedural language, depending mainly on how the used modules are developed.
Although Ansible uses SSH for a lot of developed collections/modules, this primarily depends on how that module is developed - for example, in our case it’s actually going to use the PAN-OS Python framework which uses the PAN-OS API to interact with the device and not SSH.
Ansible Modules:
- Modules in Ansible are individual units of code that perform specific tasks on target systems. They are the building blocks of Ansible automation.
- Modules are responsible for carrying out actions like installing packages, managing services, copying files, making configuration changes, and more.
Ansible Collections:
- Ansible Collections are a way to package and distribute groups of Ansible content, including roles, modules, and playbooks.
- Collections help organize and share Ansible automation content, making it easier to manage and reuse.
There is no state mechanism within the Ansible framework. Ansible simply executes the tasks it’s given in the provided YAML files - if you want to delete an existing/already deployed resource with Ansible, you have to create that logic yourself (e.g. create another playbook or task within a playbook). This is a very important factor when comparing Ansible to other automation frameworks that are stateful (like Terraform).
Ansible demonstrates remarkable proficiency in executing tasks across a multitude of network devices, offering substantial benefits for streamlining Day 0 and Day 1 operations. This includes tasks such as deploying essential software packages on Linux virtual machines, configuring standardized network templates on routers, or parameterizing firewall lockdown policies.
The significant advantage here is that Ansible can seamlessly establish connections with these resources and propagate the requisite configurations without necessitating explicit management of individual configuration parameters. In this context, Ansible stands out as a superior choice in comparison to Terraform, particularly when addressing pre-existing infrastructure, often referred to as brownfield environments.
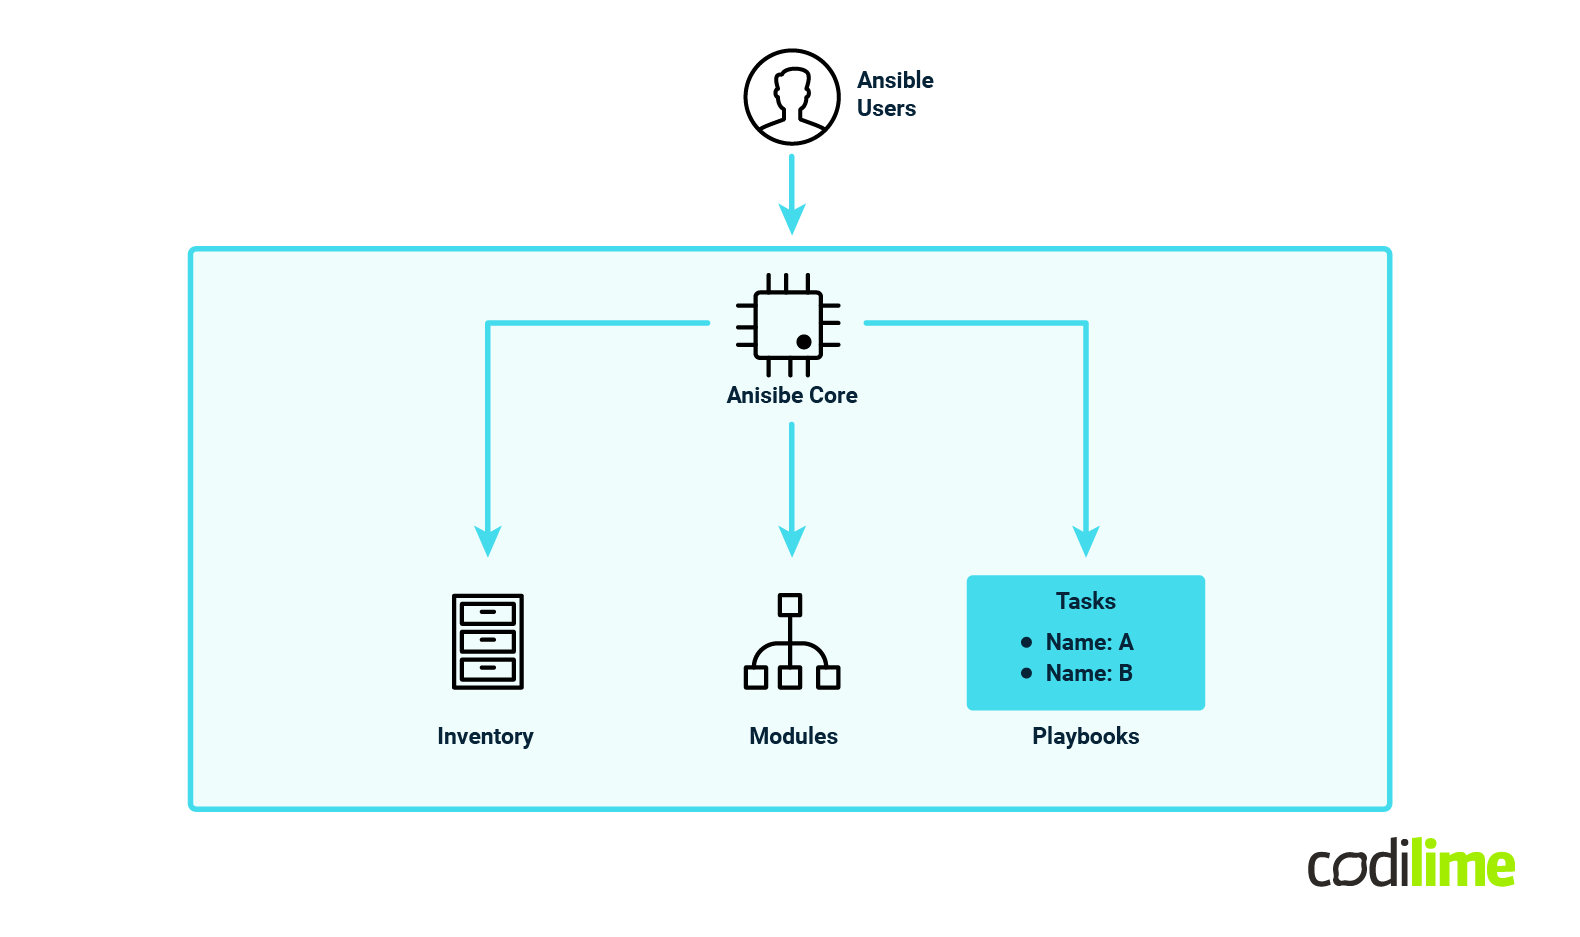
The following high-level diagram describes the Ansible architecture:
For more information - you can check out the following links:
For our specific deployment of VM-Series firewalls, we’ll be using an Ansible collection that can be obtained completely free from Ansible galaxy ![]() .
.
In order to deploy Ansible - we will need to first have Python installed (I already have it installed on version 3.11) and we’ll be using Poetry to deploy any other dependencies. A few important topics to note here:
- You can use other package managers to deploy Ansible (like pip).
- You can also install Ansible system-wide and not necessarily within a virtual environment
python3 --version
Python 3.11.4

poetry init  # Follow the steps indicated by poetry and install the following packages:
#pan-os-python
#ansible
#xmltodict

# after the installation is complete - your pyproject.toml should look more or less like this

[tool.poetry]
name = "ansible-test"
version = "0.1.0"
description = ""
authors = ["Horia Gunica"]
readme = "README.md"
packages = [{include = "ansible_test"}]

[tool.poetry.dependencies]
python = "^3.11"
ansible = "^8.4.0"
pan-os-python = "^1.11.0"
xmltodict = "^0.13.0"


[build-system]
requires = ["poetry-core"]
build-backend = "poetry.core.masonry.api"

# Now we may start the local poetry environment and also add our ansible collection (if it’s not already there)+ install poetry packages

poetry install
poetry shell
ansible-galaxy collection install paloaltonetworks.panos
The next important step is to write the YAML playbook that will deploy everything we need. Again, we will keep this as simple as possible; we will not be using any advanced tools or techniques like for loops, iterators, etc.
The order of operations would be the following :
- Configure the zones
- Configure the interfaces
- Configure the VR
- Configure the security policies
Since we’re going to pass credentials to the workflow, we’ll make use of Ansible Vault to create a credentials file and encrypt our credentials there:
ansible-vault create credentials.yml
# You will be prompted to enter a password for this vaulted file
New Vault password:
Confirm New Vault password:

#You will now be prompted to enter the hidden credentials that you want to use - in our case - we’ll use the following:
fw_username: admin
fw_password: Y0uW0n1Cr@ckm3
Next step is to set up an inventory file in which we will also configure some parameters:
### firewall_hosts.yml###

all:
  hosts:
    vmseries-a:
      vr_name: "VR-MAIN"
      outside_interface:
        fw_interface_name: "ethernet1/1"
        fw_interface_ip: "172.16.0.10/24"
        fw_zone_name: "OUTSIDE"
      inside_interface:
        fw_interface_name: "ethernet1/2"
        fw_interface_ip: "192.168.1.10/24"
        fw_zone_name: "INSIDE"
      default_route:
        route_name: "DEFAULT-ROUTE"
        destination: "0.0.0.0/0"
        nexthop: "172.16.0.11"
        interface: "ethernet1/1"
      security_policy:
        rule_name: "ALLOW-LAN-TO-LAN"
        source_zone: "any"
        source_ip: ["192.168.0.0/16"]
        destination_zone: "any"
        destination_ip: ["192.168.0.0/16"]
        application: ["any"]
        action: "allow"
      provider:
        ip_address: "A.A.A.A" # Replace this value with your VM-Series-A MGMT IP address
        username: "{{ fw_username }}"
        password: "{{ fw_password }}"

    vmseries-b:
      vr_name: "VR-MAIN"
      outside_interface:
        fw_interface_name: "ethernet1/1"
        fw_interface_ip: "172.16.0.11/24"
        fw_zone_name: "OUTSIDE"
      inside_interface:
        fw_interface_name: "ethernet1/2"
        fw_interface_ip: "192.168.2.10/24"
        fw_zone_name: "INSIDE"
      default_route:
        route_name: "DEFAULT-ROUTE"
        destination: "0.0.0.0/0"
        nexthop: "172.16.0.10"
        interface: "ethernet1/1"
      security_policy:
        rule_name: "ALLOW-LAN-TO-LAN"
        source_zone: "any"
        source_ip: ["192.168.0.0/16"]
        destination_zone: "any"
        destination_ip: ["192.168.0.0/16"]
        application: ["any"]
        action: "allow"
      provider:
        ip_address: "B.B.B.B" # Replace this value with your VM-Series-B MGMT IP address
        username: "{{ fw_username }}"
        password: "{{ fw_password }}"
Each device in the inventory contains information about its own configuration items - like zones, interfaces, IP addresses, etc. and one main security policy is used to allow any zone traffic between our local subnets.
The next important file is the playbook itself - this contains all of the steps required to successfully apply the configuration using information from our inventory file.
### firewall_hosts.yml###

all:
  hosts:
    vmseries-a:
      vr_name: "VR-MAIN"
      outside_interface:
        fw_interface_name: "ethernet1/1"
        fw_interface_ip: "172.16.0.10/24"
        fw_zone_name: "OUTSIDE"
      inside_interface:
        fw_interface_name: "ethernet1/2"
        fw_interface_ip: "192.168.1.10/24"
        fw_zone_name: "INSIDE"
      default_route:
        route_name: "DEFAULT-ROUTE"
        destination: "0.0.0.0/0"
        nexthop: "172.16.0.11"
        interface: "ethernet1/1"
      security_policy:
        rule_name: "ALLOW-LAN-TO-LAN"
        source_zone: "any"
        source_ip: ["192.168.0.0/16"]
        destination_zone: "any"
        destination_ip: ["192.168.0.0/16"]
        application: ["any"]
        action: "allow"
      provider:
        ip_address: "A.A.A.A" # Replace this value with your VM-Series-A MGMT IP address
        username: "{{ fw_username }}"
        password: "{{ fw_password }}"

    vmseries-b:
      vr_name: "VR-MAIN"
      outside_interface:
        fw_interface_name: "ethernet1/1"
        fw_interface_ip: "172.16.0.11/24"
        fw_zone_name: "OUTSIDE"
      inside_interface:
        fw_interface_name: "ethernet1/2"
        fw_interface_ip: "192.168.2.10/24"
        fw_zone_name: "INSIDE"
      default_route:
        route_name: "DEFAULT-ROUTE"
        destination: "0.0.0.0/0"
        nexthop: "172.16.0.10"
        interface: "ethernet1/1"
      security_policy:
        rule_name: "ALLOW-LAN-TO-LAN"
        source_zone: "any"
        source_ip: ["192.168.0.0/16"]
        destination_zone: "any"
        destination_ip: ["192.168.0.0/16"]
        application: ["any"]
        action: "allow"
      provider:
        ip_address: "B.B.B.B" # Replace this value with your VM-Series-B MGMT IP address
        username: "{{ fw_username }}"
        password: "{{ fw_password }}"
All of the tasks used here are documented under the following read-the-docs section ![]() .
.
The only specific implementation we are doing for this project is to handle the commit conditionally. We do not commit every time but make use of a handler function instead which gets notified if there are actually any changes in the Ansible tasks - if there are no changes (configurations are already there) then that commit will not trigger anymore.
All that we have to do now is run the playbook and apply the configuration (remember to double check you have the virtual environment shell activated):
ansible-playbook configure_firewalls_playbook.yml -i firewall_hosts.yml --ask-vault-pass

#The `--ask-vault-pass` indicates that you will be prompted to enter the vault password to unencrypt the file
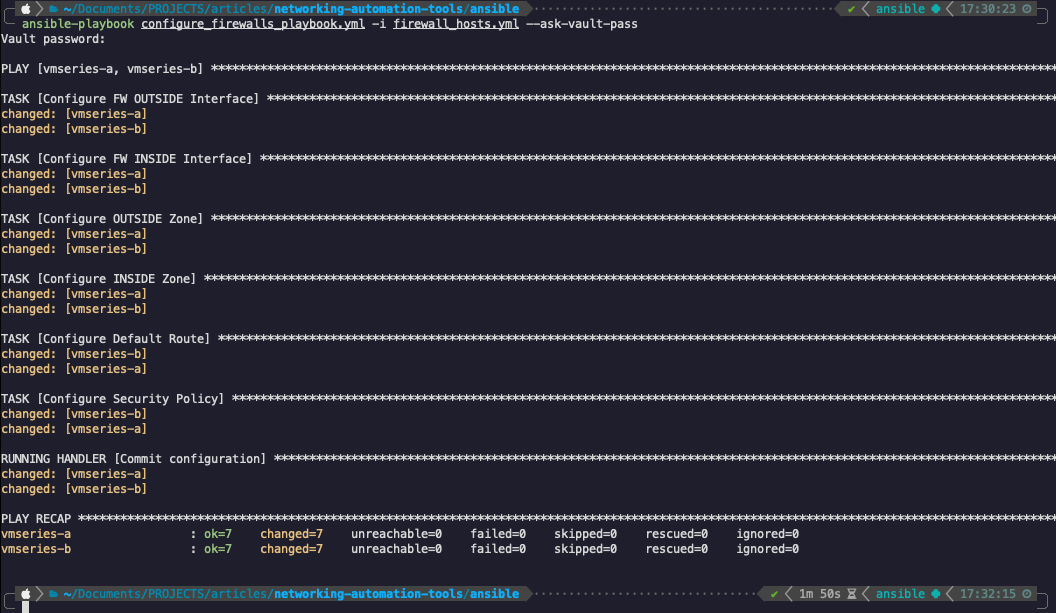
As can be seen from the output - the Ansible playbook was executed successfully!
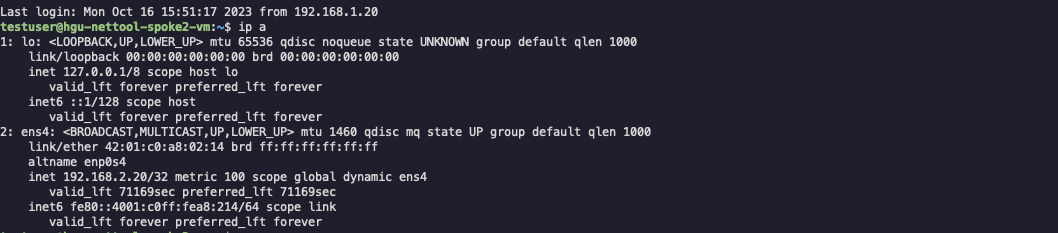
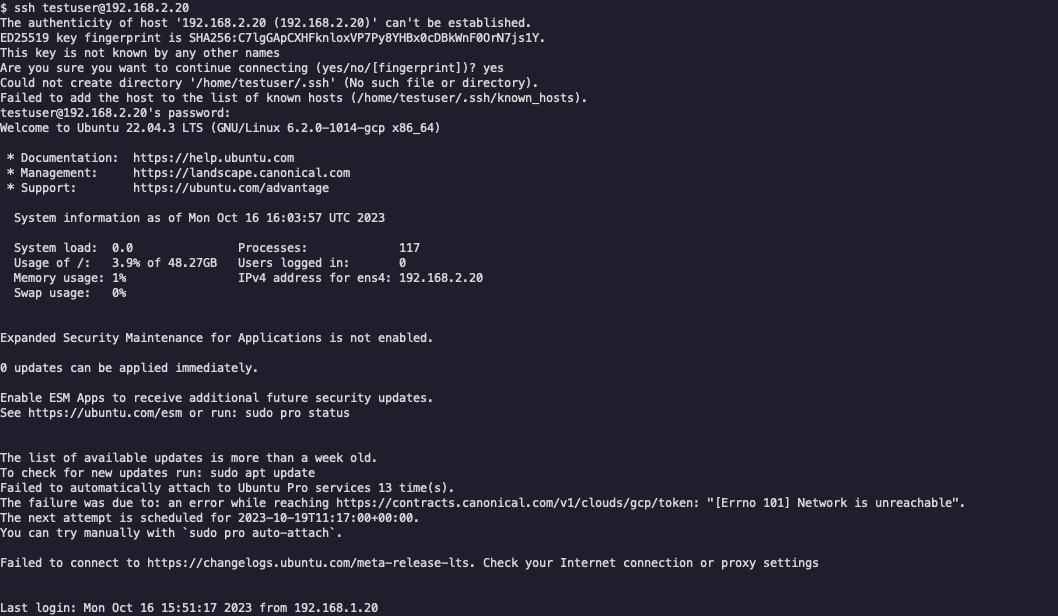
Now in order to test the traffic we’ll SSH to one of the VMs and try to ping an SSH between them:
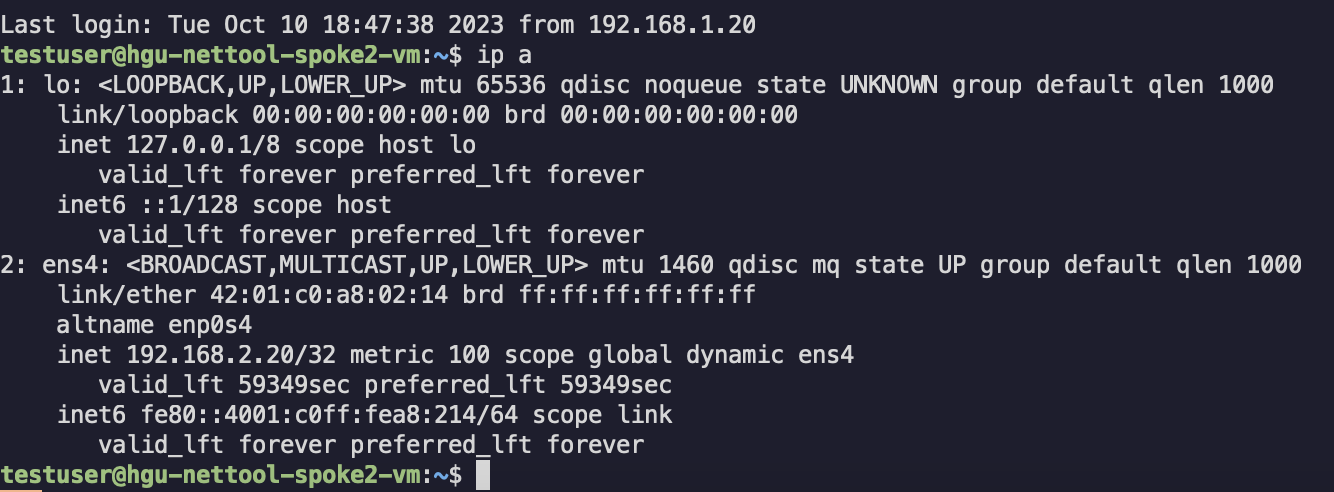

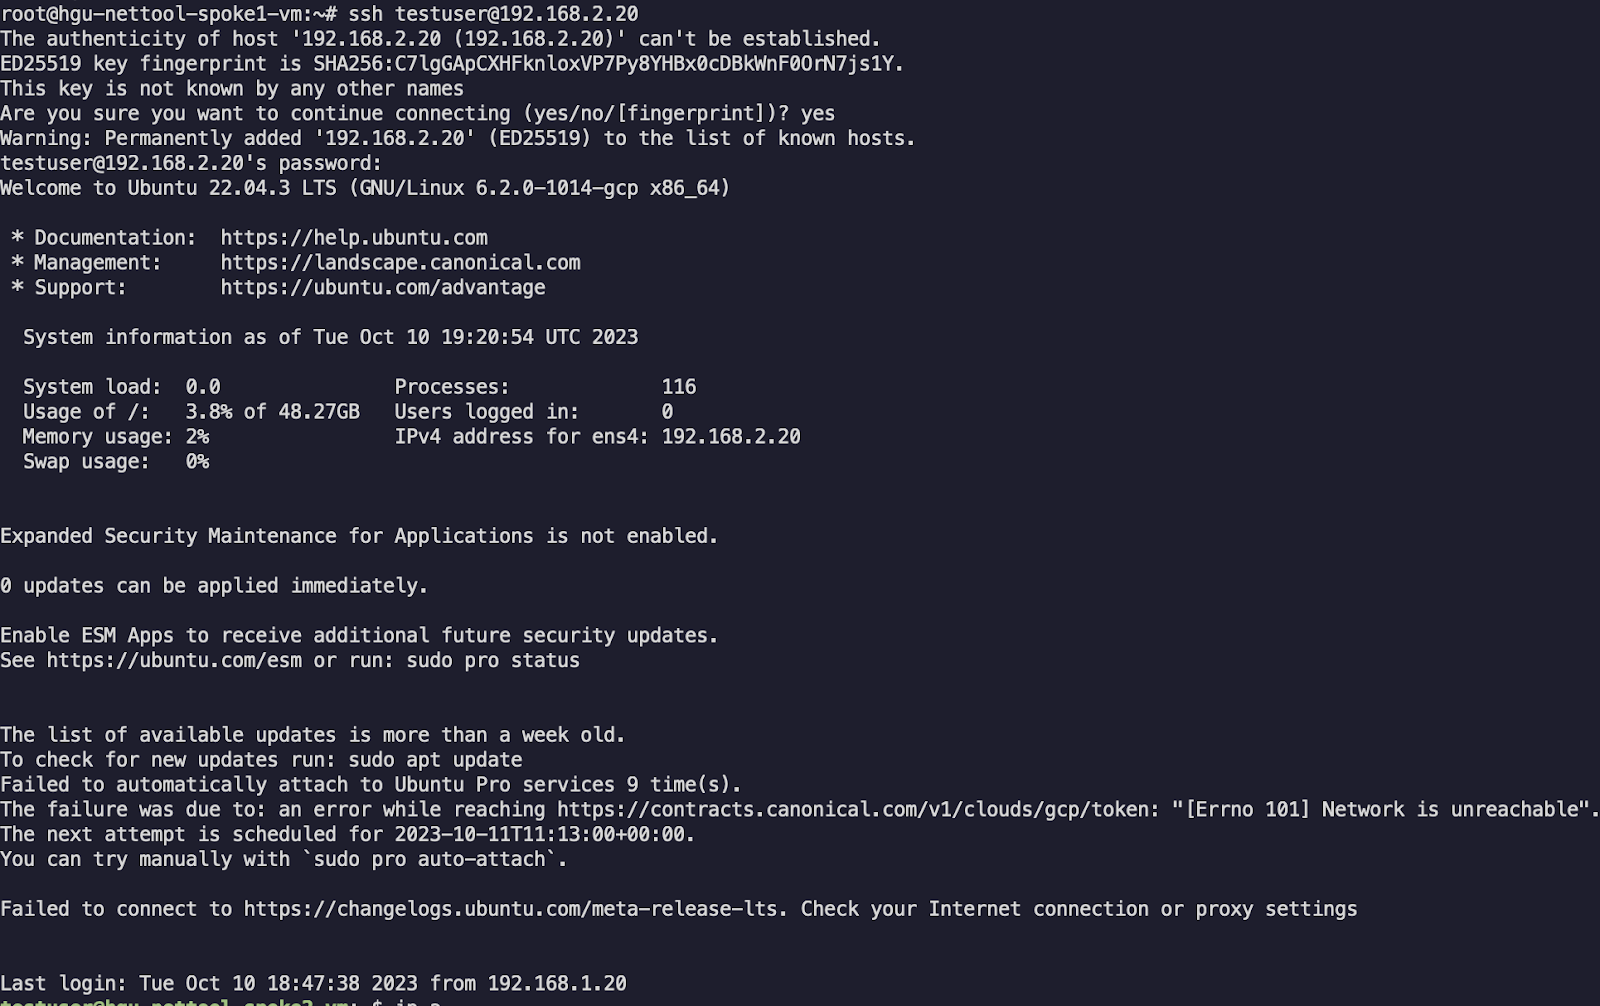
The traffic seems to be working just fine.
Let’s also check one of our Palo Alto VM-Series configurations and logs:

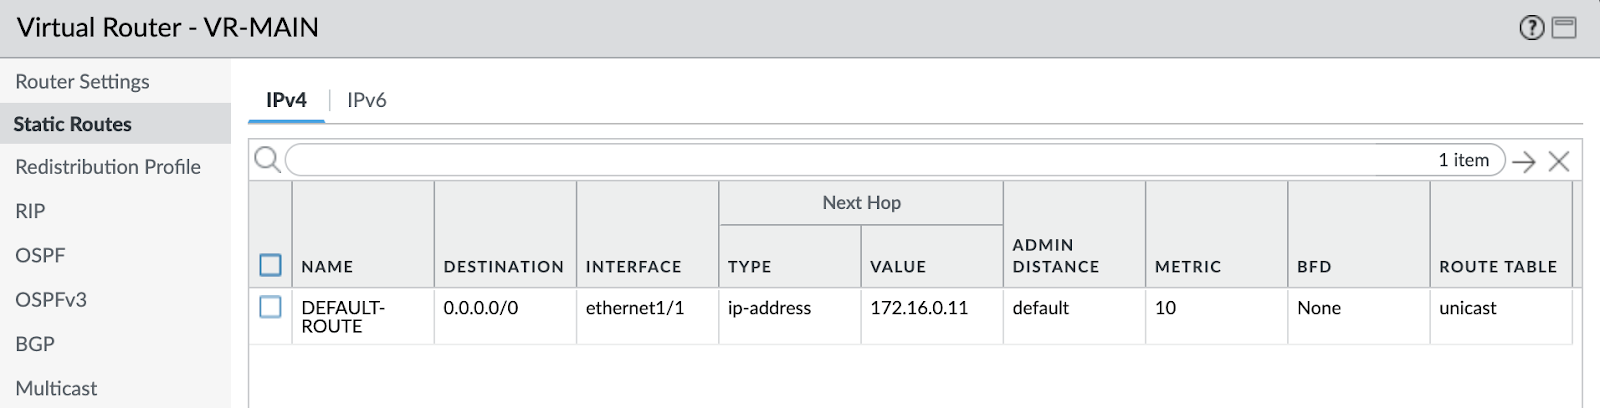


Our configured items are there as expected with their corresponding names and values. We can also see “ping” application logs that match our security policy.
Our Ansible deployment is now complete! We may now try to fill in some of the metrics that result from this small automation example:
| Automation tool | Ease of instalation | Ease of development | Available information | Learning curve | Versatility | Scalability | Statefulness |
|---|---|---|---|---|---|---|---|
| Ansible | Easy | Easy | Plenty | Shallow | High | High | None* |
| Terraform | |||||||
| Python SDK |
*Although Ansible does not have any state handling at its core, modules can be developed in such a way to be stateful but that, of course, is directly related to how that module is developed.
Ansible is pretty easy to pick up and can scale very well whilst providing a good amount of flexibility and versatility as it can deploy not only infrastructure but also configure the deployed network devices/appliances as well.
One of its disadvantages is that there is no embedded statefulness. This lack of a feature can be cumbersome when you want to do a full life cycle management of your resources and include the entire stateful CRUD (Create Read Update Delete) stack.
Terraform
Terraform is not just a network automation tool - it’s an infrastructure as code (IaC) tool developed by HashiCorp. It is designed to help automate and manage the provisioning and configuration of infrastructure resources, such as virtual machines, networks, storage, and more, across various cloud providers and on-premises environments.
Terraform has become very popular for managing public cloud infrastructure but, as we will see in the upcoming section, it can even orchestrate the configuration of network appliances as well - using that same IaC approach.
The high-level architecture of Terraform looks like the following:
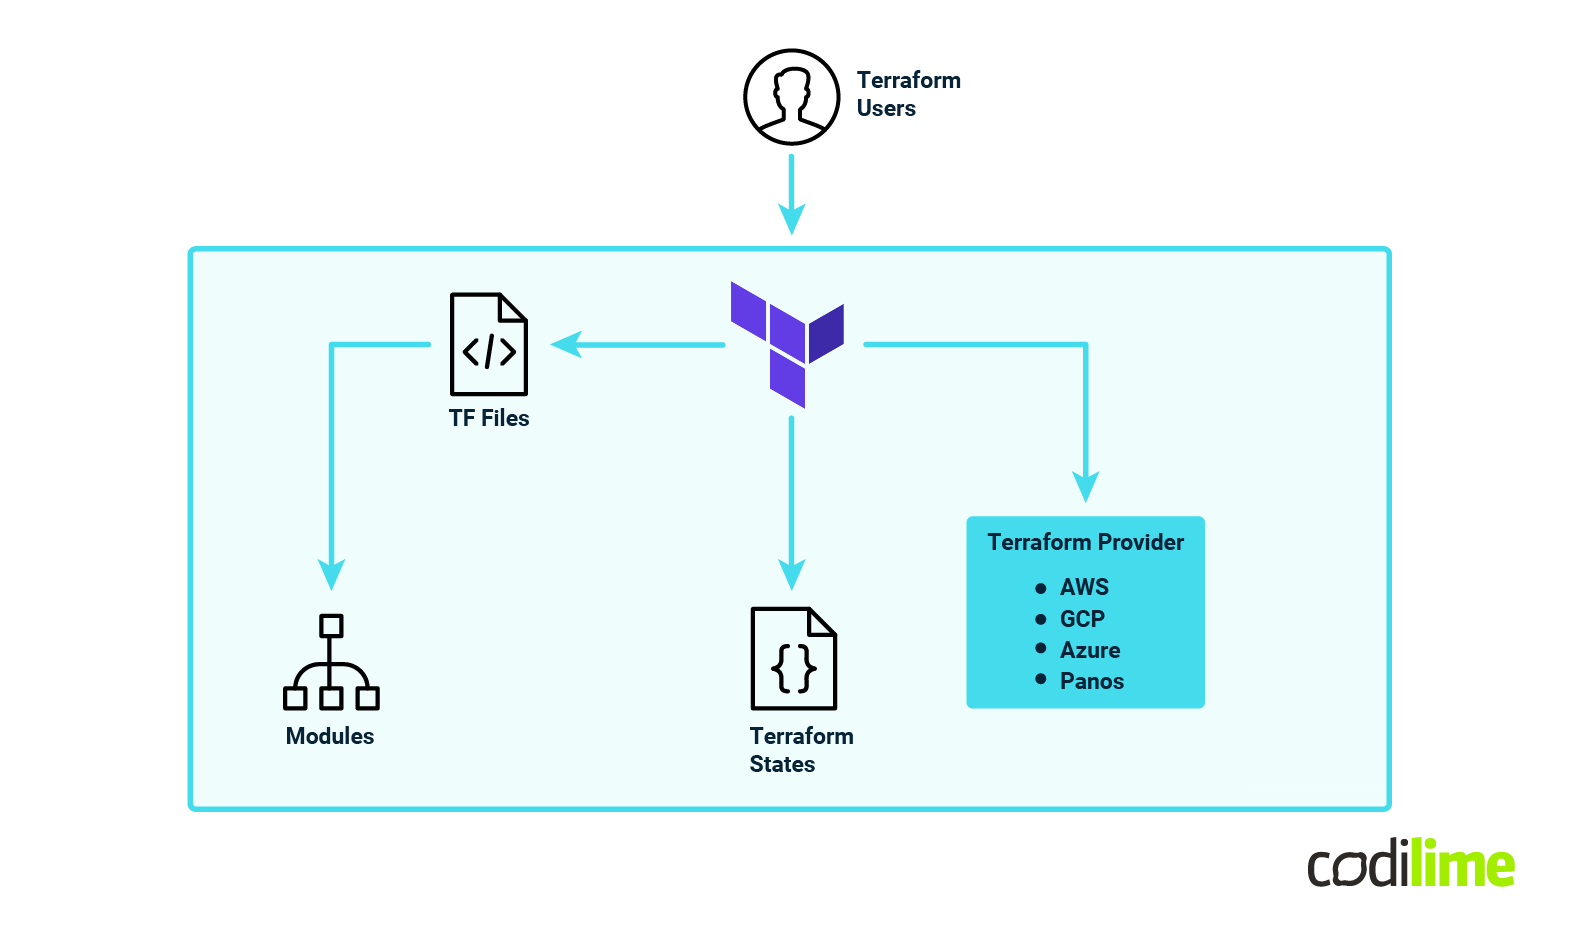
Terraform uses an important component called a “provider” in order to “understand” how to converse with the specific infrastructure it needs to deploy. These providers are developed in the Go programming language.
An illustrative demonstration of Terraform providers (these are just examples) encompasses the following categories:
-
Public cloud providers:
- Amazon Web Services (AWS)
- Azure (AzureRM)
- Google Cloud Platform (Google)
-
Container Orchestration
- Kubernetes
-
Networking
- Palo Alto Networks (PanOS)
- Cisco Application Centric Infrastructure (ACI)
- Aviatrix
The code is organized in files with the “.tf” extension and developed in a declarative manner using a toolkit language called HCL (Hashicorp Configuration Language). Within this code, the developers describe the desired results - or the desired state I should say - and Terraform will do whatever is needed to bring that infrastructure into that desired state.
Within these Terraform files, developers can reference and use modules developed and maintained by various entities. Terraform also allows users to very easily spin up a module without too much complexity.
An important characteristic of Terraform is its statefulness - the fact that it actually keeps track of your infrastructure state via a special component called the “Terraform state”. Within this state file you can find Terraform’s “view” of the deployed resources. This leads to one of its most important advantages - the fact that the user only needs to handle the creation of the resources and not develop any deletion or modification logic. You want to modify something within the infrastructure orchestrated by Terraform? Just delete or modify that section of the code and Terraform will handle all the necessary steps to get your infrastructure to your desired state.
Because the Terraform state file is of critical importance, it is highly recommended that you protect this state file by any means necessary so that you do not lose it . Fortunately, Terraform offers a wide range of solutions for placing this state file on redundant systems.
Since code sharing is a critical point of network automation software development, there are situations in which multiple developers need to interact with the state file in order to deploy/change/delete infrastructure/configurations. To handle such situations, Terraform implements a mechanism called “state locking” so that any time someone needs to directly interact with the state file they acquire this state lock and prohibit any other developers from tampering with the state file until the current deployment is finished.
Having iterated its main characteristics, let’s now delve into installing Terraform and start our development!
In order to deploy Terraform you just need to install it either via brew/apt/etc. depending on what operating system you work on.
Once that is completed, you can start development! For our implementation we will be using the PAN-OS provider ![]() .
.
We can put this provider configuration in a versions.tf file:
### versions.tf ###

terraform {
  required_providers {
    panos = {
      source = "PaloAltoNetworks/panos"
      version = "1.11.1"
    }
  }
}

provider "panos" {
  alias = "panos-vmseries-a"
  hostname = "A.A.A.A" # Replace this value with VM-Series-A MGMT IP
  verify_certificate = false
}

provider "panos" {
  alias = "panos-vmseries-b"
  hostname = "B.B.B.B" # Replace this value with VM-Series-B MGMT IP
  verify_certificate = false
}
Note that we did not configure any username or passwords as by default the provider uses PANOS_USERNAME and PANOS_PASSWORD environment variables if not directly configured under the provider block. This is a more secure method of credential storing than just plainly configuring them in the provider block.
Note: The recommended way to handle sensitive data with Terraform is by using Hashicorp Vault.
Now that our provider configuration is there we can instruct Terraform to pull this provider from the registry and load it locally so that we may make use of it:
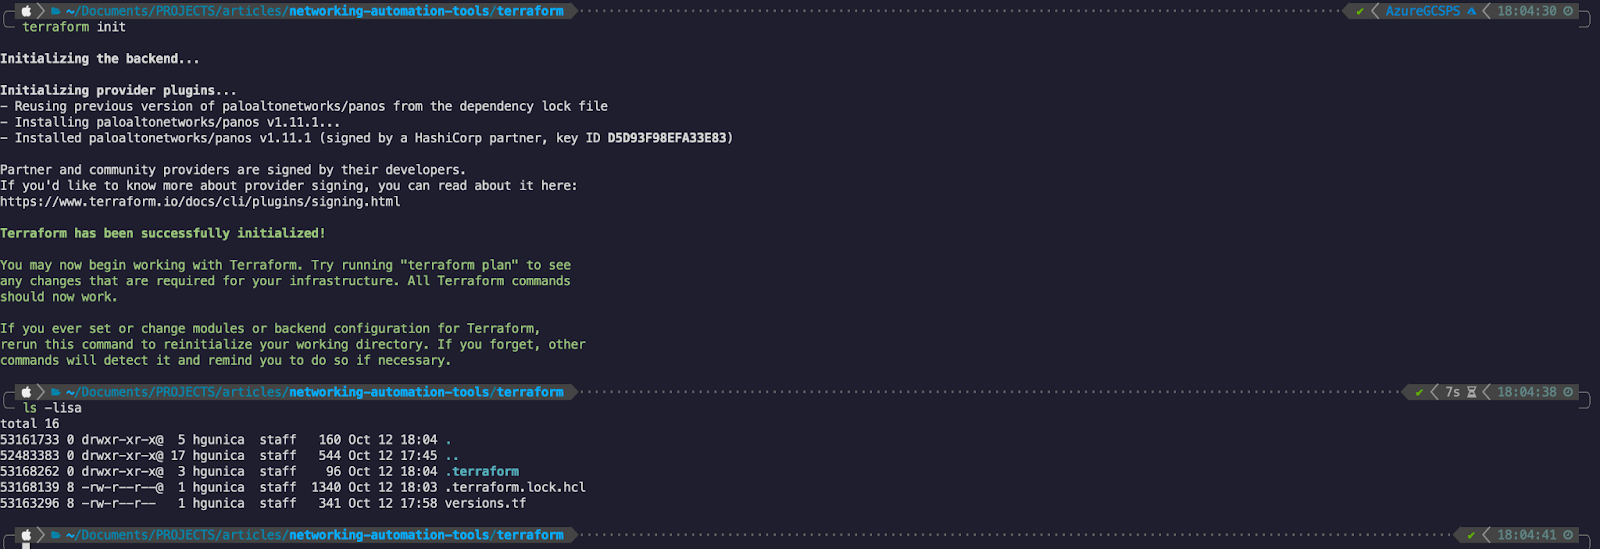
By using terraform init - we have successfully managed to download the provider required for our automation. Notice that there is a hidden folder automatically created called “.terraform” - this folder contains the actual provider files.
The next step is to actually define our configuration in the proper Terraform files. For this we will be splitting the configuration into vm-series-a.tf and vm-series-b.tf. The main difference between these two is the use of different variables and calling out the different providers.
### vm-series-a.tf ###

resource "panos_ethernet_interface" "vmseries_a_outside_int" {
  provider = panos.panos-vmseries-a

  name       = var.vmseries_a.outside_interface.name
  vsys       = "vsys1"
  mode       = "layer3"
  static_ips = var.vmseries_a.outside_interface.ip
  comment    = var.vmseries_a.outside_interface.description

  lifecycle {
    create_before_destroy = true
  }
}

resource "panos_ethernet_interface" "vmseries_a_inside_int" {
  provider = panos.panos-vmseries-a

  name       = var.vmseries_a.inside_interface.name
  vsys       = "vsys1"
  mode       = "layer3"
  static_ips = var.vmseries_a.inside_interface.ip
  comment    = var.vmseries_a.inside_interface.description

  lifecycle {
    create_before_destroy = true
  }
}

resource "panos_zone" "vmseries_a_inside_zone" {
  provider = panos.panos-vmseries-a

  name           = var.vmseries_a.inside_zone
  mode           = "layer3"
  enable_user_id = false
  interfaces = [
    panos_ethernet_interface.vmseries_a_inside_int.name
  ]
  lifecycle {
    create_before_destroy = true
  }
}

resource "panos_zone" "vmseries_a_outside_zone" {
  provider = panos.panos-vmseries-a

  name           = var.vmseries_a.outside_zone
  mode           = "layer3"
  enable_user_id = false
  interfaces = [
    panos_ethernet_interface.vmseries_a_outside_int.name
  ]
  lifecycle {
    create_before_destroy = true
  }
}

resource "panos_virtual_router" "vmseries_a_vr" {
  provider = panos.panos-vmseries-a

  name        = var.vmseries_a.vr_name
  interfaces = [
    panos_ethernet_interface.vmseries_a_inside_int.name,
    panos_ethernet_interface.vmseries_a_outside_int.name,
  ]
  lifecycle {
    create_before_destroy = true
  }
}

resource "panos_static_route_ipv4" "vmseries_a_static_route" {
  provider = panos.panos-vmseries-a

  name           = var.vmseries_a.static_route.name
  virtual_router = panos_virtual_router.vmseries_a_vr.name
  destination    = var.vmseries_a.static_route.destination
  next_hop       = var.vmseries_a.static_route.next_hop

  lifecycle {
    create_before_destroy = true
  }
}

resource "panos_security_policy" "vmseries_a_policy" {
  provider = panos.panos-vmseries-a

  rule {
    name                  = var.vmseries_a.policy.name
    source_zones          = var.vmseries_a.policy.source_zones
    source_addresses      = var.vmseries_a.policy.source_addresses
    source_users          = var.vmseries_a.policy.source_users
    destination_zones     = var.vmseries_a.policy.destination_zones
    destination_addresses = var.vmseries_a.policy.destination_addresses
    applications          = var.vmseries_a.policy.applications
    services              = var.vmseries_a.policy.services
    categories            = var.vmseries_a.policy.categories
    action                = var.vmseries_a.policy.action
  }

  lifecycle {
    create_before_destroy = true
  }
}
The way we have developed the code points us to using just two variables of the same type: vmseries_a and vmseries_b (vmseries_b configuration looks symmetrical - with the corresponding items).
That means that we also need to define those variables and it is best practice to use them within a separate file called variables.tf:
### variables.tf ###

variable "vmseries_a" {
  description = "VM-Series A configuration"
  type        = any
}

variable "vmseries_b" {
  description = "VM-Series B configuration"
  type        = any
}
The parameterization of set variables is usually done in a “tfvars” file - commonly named (so that Terraform interprets it by default) terraform.tfvars:
vmseries_a = {
  outside_interface = {
    name        = "ethernet1/1"
    ip          = ["172.16.0.10/24"]
    description = "Configured by Terraform"
  }
  inside_interface = {
    name        = "ethernet1/2"
    ip          = ["192.168.1.10/24"]
    description = "Configured by Terraform"
  }
  inside_zone  = "INSIDE"
  outside_zone = "OUTSIDE"
  vr_name      = "VR-MAIN"
  static_route = {
    name        = "DEFAULT-ROUTE"
    destination = "0.0.0.0/0"
    next_hop    = "172.16.0.11"
  }
  policy = {
    name                  = "ALLOW-TRAFFIC"
    source_zones          = ["any"]
    source_addresses      = ["192.168.0.0/16"]
    source_users          = ["any"]
    destination_zones     = ["any"]
    destination_addresses = ["192.168.0.0/16"]
    applications          = ["any"]
    services              = ["application-default"]
    categories            = ["any"]
    action                = "allow"
  }
}

vmseries_b = {
  outside_interface = {
    name        = "ethernet1/1"
    ip          = ["172.16.0.11/24"]
    description = "Configured by Terraform"
  }
  inside_interface = {
    name        = "ethernet1/2"
    ip          = ["192.168.2.10/24"]
    description = "Configured by Terraform"
  }
  inside_zone  = "INSIDE"
  outside_zone = "OUTSIDE"
  vr_name      = "VR-MAIN"
  static_route = {
    name        = "DEFAULT-ROUTE"
    destination = "0.0.0.0/0"
    next_hop    = "172.16.0.10"
  }
  policy = {
    name                  = "ALLOW-TRAFFIC"
    source_zones          = ["any"]
    source_addresses      = ["192.168.0.0/16"]
    source_users          = ["any"]
    destination_zones     = ["any"]
    destination_addresses = ["192.168.0.0/16"]
    applications          = ["any"]
    services              = ["application-default"]
    categories            = ["any"]
    action                = "allow"
  }
}
Now that we have all our necessary files, we can try a dry run of the resource creation by using terraform plan (note: most output is omitted as it can get very lengthy):
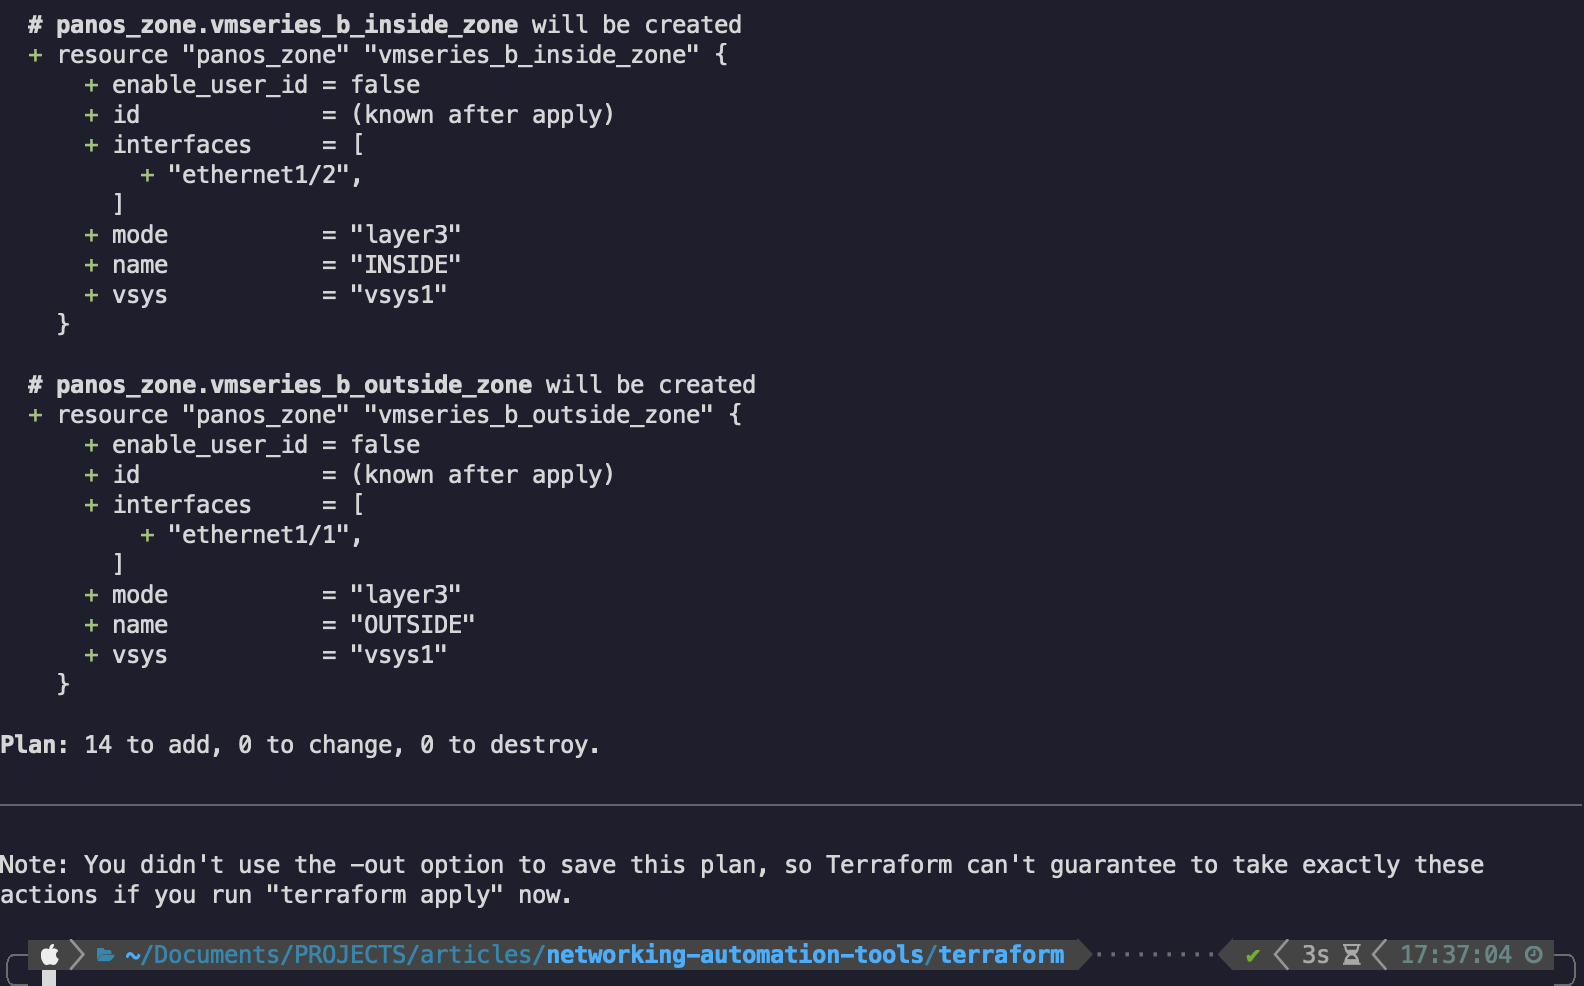
If the configuration is valid, we will see an estimated amount of resources that are created, changed and destroyed.
Since it’s a greenfield environment, it’s normal to see only created resources in the plan output.
Since the dry run is successful which means that our code should be valid - we can apply that code and create the resources:
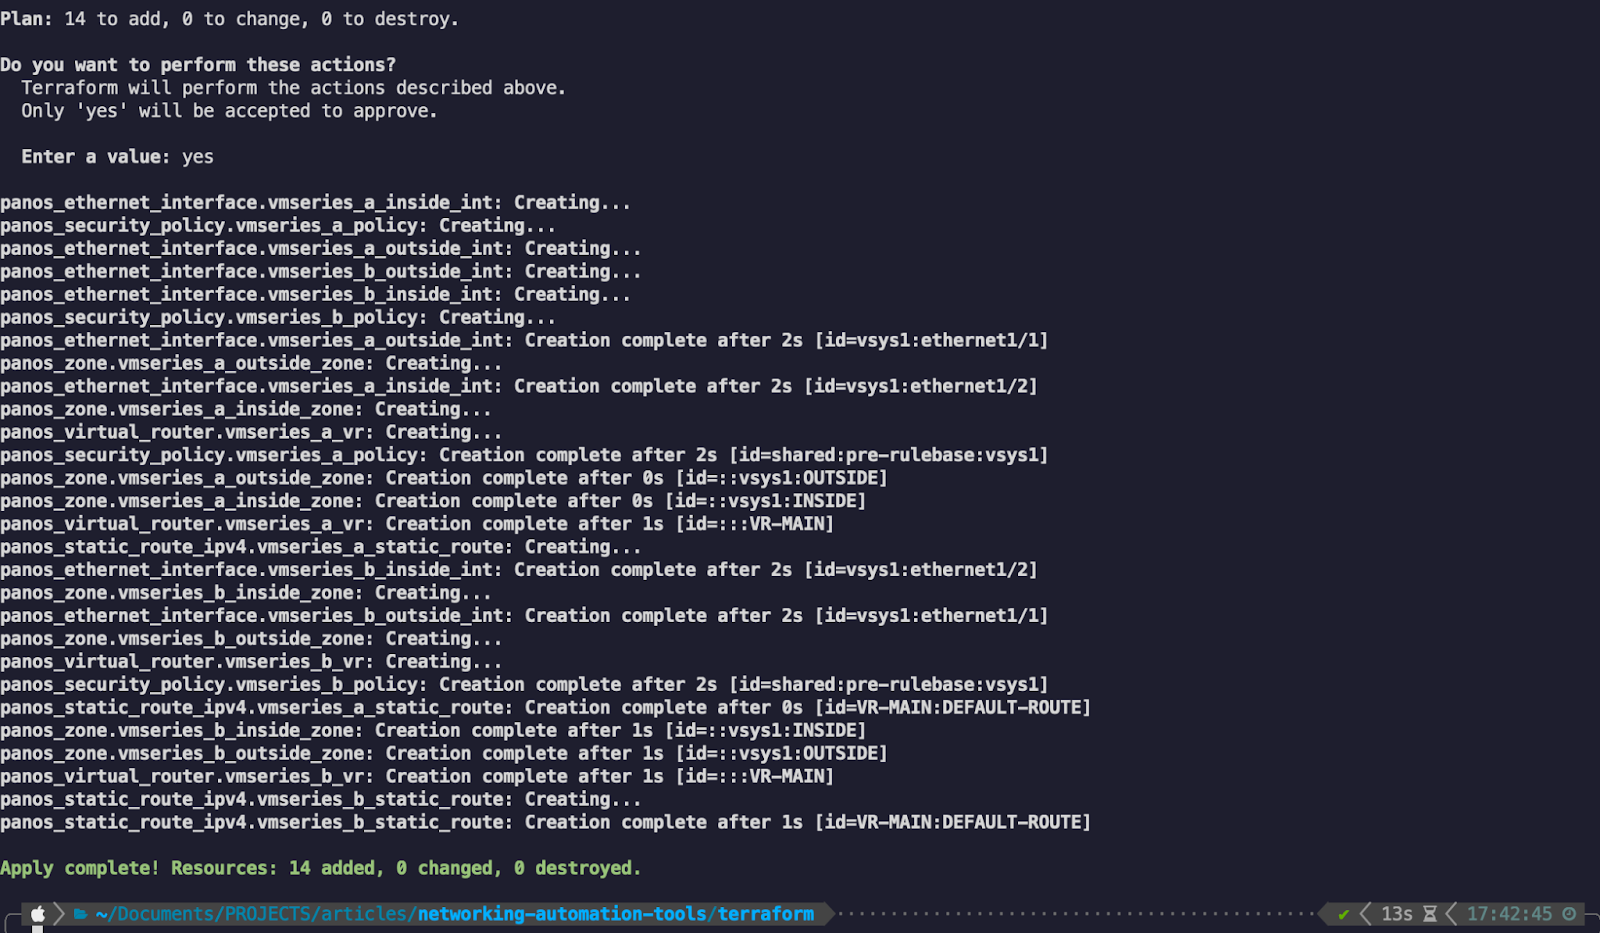
The application is successful and our resources are now created.
Note: Unfortunately you cannot also commit the changes using the Terraform provider. In that regard, the last step of actually committing the changes will be achieved by triggering an API call to apply the commit:
curl --insecure -X GET "https://A.A.A.A/api/?key=$VMSERIES_A_API_KEY&type=commit&cmd=<commit></commit>"

curl --insecure -X GET "https://B.B.B.B/api/?key=$VMSERIES_A_API_KEY&type=commit&cmd=<commit></commit>"

# Note:
$VMSERIES_A_API_KEY and $VMSERIES_B_API_KEY are environment variables that store the API key for the respective VMSeries
In order to obtain the API keys - you can grab them using the following API call:
curl -H "Content-Type: application/x-www-form-urlencoded" -X POST https://firewall/api/?type=keygen -d 'user=<user>&password=<password>'
In this scenario ‘--insecure’ is used along with CURL to bypass the certificate validation. In normal circumstances this option should NOT be used and the certificate presented by the devices should be a valid one!
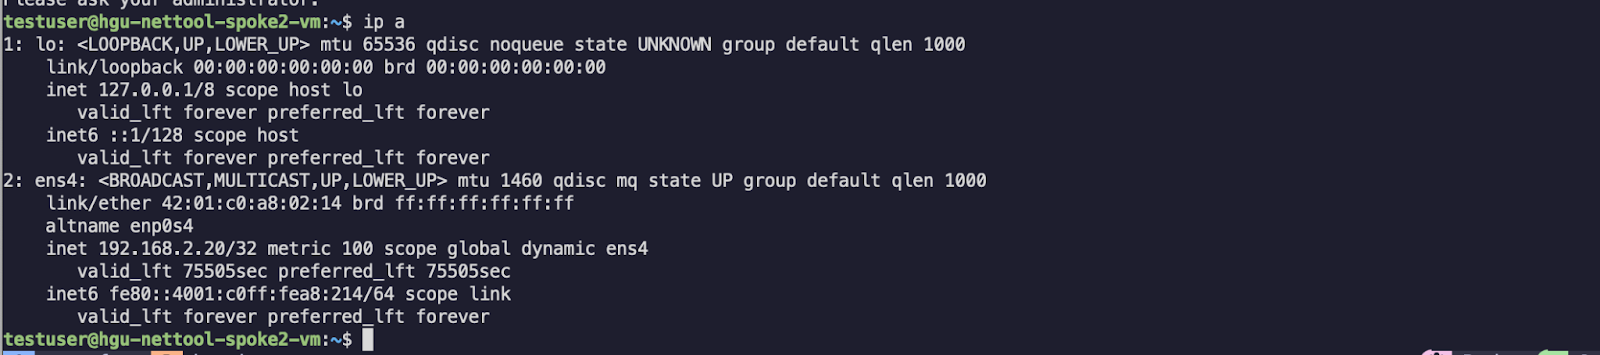
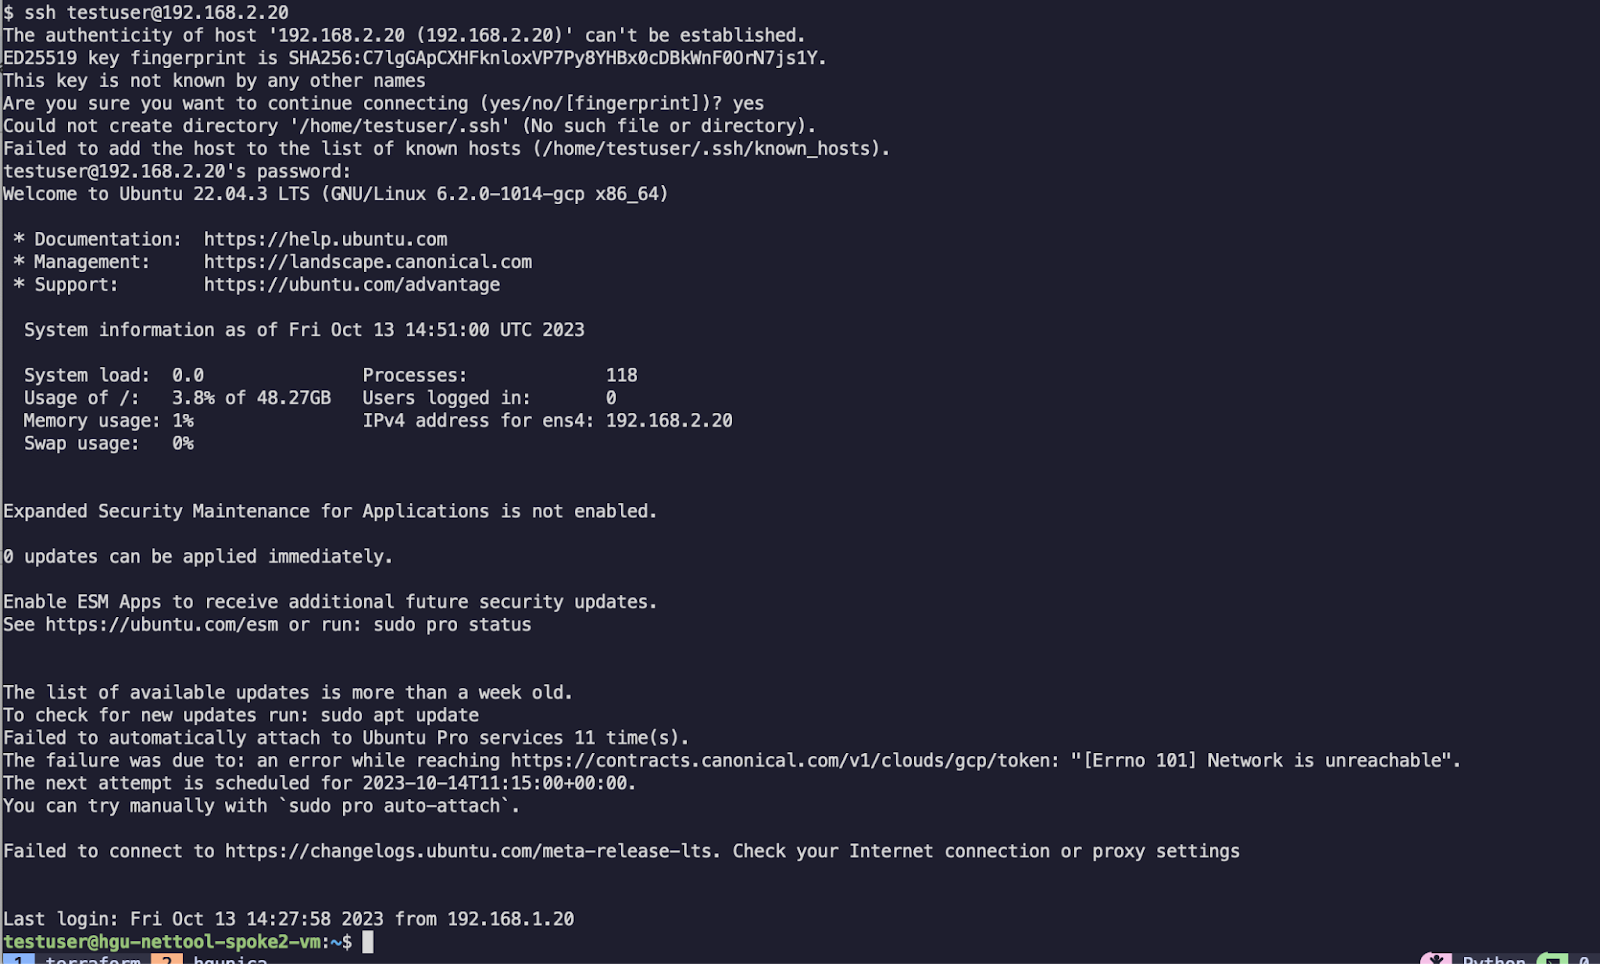
Now we can check our connectivity once again:

We can also briefly check our configurations and logs as well:


The traffic is working once again - as expected.
Before we turn to our third and final network automation tool for this article, we can quickly make use of the beauty of Terraform’s statefulness to destroy/clean up the environment:
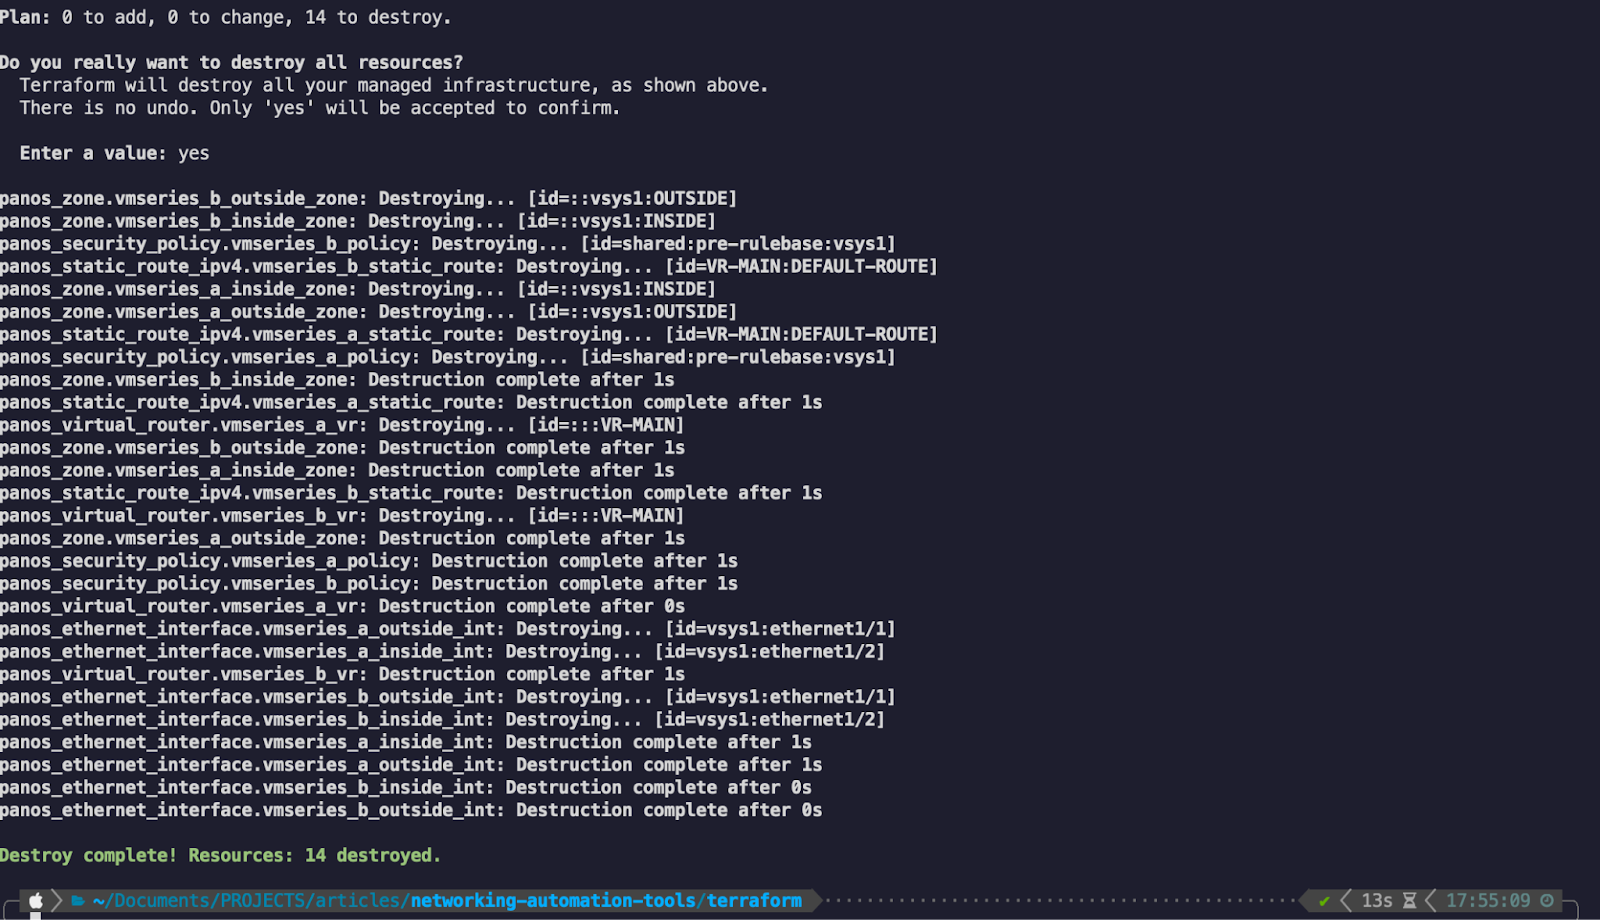
And just like that, along with the two commit commands, our configuration has been cleaned up and is ready to start anew.
Having journeyed through the intricacies of Terraform, we can now try to answer some questions about it’s quality and performance:
| Automation tool | Ease of instalation | Ease of development | Available information | Learning curve | Versatility | Scalability | Statefulness |
|---|---|---|---|---|---|---|---|
| Ansible | Easy | Easy | Plenty | Shallow | High | High | None* |
| Terraform | Easy | Easy | Plenty | Shallow | Medium | Medium | Included |
| Python SDK |
Terraform is an incredibly useful tool for infrastructure as a code. Its syntax is pretty simple to pick up and its large community allows developers to constantly contribute with new modules, providers and projects!
One of the major advantages of Terraform remains its stateful nature and out of the box support for full life cycle, stateful CRUD operations.
Python SDK
When it comes down to managing network automation, Python is not an automation tool in itself. Python is a high-level, versatile, and interpreted programming language known for its simplicity, readability, and broad range of applications.
Since Python is a programming language it sits at a much lower level of abstraction compared to our previously described network automation tools. In this sense, it has both advantages and disadvantages. While we do not have any of the out of the box features that dedicated automation and orchestration tools offer, we do have the flexibility to mold the automation process however we want and to match any use case no matter how complex it might be…as long as we do the necessary development.
There isn’t really a high-level architecture to show for Python since we will simply be using the open-source SDK known as PAN-OS Python ![]() to obtain what we desire.
to obtain what we desire.
The installation process is almost identical to Ansible without the additional steps:
- Install Python at the OS level
- Use Poetry to install the pan-os-python dependency
Once that is done, we just need to start development!
### configure-fws.py ###

import panos
import os
import panos.firewall
import panos.network
import panos.policies


VMSERIES_A = {
    "ip" : "A.A.A.A", # Replace this value with VM-Series A MGMT IP
    "outside_interface" : {
        "name" : "ethernet1/1",
        "ip" : "172.16.0.10/24",
        "zone" : "OUTSIDE",
        "description" : "Configured via Python SDK"
    },
    "inside_interface" : {
        "name" : "ethernet1/2",
        "ip" : "192.168.1.10/24",
        "zone" : "INSIDE",
        "description" : "Configured via Python SDK"
    },
    "vr_name" : "VR-MAIN",
    "static_route" : {
        "name" : "DEFAULT-ROUTE",
        "destination" : "0.0.0.0/0",
        "next_hop" : "172.16.0.11"
    },
    "security_policy" : {
        "name" : "ALLOW-TRAFFIC",
        "source_zones" : ["any"],
        "source_addresses" : ["192.168.0.0/16"],
        "source_users" : ["any"],
        "destination_zones" : ["any"],
        "destination_addresses" : ["192.168.0.0/16"],
        "applications" : ["any"],
        "services" : ["application-default"],
        "categories" : ["any"],
        "action" : "allow",
    }
}

VMSERIES_B = {
    "ip" : "B.B.B.B",# Replace this value with VM-Series B MGMT IP
    "outside_interface" : {
        "name" : "ethernet1/1",
        "ip" : "172.16.0.11/24",
        "zone" : "OUTSIDE",
        "description" : "Configured via Python SDK"
    },
    "inside_interface" : {
        "name" : "ethernet1/2",
        "ip" : "192.168.2.10/24",
        "zone" : "INSIDE",
        "description" : "Configured via Python SDK"
    },
    "vr_name" : "VR-MAIN",
    "static_route" : {
        "name" : "DEFAULT-ROUTE",
        "destination" : "0.0.0.0/0",
        "next_hop" : "172.16.0.10"
    },
    "security_policy" : {
        "name" : "ALLOW-TRAFFIC",
        "source_zones" : ["any"],
        "source_addresses" : ["192.168.0.0/16"],
        "source_users" : ["any"],
        "destination_zones" : ["any"],
        "destination_addresses" : ["192.168.0.0/16"],
        "applications" : ["any"],
        "services" : ["application-default"],
        "categories" : ["any"],
        "action" : "allow",
    }
}
PANOS_USERNAME = os.environ.get('PANOS_USERNAME')
PANOS_PASSWORD = os.environ.get('PANOS_PASSWORD')

def main():

    vmseries_a = panos.firewall.Firewall(VMSERIES_A["ip"], PANOS_USERNAME, PANOS_PASSWORD)
    vmseries_b = panos.firewall.Firewall(VMSERIES_B["ip"], PANOS_USERNAME, PANOS_PASSWORD)

    vmseries_a_objects = []
    vmseries_b_objects = []

    print("Firewall VMSERIES_A system info: {0}".format(vmseries_a.refresh_system_info()))
    print("Firewall VMSERIES_B system info: {0}".format(vmseries_b.refresh_system_info()))

    print("\nConfiguring Interfaces...\n")
    vmseries_a_objects.append(panos.network.EthernetInterface(name = VMSERIES_A["outside_interface"]["name"], mode="layer3", ip=VMSERIES_A["outside_interface"]["ip"], comment=VMSERIES_A["outside_interface"]["description"]))
    vmseries_a_objects.append(panos.network.EthernetInterface(name = VMSERIES_A["inside_interface"]["name"], mode="layer3", ip=VMSERIES_A["inside_interface"]["ip"], comment=VMSERIES_A["inside_interface"]["description"]))

    vmseries_b_objects.append(panos.network.EthernetInterface(name = VMSERIES_B["outside_interface"]["name"], mode="layer3", ip=VMSERIES_B["outside_interface"]["ip"], comment=VMSERIES_B["outside_interface"]["description"]))
    vmseries_b_objects.append(panos.network.EthernetInterface(name = VMSERIES_B["inside_interface"]["name"], mode="layer3", ip=VMSERIES_B["inside_interface"]["ip"], comment=VMSERIES_B["inside_interface"]["description"]))

    print("\nConfiguring Zones...\n")
    vmseries_a_objects.append(panos.network.Zone(name=VMSERIES_A["outside_interface"]["zone"], mode="layer3", interface=[VMSERIES_A["outside_interface"]["name"]]))
    vmseries_a_objects.append(panos.network.Zone(name=VMSERIES_A["inside_interface"]["zone"], mode="layer3", interface=[VMSERIES_A["inside_interface"]["name"]]))

    vmseries_b_objects.append(panos.network.Zone(name=VMSERIES_B["outside_interface"]["zone"], mode="layer3", interface=[VMSERIES_B["outside_interface"]["name"]]))
    vmseries_b_objects.append(panos.network.Zone(name=VMSERIES_B["inside_interface"]["zone"], mode="layer3", interface=[VMSERIES_B["inside_interface"]["name"]]))

    print("\nConfiguring VR...\n")
    vmseries_a_vr = panos.network.VirtualRouter(name=VMSERIES_A["vr_name"], interface=[VMSERIES_A["outside_interface"]["name"], VMSERIES_A["inside_interface"]["name"]])
    vmseries_b_vr = panos.network.VirtualRouter(name=VMSERIES_B["vr_name"], interface=[VMSERIES_B["outside_interface"]["name"], VMSERIES_B["inside_interface"]["name"]])
    vmseries_a_objects.append(vmseries_a_vr)
    vmseries_b_objects.append(vmseries_b_vr)

    print("\nConfiguring static routes...\n")
    vmseries_a_default_route = panos.network.StaticRoute(name=VMSERIES_A["static_route"]["name"], destination=VMSERIES_A["static_route"]["destination"], nexthop_type="ip-address",nexthop=VMSERIES_A["static_route"]["next_hop"])
    vmseries_b_default_route = panos.network.StaticRoute(name=VMSERIES_B["static_route"]["name"], destination=VMSERIES_B["static_route"]["destination"], nexthop_type="ip-address",nexthop=VMSERIES_B["static_route"]["next_hop"])

    vmseries_a_vr.add(vmseries_a_default_route)
    vmseries_b_vr.add(vmseries_b_default_route)

    print("\nConfiguring Security Policies...\n")
    vmsereis_a_rulebase = panos.policies.Rulebase()
    vmsereis_b_rulebase = panos.policies.Rulebase()

    vmsereis_a_rulebase.add(panos.policies.SecurityRule(
        name=VMSERIES_A["security_policy"]["name"],
        fromzone=VMSERIES_A["security_policy"]["source_zones"],
        tozone=VMSERIES_A["security_policy"]["destination_zones"],
        source=VMSERIES_A["security_policy"]["source_addresses"],
        source_user=VMSERIES_A["security_policy"]["source_users"],
        destination=VMSERIES_A["security_policy"]["destination_addresses"],
        application=VMSERIES_A["security_policy"]["applications"],
        service=VMSERIES_A["security_policy"]["services"],
        action=VMSERIES_A["security_policy"]["action"],
        type="universal",
        ))
    vmseries_a_objects.append(vmsereis_a_rulebase)


    vmsereis_b_rulebase.add(panos.policies.SecurityRule(
        name=VMSERIES_B["security_policy"]["name"],
        fromzone=VMSERIES_B["security_policy"]["source_zones"],
        tozone=VMSERIES_B["security_policy"]["destination_zones"],
        source=VMSERIES_B["security_policy"]["source_addresses"],
        source_user=VMSERIES_B["security_policy"]["source_users"],
        destination=VMSERIES_B["security_policy"]["destination_addresses"],
        application=VMSERIES_B["security_policy"]["applications"],
        service=VMSERIES_B["security_policy"]["services"],
        action=VMSERIES_B["security_policy"]["action"],
        type="universal",
        ))
    vmseries_b_objects.append(vmsereis_b_rulebase)

    print("\nAdd objects...\n")
    for item in vmseries_a_objects:
        vmseries_a.add(item)
        item.create()

    for item in vmseries_b_objects:
        vmseries_b.add(item)
        item.create()

    print("\nCommitting configuration...\n")
    vmseries_a.commit()
    vmseries_b.commit()

if __name__ == "__main__":
    main()
Remember that this is a very basic usage of the PAN-OS Python SDK. There is no error handling, no advanced looping mechanisms, etc. and we assume that the provided input is 100% correct.
Within the script, we are spawning two objects - one for each VM-Series. After that, we also create other objects for each configuration item required - each interface, zone, VR, etc. on a per-firewall basis.
In order to maintain some flexibility, the information for each VM-Series configuration data is passed from a dictionary that acts as a descriptor for the desired firewall configuration.
The last part of the script glues together all of the configuration objects for each VM-Series and then commits the configurations of the firewalls.
What remains now is just to run the script and then check the configurations.
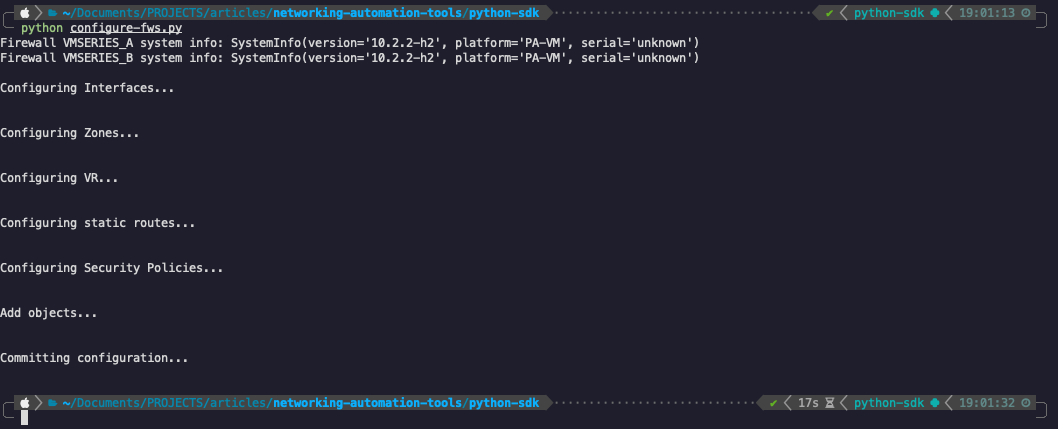


As also expected in Python’s case, our configuration was a success and connectivity between the two spokes is working without issues.
Let’s now outline the last of our network automation tools within the metrics table:
| Automation tool | Ease of instalation | Ease of development | Available information | Learning curve | Versatility | Scalability | Statefulness |
|---|---|---|---|---|---|---|---|
| Ansible | Easy | Easy | Plenty | Shallow | High | High | None* |
| Terraform | Easy | Easy | Plenty | Shallow | Medium | Medium | Included |
| Python SDK | Easy | Medium | Plenty* | Steep | High | High | None* |
*The available information in case of python is highly dependent on the SDK provider documentation and not strictly related to python itself.
Python is by all means an excellent tool that can be used when it comes to network automation. You can find an abundance of information on the Internet (a lot of it is free!) but when it comes to the SDK itself, that highly depends on the developer of the SDK. Fortunately in our case, Palo Alto’s pan-on Python SDK is very well documented.
Given that Python is a programming language and not an out of the box automation product, you need to be aware that it will require at least some basic programming knowledge to work with - most of the SDKs out there require object oriented programming (OOP) knowledge in order to be able to consume them.
There is no embedded statefulness mechanism in Python but you may very well build your own, maybe using an external database or just writing to disk files directly.
There is one thing that makes Python stand out when using it as an automation tool compared to the other two previously discussed options and that is flexibility! Since it sits at a lower level of abstraction, you can achieve goals that would be impossible for Terraform or for Ansible - the possibilities are literally endless. There is one big caveat to this, of course, and that is the time and effort you need to put into developing all of these features that need to be tailored to your needs.
In the end, it's a question of time and effort versus constrained features.
Check out our other related articles:
- Ansible vs. Terraform in networks: similarities and differences
- Python Paramiko and Netmiko for automation
- Python Nornir for simplifying network automation: code examples
- Configuration as Code — moving in the right direction


Performance
Let’s have a quick look at the performance KPI for each tool. In order to facilitate this, we’ll be using each tool to deploy 100 objects (of type IP-Address-netmask) on a single Palo Alto VMSeries and measuring the execution time. Note that this will be done without actually committing the changes - that step is omitted from this step for brevity’s sake.
Important Note: the following tests are relatively straightforward, without the implementation of major tweaking for each of the tool’s performance parameters. Please refrain from regarding the ensuing metrics as a benchmark for the tools’ inherent speed given the simplistic nature of the test conditions. The performance is also directly tied to the practical execution of the underlying modules that the tools use. The primary objective of these tests is to provide an overview of the high-level deployment time values.
Ansible:
---
- hosts: vmseries-a
  vars_files: credentials.yml
  connection: local
  gather_facts: false

  tasks:

    - name: Configure bulk addresses
      paloaltonetworks.panos.panos_address_object:
        provider: "{{ provider }}"
        name: "test-address-{{ item }}"
        address_type: "ip-netmask"
        value: "1.1.1.{{ item }}"
      loop: "{{ range(1, 101) | list }}"
      loop_control:
        loop_var: item
      async: 100
      poll: 0

# Note - we also need to set these settings in the ‘ansible.cfg’ configuration file:

[defaults]
callbacks_enabled = profile_tasks, timer
Total time: 30 seconds

Terraform:
resource "panos_address_object" "example" {
    provider = panos.panos-vmseries-a

    count = 100
    name = "test-address-${count.index + 1}"
    value = "1.1.1.${count.index + 1}"
    type = "ip-netmask"
    lifecycle {
        create_before_destroy = true
    }
}
Total time: 17 seconds

Python SDK:
import datetime
import panos
import os
import panos.firewall
import panos.objects


VMSERIES_A = {
    "ip" : "A.A.A.A",
}

PANOS_USERNAME = os.environ.get('PANOS_USERNAME')
PANOS_PASSWORD = os.environ.get('PANOS_PASSWORD')

def main():
    start = datetime.datetime.now()
    vmseries_a = panos.firewall.Firewall(VMSERIES_A["ip"], PANOS_USERNAME, PANOS_PASSWORD)

    vmseries_a_objects = []

    print("\nConfiguring Objects...\n")
    for fw_object in range(1, 101):
        created_object = panos.objects.AddressObject(name = f'test-address-{fw_object}', value = f'1.1.1.{fw_object}', type='ip-netmask')
        vmseries_a_objects.append(created_object)

    print("\nAdd objects...\n")
    for item in vmseries_a_objects:
        vmseries_a.add(item)
    vmseries_a.find('test-address-1').create_similar()

    print("\nTotal execution time was: " + str(datetime.datetime.now() - start))
if __name__ == "__main__":
    main()
Total time: 1.7 seconds

Finally, to our original metrics table we can also add this performance test result from the bulk creation of 100 objects:
| Automation tool | Ease of instalation | Ease of development | Available information | Learning curve | Versatility | Scalability | Statefulness | Bulk Creation Performance Test |
|---|---|---|---|---|---|---|---|---|
| Ansible | Easy | Easy | Plenty | Shallow | High | High | None* | 30s |
| Terraform | Easy | Easy | Plenty | Shallow | Medium | Medium | Included | 17s |
| Python SDK | Easy | Medium | Plenty* | Steep | High | High | None* | 1.7s |
Notes:
- For Ansible we made use of an async action so that it runs each iteration in the for loop without blocking the next one. This is not the default method for Ansible - the default method is synchronous - but for this performance case that would take up to approximately five minutes to configure all of the objects.
- For Python we did make use of the bulk creation enhancement offered by the create_similar() method.
Which network automation tools should you choose?
The choice of the right tool depends on various factors, including the complexity of the network environment and the expertise of the automation team. It’s important to note that no tool will be perfect - they all come with their own advantages and disadvantages.
Ansible is a versatile automation tool known for its ease of use and versatility. It simplifies configuration management, application deployment, and task automation. However, it lacks built-in statefulness, which may limit its ability to manage the full life cycle of resources effectively.
Terraform, on the other hand, is a powerful infrastructure as code (IaC) tool that excels in managing cloud infrastructure and network appliances. It offers statefulness, making it highly effective for full CRUD operations. Terraform's syntax is straightforward, and its nature encourages a vibrant community with a wealth of available information and modules.
Python, while not an automation tool itself, provides the utmost flexibility for network automation. It allows developers to create customized network automation solutions tailored to their specific needs. The PAN-OS Python SDK is an excellent resource for managing Palo Alto Networks devices. However, Python requires programming expertise and lacks embedded statefulness, which may necessitate building custom state management.
It is essential to bear in mind that there is no universally versatile tool available, and many situations necessitate a combination of various network automation tools.
Watch a video that offers practical insights and innovative approaches to complex network firewall upgrades through a real-world case study on automation:
Conclusion
In conclusion, each tool serves a unique purpose and offers its own set of advantages and disadvantages. Ansible is a great choice for deploying configuration on a large number of network devices, while Terraform’s strength lies in managing infrastructure as code with statefulness. Python offers unparalleled flexibility but requires programming skills.
Ultimately, the effectiveness of each tool is influenced by the specific requirements and goals of the automation project. It's crucial to evaluate ease of installation, development, available information, learning curve, flexibility, scalability, and statefulness when choosing the ideal network automation tool for a given scenario.


