


Manual management and configuration can quickly become overwhelming and time-consuming. Whether we talk about deploying configurations, running commands across devices, or collecting and analysing traffic data, there is always a need to automate repetitive tasks, improve network scalability, and enhance overall efficiency.
Let’s imagine someone is facing the daunting task of updating login banners on numerous Cisco devices or gathering essential data through a single show command. Many engineers can wonder about the most efficient methods to accomplish these objectives. One of the possible solutions is Nornir, a powerful network automation framework that offers a range of features designed to simplify and improve network management.
In this article, we will delve into the core aspects of Nornir, like defining its characteristics and capabilities, and explore Nornir plugins that seamlessly integrate with various network devices and platforms.
In the final text parts, you will find the Nornir installation and requirements walkthrough and a practical example illustrating how it simplifies complex network management tasks.
What is Nornir
Nornir is an automation framework. It was built with the goal of allowing multi-threaded task execution without using a DSL (domain-specific language). For example in Ansible you need to write playbooks in .yaml format. Nornir is built with Python and designed to be used with Python.

Read more about how to increase your network efficiency and reliability by incorporating automation:
- Network automation tools comparison in code examples: Terraform, Ansible, and Python SDK
- Python Paramiko and Netmiko for automation
Characteristics of Nornir
- Ability to run tasks concurrently
In Nornir terminology, a task is an action to be executed on a single device. Nornir is multi-threaded – multiple tasks can be executed at the same time, each one on a different end device. Nornir can keep track of each task and its result.
- The result of a task on one device does not affect results on another
It’s possible to define multiple tasks for multiple end devices and their execution is independent of each other.
- Built-in logger to see what happened during task execution
In case of a task failure there is information about the reason for the failure.
- Built-in inventory management to define hosts on which tasks should be executed
It is possible to group hosts in the inventory and create a task that runs only on a specific group.
- Easily extended with custom plugins
More information about Nornir plugins will be covered below.
- Easy to start
Only a basic knowledge of Python is required and very few dependencies exist.
Nornir plugins
Nornir as an automation framework by itself does not have functionalities allowing it to communicate with network devices in multi-vendor environment. It needs plugins, created both by Nornir developers and community, to do that. This way Nornir installation can stay small, since only the core and needed plugins should be installed. Examples of plugins are:
- nornir_napalm - allows interaction with Juniper and Cisco devices using the napalm library,
- nornir_netmiko - makes it easy to interact with network devices from multiple vendors,
- nornir_f5 - to interact with f5 devices.
A list of all plugins can be found here ![]() .
.
Each plugin is a separate piece of code. Extending Nornir with plugins allows it to be smaller and easier to manage. When starting with Nornir all you need to do is install the core and the dedicated plugin(s) to achieve a specific goal. For example, there is no need to install plugins for f5 if you want to configure Juniper devices.
Each plugin is managed separately and they may have different levels of support and code quality.
In our examples later in this article, netmiko will be used to configure Cisco IOS routers.
Nornir inventory
The Nornir inventory defines hosts on which tasks are executed. It allows for grouping hosts together and running tasks on a group of hosts.
There are multiple plugins to help manage the inventory; a few examples:
- SimpleInventory – built into Nornir, this stores hosts and group information in .yaml files.
- nornir_ansible – allows using Ansible inventories with Nornir. If you already have an Ansible inventory with hosts, using this plugin allows it to be reused.
- nornir-sql – useful if hosts are stored in a database,
- nornir_csv – similar to SimpleInventory, but allows using CSV instead of .yaml files.
Nornir installation and requirements walkthrough
To run Nornir you need to have Python version 3.7 or higher. Examples in this article are created using Python 3.11. To install all requirements pip is also needed. PIP is the package installer for Python and it should come with Python installation.
The first step is to create a virtual environment with Python, where all dependencies will be installed.
python -m venv .nornir_venv
Next step is activating the environment and installing the Nornir and netmiko (in our case, but this is dependent on what you want to configure) plugin from the requirements file.
To do that and access the virtual environment use the following commands:
Windows:
.\.nornir_venv\Scripts\activate
Linux:
source ./.nornir_venv/bin/activate
Requirements can be installed from the requirements.txt file that is provided below. It contains all required dependencies to run Nornir.
requirements.txt:
bcrypt==4.0.1
cffi==1.15.1
colorama==0.4.6
cryptography==40.0.1
future==0.18.3
mypy-extensions==0.4.4
netmiko==4.1.2
nornir==3.3.0
nornir-netmiko==1.0.0
nornir-utils==0.2.0
ntc-templates==3.3.0
paramiko==3.1.0
pycparser==2.21
PyNaCl==1.5.0
pyserial==3.5
PyYAML==6.0
ruamel.yaml==0.17.21
scp==0.14.5
six==1.16.0
tenacity==8.2.2
textfsm==1.1.2
typing_extensions==4.5.0
Below command install all packages found in requirements.txt.
pip install -r requirements.txt
Nornir inventory - SimpleInventory example
We have mentioned above, that the inventory can also be managed by plugins. In this blog Simplelnventory will be used as an example of an inventory plugin.
There are three files that need to be created for the SimpleInventory plugin:
- hosts.yaml – stores information about hosts, for example the hostname, the group it belongs to, and variables,
- groups.yaml – stores information about groups and their variables,
- defaults.yaml – stores default values for all hosts. If there is a value that is the same for all hosts it should be stored in this file.
By default, each file should be added to the inventory folder. The most basic folder structure when using SimpleInventory is:
-
Main Nornir project folder
-
Inventory
- hosts.yaml
- groups.yaml
- defaults.yam
-
nornir_script.py
-
Below are examples of host files that will be used in our examples:
# hosts file
There are three routers defined: router_1 and router_2 belong to site_1 and are dmz types, while router_3 belongs to site_2 and is a wan type.
---
router_1:
  hostname: 192.168.0.83
  port: 22
  groups:
   - site_1
  data:
    type: dmz
router_2:
  hostname:  192.168.0.32
  groups:
   - site_1
  data:
      type: dmz
router_3:
  hostname: 192.168.0.254
  groups:
    - site_2
  data:
      type: wan
# groups file
There are three groups: global, site_1 and site_2. Global contains both of the site groups. It's possible to filter the hosts during script execution and run Nornir only against hosts in a specific group. In data you can specify values that are shared in the group. For example, if you want to create a script that updates the NTP server on all hosts, but each site should have a dedicated NTP, this setting can be configured in the group file. More specific data always overwrites less specific. In the below example, site_1 is going to use its own dedicated NTP server, while site_2 is going to use an NTP server defined under a global group.
---
global:
    groups:
     - site_1
     - site_2
    data:
      ntp: 3.3.3.3
site_1:
    data:
      ntp: 1.1.1.1
site_2:
    data:
      ntp: 2.2.2.2
# defaults file
This stores default values that are shared between hosts. They are overwritten by host-specific variables. If the username, password and optional enable secret is the same between the hosts those values can be stored in the defaults file, as in this example.
---
 username: admin
 password: admin
 platform: ios
 port: 22
 connection_options:
   netmiko:
     extras:
      secret: admin
Inheritance is built into the Nornir inventory. When running a task on a host it’s possible to automatically access variables from the group it belongs to and variables defined on the host level take precedence over those defined on the group level.
Nornir task example
Initiating Nornir
Below is a python script with an example of Nornir initialization. We called it nornir_script.py.
from nornir import InitNornir
from nornir.core.task import Result, Task
from nornir_netmiko.tasks import netmiko_send_command, netmiko_send_config
from nornir_utils.plugins.functions import print_result

nr = InitNornir(
      config_file='nornir_config.yaml'
)
The first step when creating a script using Nornir is to import the necessary libraries and initialise them with InitNornir. Nornir_config.yaml is the file that contains the settings for Nornir. In our example it has information about the inventory plugin, references to inventory files and the number of workers (threads) that can be executed at the same time. Configuration can also be added in nornir_script.py as a Python variable, but having it in the dedicated file makes it easier to read and modify.
Nornir_config.yaml
---
inventory:
  plugin: SimpleInventory
  options:
    host_file: "inventory/hosts.yaml"
    group_file: "inventory/groups.yaml"
defaults_file: "inventory/defaults.yaml"
runner:
  plugin: threaded
  options:
    num_workers: 10
Accessing inventory
To make sure that all libraries are installed correctly and Nornir works, a simple print is sufficient. If everything works you will be able to see printed information about all hosts in the inventory. Extend nornir_script.py with the print. norni_script.py should look something like this after modification (imports are stay the same, it were omitted to show only modification):
nr = InitNornir(
config_file='nornir_config.yaml'
)
print(nr.inventory.hosts)
A Nornir script can be executed with python nornir_script.py and below is the result of the execution.
python nornir_script.py

{'router_1': Host: router_1, 'router_2': Host: router_2, 'router_3': Host: router_3}
Executing simple show command on multiple hosts
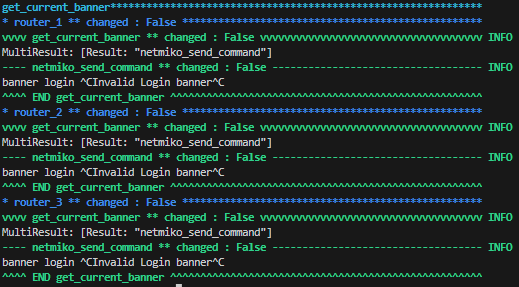
To run a single show command, the function get_current_banner function is added to the script and print_results presents all results on the screen.
def get_current_banner(task: Task) -> Result:
    output = task.run(netmiko_send_command, command_string='show running-config | i banner' )
    return Result(host=task.host, result=output)

output = nr.run(task=get_current_banner)
print_result(output)
In this example, netmiko_send_command plugin was used to run the command 'show running-config | i banner' on all hosts in the inventory. The function get_current_banner returns a Result object that contains information about the result of the command for each host; nr.run is used to define which tasks should be executed.
Below is the output of the result. The single task get_current_banner was executed on three routers and all three runs were successful. There is an output of the command presented. On all three routers, the banner login ^CInvalidLogin banner^C is configured. Netmiko takes care of parsing and removing unnecessary data for example prompts or empty lines. It has the ability to recognize when the output of a command ends. It's also able to log in to the device with provided credentials and can access the enable mode on Cisco Router.
Executing configuration change on multiple hosts
Below is a code that deletes the existing banner and creates a new one on each host. Each function is explained in more detail later.
def delete_banner(task: Task) -> Result:
    output = task.run(netmiko_send_config, config_commands=\['no banner login'])
    return Result(host=task.host, result=output)

def configure_banner(task: Task, delete_banner_result: Result, valid_banner: str) -> Result:
    if delete_banner_result.changed is True:
        output = task.run(task=netmiko_send_config, config_commands=\[f'banner login {valid_banner}'])
        return Result(host=task.host, result=output)

def main_task(task: Task) -> Result:
    valid_banner = f'You are logging into {task.host}. YOU ARE ACCESSING A RESTRICTED SYSTEM'
    delete_banner_result = task.run(delete_banner)
    task.run(configure_banner, delete_banner_result=delete_banner_result, valid_banner=valid_banner)

output = nr.run(task=main_task)
print_result(output)
In this case the code is a little bit more complicated. This time nr.run is not executing each task directly, but is using the function main_task to group specific tasks together. In this case main_task calls delete_banner and configure_banner. To make sure that actions taken by the script are logical, the configuration of the banner is executed only if the banner was successfully deleted. It's achieved by passing the result delete_banner as a parameter to configure_banner and checking if the property changed is set to True.
The plugin netmiko_sends_config is able by itself to access the configuration mode. There is no need to type conf t to access it. In each configuration task only configuration commands need to be defined.
In the main_task variable, valid_banner stores the banner that is going to be configured on each host. Thanks to built-in Nornir functionalities, ‘task.host’ will be replaced with the name of the router from the hosts.yaml (router_1, router_2 or router_3). This way, after execution, each router will have its own hostname in the login banner.
This is a very simple example, but because of Nornir’s flexibility it’s possible to store tasks across multiple Python files and with the import create workflows that execute them. Each Nornir project can be easily built from the function defined earlier to achieve a specific goal rather than creating one big workflow covering all possibilities.
Execution of script that modifies the banners provides the below results.
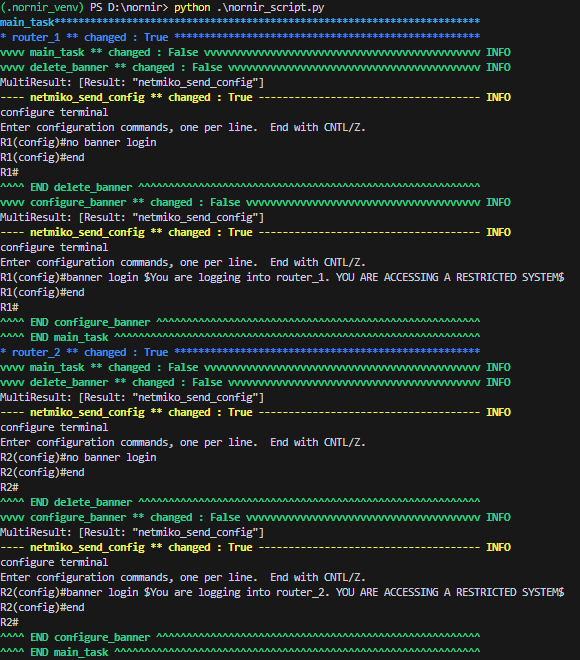
The flow is the same for each router. First, the main_task is executed, next delete_banner is called and the command ‘no banner login’ is run in config mode. The changed True tells us that the config has been successfully changed. After deleting the config, a valid banner is configured. As you can see, for each router the configuration command has a unique hostname.
Filtering hosts
Filtering hosts allows you to define the hosts on which Nornir should be executed. It's very straightforward. To get all hosts in the group ‘site_1’.
site_1 = nr.inventory.children_of_group('site_1')
To filter hosts by value from the hosts' file
wan = nr.filter(type=wan)
This way it’s possible to perform the example site_1.run(task=task_name) and the task will be executed only on filtered hosts.
Handling errors
By default, information about failures and successes are stored in nornir.log. For example, if there is an issue with the network connectivity to the host, netmiko.exceptions.NetmikoTimeoutException is raised, and in the log file there will be tracebacks from the failed execution.
Below is the partial log from a failed run.
netmiko.exceptions.NetmikoTimeoutException: TCP connection to device failed.

Common causes of this problem are:

1. Incorrect hostname or IP address.
2. Wrong TCP port.
3. Intermediate firewall blocking access.

Device settings: cisco_ios 192.168.0.254:22
Nornir - additional information
To keep everything as simple as possible there are few concepts that have been omitted:
- Storing login and password as plain text in the defaults.yaml is not ideal and it should not be done in a production environment.
- In our case, the output of each command is shown on screen. For projects with a larger number of hosts, it’s a good idea to create reports that contain only those values that are useful. In its simplest form, it should be quite straightforward to create Excel spreadsheets containing the host and result of each command with information stating whether it was successful.
- Nornir allows for more advanced hosts filtering than presented above. If there is a need to filter hosts more granularly there is an option to filter based on F object - more information about F object can be found in the documentation
 .
. - The Nornir project can be found here . If you are interested in adding something new to Nornir there is documentation covering how to start contributing to the project.


Summary
With a few lines of code we were able to update banners on several devices. Nornir as an automation framework allows the creation of scripts that are not complex and with built-in multithreading it has good scalability potential. This was just an introduction to Nornir and we hope that it is a useful start for your own network automation. If you want to learn more about Python testing frameworks, read our previous article.


