


Cloud-init is used wherever a Linux/Unix VM needs to configure itself automatically on first boot - no manual or SSH intervention required.
All major cloud platforms (AWS, Azure, GCP, OpenStack) use it as the standard mechanism to inject configuration into new instances at launch. Kubernetes autoscaling uses it to bootstrap new worker nodes - installing the kubelet and joining the cluster before any workloads arrive. CI/CD systems use it to configure ephemeral build agents on the fly. Private clouds (OpenStack, Proxmox) apply it to turn generic VM templates into unique, configured instances. Even network manufacturers (Cisco) use it as configuration bootloader during the first device bootup.
In short: any time a generic image needs to become a ready-to-use machine automatically, cloud-init fills that gap.
For more on automated deployment, see our guide on zero-touch provisioning for network devices.
What is cloud-init?
Cloud-init is the industry-standard, cross-platform tool for bootstrapping cloud virtual machines. It runs automatically during the very first boot of a new instance, reads configuration data from the cloud provider's metadata service, and applies that configuration before the system is handed over to administrators or application workloads.
Cloud-init covers a wide range of setup tasks. The most commonly used capabilities are:
• setting the hostname and locale,
• creating user accounts and injecting SSH public keys,
• writing arbitrary files to disk (configs, scripts, certificates),
• installing and removing packages via the distribution package manager,
• executing shell commands or scripts,
• configuring networking, mount points, and disk layouts,
• running configuration management tools (Ansible, Puppet, Chef).
Project scope
This guide is based on a real-world scenario where a client needed to set up a network consisting of a large number of devices, both virtual and physical.
Originally, the standard configuration approach involved connecting to each device individually via console, telnet, or SSH. This process was significantly time-consuming due to delays caused by terminal response times and corrupted connections. By leveraging cloud-init, we were able to accelerate this process and everything now happens automatically during the first boot. This shift largely eliminated connectivity issues, resulting in fewer connection retries, fewer repeated commands, and less verification repetition.
When to use cloud-init vs. image baking or Ansible
Before diving into the technical setup, it is important to understand where cloud-init fits in your stack:
Cloud-init
Best for "Just-in-Time" customization (hostname, SSH keys, unique IDs) on generic images.
Image Baking (Packer)
Best for immutable infrastructure where boot speed is critical. Install heavy dependencies here, then use cloud-init for the final configuration.
Ansible/Chef
Best for ongoing configuration management. Use cloud-init to "hand off" the VM to your management tool.
How does cloud-init work?
The cloud-init process is divided into several stages: detect, local, network, config and final.
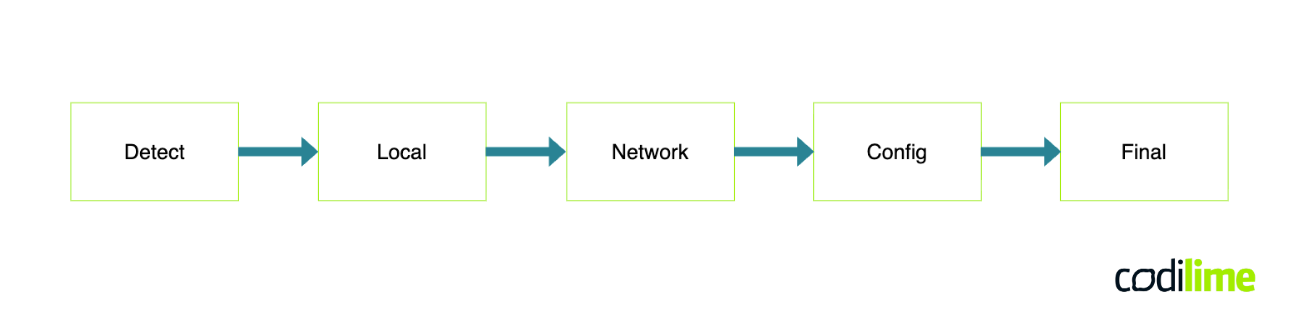
Detect – detects platform on which the instance is running and checks if proper parameters are provided for the cloud-init process to start, otherwise the process is disabled.
Local (cloud-init-local) – gets information about the data source and performs basic network configuration (including clearing persistent values like MAC addresses).
Network (cloud-init-network.service) – runs modules defined under cloud_init_modules listed in the /etc/cloud/cloud.cfg file. This stage starts after the network configuration in the previous step is available.
Config (cloud-config.service) – it simply executes configuration modules that don't affect other parts of the boot process, such as runcmd. Again all modules are listed in the /etc/cloud/cloud.cfg file (e.g.: ntp, runcmd).
Final (cloud-final.service) – runs arbitrary scripts and late-stage commands, e.g.: user-defined scripts, package installation or configuration plugins (Ansible, Chef, etc).
Source files
Cloud-init relies on a set of configuration files that define how an instance should be provisioned. Throughout this article, NoCloud will be used as the data source - a lightweight option that reads configuration directly from local files or attached media, making it ideal for local testing and non-cloud environments. In a standard NoCloud setup, there are four configuration files to be aware of: meta-data, user-data, vendor-data, network-config.
Meta-data
Provides instance identity information like hostname and instance ID. The only mandatory YAML-formatted file (it can be empty, however there is a risk of affecting the results of the cloud-init process).
User-data
Contains the main provisioning instructions such as package installation, user creation, and script execution. There are several different formats to use, the most common one is to put #cloud-config at the beginning of the file YAML-formatted optional file (other formats e.g. Jinja, MIME, Boothook). In the older versions, the user-data was mandatory, so to keep it backward compatible it is recommended to attach the file (even if it is empty).
Network-config
Defines network interface settings, another optional YAML-formatted file. There are two common formats: version 1 (created for cloud-init itself) or version 2 (which is also accepted by Netplan). One important notice is that the network configuration can be provided in several different ways and files beyond the network-config file.
Vendor-data
Allows infrastructure providers to inject additional configuration that runs alongside user-data. Vendor-data is an optional YAML file, most commonly used by public cloud providers to inject provider-specific settings.
With the foundations in place, let's look at five KVM-specific scenarios.
Practical examples
It is time to move on to some practical examples demonstrating how to configure virtual machines on KVM using cloud-init. Each example will include a complete set of configuration files along with their contents.
Example 1 - Create users and enable SSH access
To start with something simple, an official Ubuntu 22.04 image will be used along with a minimal configuration to provision a virtual machine on KVM. This basic setup will assign a hostname, set password for the default user and create a new user with an imported SSH key.
EXECUTION COMMAND:
virt-install --name cloud-init-001 \
--memory 4000 --os-variant ubuntu22.04 \
--disk=size=10,backing_store="$(pwd)/image/ubuntu-22.04-minimal-cloudimg-amd64.img" \
--cloud-init user-data="$(pwd)/user-data",meta-data="$(pwd)/meta-data",network-config="$(pwd)/network-config" \
--network network=default
It is typical command to start VM on KVM server, quick parameter explanation:
virt-install | command to create a VM |
--name … | assign a name on the KVM |
--memory … | configured RAM |
--os-variant … | point out exact image used, it helps KVM to assign proper attributes |
--disk=… | set fixed disk size 10GB and provide the link to the image which will be copied |
--network ... | attach default network to VM adapter |
--cloud-init … | provide the cloud-init configuration files directly deploy process |
META-DATA:
instance-id: ed1a65d5-156a-43a5-97cc-a8e006f6af60
NOTE: Instance-id can be created manually or automatically (ie. echo "instance-id: $(uuidgen)" >> meta-data).
USER-DATA:
#cloud-config
password: password
chpasswd:
  expire: False
ssh_pwauth: True
hostname: cloud-init-001
users:
  - default
  - name: usr1
	shell: /bin/bash
	plain_text_passwd: pass1
	lock_passwd: true
	sudo: ALL=(ALL) NOPASSWD:ALL
	ssh_authorized_keys:
  	- ssh-ed25519 AAAAC3NzaC1lZDI1NTE5AAAAIGExTOh90fASqMKNWfG/DEj3OgFG2xvtGwtyYiMhBU5R usr1@example.com
NOTE: the name of the file can be different, but the very first line has to match #cloud-config.
NETWORK-CONFIG:
__EMPTY__
After a few seconds, the terminal will start displaying consecutive lines related to the machine's boot process. The key step here is to locate the entries related to cloud-init itself. The easiest way to do this is to look for any lines beginning with the cloud-init keyword.
cloud-init[221]: Generating public/private rsa key pair.
cloud-init[221]: Your identification has been saved in /etc/ssh/ssh_host_rsa_key
cloud-init[221]: Your public key has been saved in /etc/ssh/ssh_host_rsa_key.pub
Entries similar to the one shown above indicate that the cloud-init process is available on the image currently in use and that an attempt to configure the host will be made. Once logged into the machine, it is possible to quickly verify whether the cloud-init process is still running or has already been completed, as well as whether any errors have occurred.
# Short version - in progress
ubuntu@cloud-init-001:~$ cloud-init status
status: running

# Short version - complete
ubuntu@cloud-init-001:~$ cloud-init status
status: done
# Long version - in progress
ubuntu@cloud-init-001:~$ cloud-init status --long
status: running
extended_status: running
boot_status_code: enabled-by-generator
last_update: Thu, 01 Jan 1970 (…)
detail: DataSourceNoCloud [seed=dmi,/dev/sr0][dsmode=local]
errors: []
recoverable_errors: {}

# Long version - complete
ubuntu@cloud-init-001:~$ cloud-init status --long
status: done
extended_status: done
boot_status_code: enabled-by-generator
last_update: Thu, 01 Jan 1970 (…)
detail: DataSourceNoCloud [seed=dmi,/dev/sr0][dsmode=local]
errors: []
recoverable_errors: {}
If no errors have been reported, it is time to move on to verify the actual configuration. As a first step, a quick check can be performed to see what IP address the new virtual machine has been assigned.
user@kvm $ virsh net-dhcp-leases default
Expiry Time       	  MAC address     	  Protocol      IP address           Hostname         (…)
--------------------------------------------------------------------------------------------------------------------------
2026-03-29 20:53:35   52:54:00:ae:4b:cf   ipv4          192.168.122.212/24   cloud-init-001   (...)
And now try to login to a newly created user with SSH public key.
user@kvm $ ssh usr1@192.168.122.212 -o UserKnownHostsFile=/dev/null -o StrictHostKeyChecking=no -i ssh_key
(...) === WELCOME BANNER === (...)
usr1@cloud-init-001:~$ id
uid=1000(usr1) gid=1000(usr1) groups=1000(usr1)
usr1@cloud-init-001:~$ cat .ssh/authorized_keys
ssh-ed25519 AAAAC3NzaC1lZDI1NTE5AAAAIGExTOh90fASqMKNWfG/DEj3OgFG2xvtGwtyYiMhBU5R usr1@example.com
usr1@cloud-init-001:~$
Everything looks good, so it is time to move on to the next example.
NOTE: The simplicity of the examples shown here should not be mistaken for a recommended production configuration. They are starting points for understanding how cloud-init works, not templates for secure deployments. These may be acceptable in a lab, it is recommended to use more secure features.
Example 2 – Install package and configure service
The goal is to configure one of the fundamental service ntp, install a few additional packages and at the end execute a simple command.
EXECUTION COMMAND:
Use the same virt-install command as in Example 1 unless noted otherwise.
META-DATA:
instance-id: 18724da3-b10f-4218-8d72-4ea0f869dfd4
USER-DATA:
#cloud-config
password: password
chpasswd:
  expire: False
ssh_pwauth: True
hostname: cloud-init-002
ntp:
  enabled: true
  ntp_client: auto
  servers:
  - ntp.acme.com
apt:
  preserve_sources_list: true
  conf: |
      APT {
          Get {
              Assume-Yes 'true';
              Fix-Broken 'true';
          }
      }
  http_proxy: http://proxy.acme.com:80
  https_proxy: http://proxy.acme.com:80
package_reboot_if_required: true
package_update: true
packages:
- vim
- iputils-ping
- less
- qemu-guest-agent
runcmd:
- 'sudo systemctl enable --now qemu-guest-agent'
NETWORK-CONFIG:
__EMPTY__
In this case, the entire procedure takes considerably longer, mainly due to downloading packages from the Internet. To avoid repeatedly checking the terminal using the already familiar cloud-init status command, an additional --wait argument can be used. This is particularly useful in automated deployment scenarios, where subsequent tasks depend on the cloud-init process being fully completed before they can proceed.
ubuntu@cloud-init-002:~$ cloud-init status --wait
.......................................................................
(...)
[  OK  ] Finished Cloud-init: Final Stage.
[  OK  ] Reached target Cloud-init target.
.status: done
ubuntu@cloud-init-002:~$ echo $?
0
ubuntu@cloud-init-002:~$
In case of any error, the exit code will be non-ZERO:
ubuntu@ubuntu:~$ cloud-init status --wait
...............................................................................(...)
cloud-init[808]: cloud-init has finished
cloud-init[808]: version: 25.1.4-0ubuntu0~22.04.1
cloud-init[808]: timestamp: Tue, 31 Mar 2026 09:01:54 +0000
cloud-init[808]: datasource: DataSourceNoCloud [seed=dmi,/dev/sr0][dsmode=local]
cloud-init[808]: uptime: 52.35
.status: error
ubuntu@ubuntu:~$ echo $?
1
ubuntu@ubuntu:~$
The wrap-up
This foundational setup is enough for simple labs, but production environments often require more complexity. In part 2, we take this further.
We will explore how to execute custom scripts safely, use "Phone Home" signals to notify your pipeline that a VM is ready, and provide a systematic guide to troubleshooting when a boot fails.


