CNI (Container Networking Interface) is an interface between container runtime and network implementation. It allows different projects, like Tungsten Fabric, to provide their implementation of the CNI plugins and use them to manage networking in a Kubernetes cluster. In this blog post, you will learn how to use Tungsten Fabric as a Kubernetes CNI plugin to ensure network connectivity between containers and bare metals. You will also see an example of a nested deployment of a Kubernetes cluster into OpenStack VM with a TF CNI plugin.
The CNI interface itself is very simple. The most important operations it has to implement are ADD and DEL. As the names suggest, ADD’s role is to add a container to the network and DEL’s is to delete it from the network. That’s all. But are these functions performed?
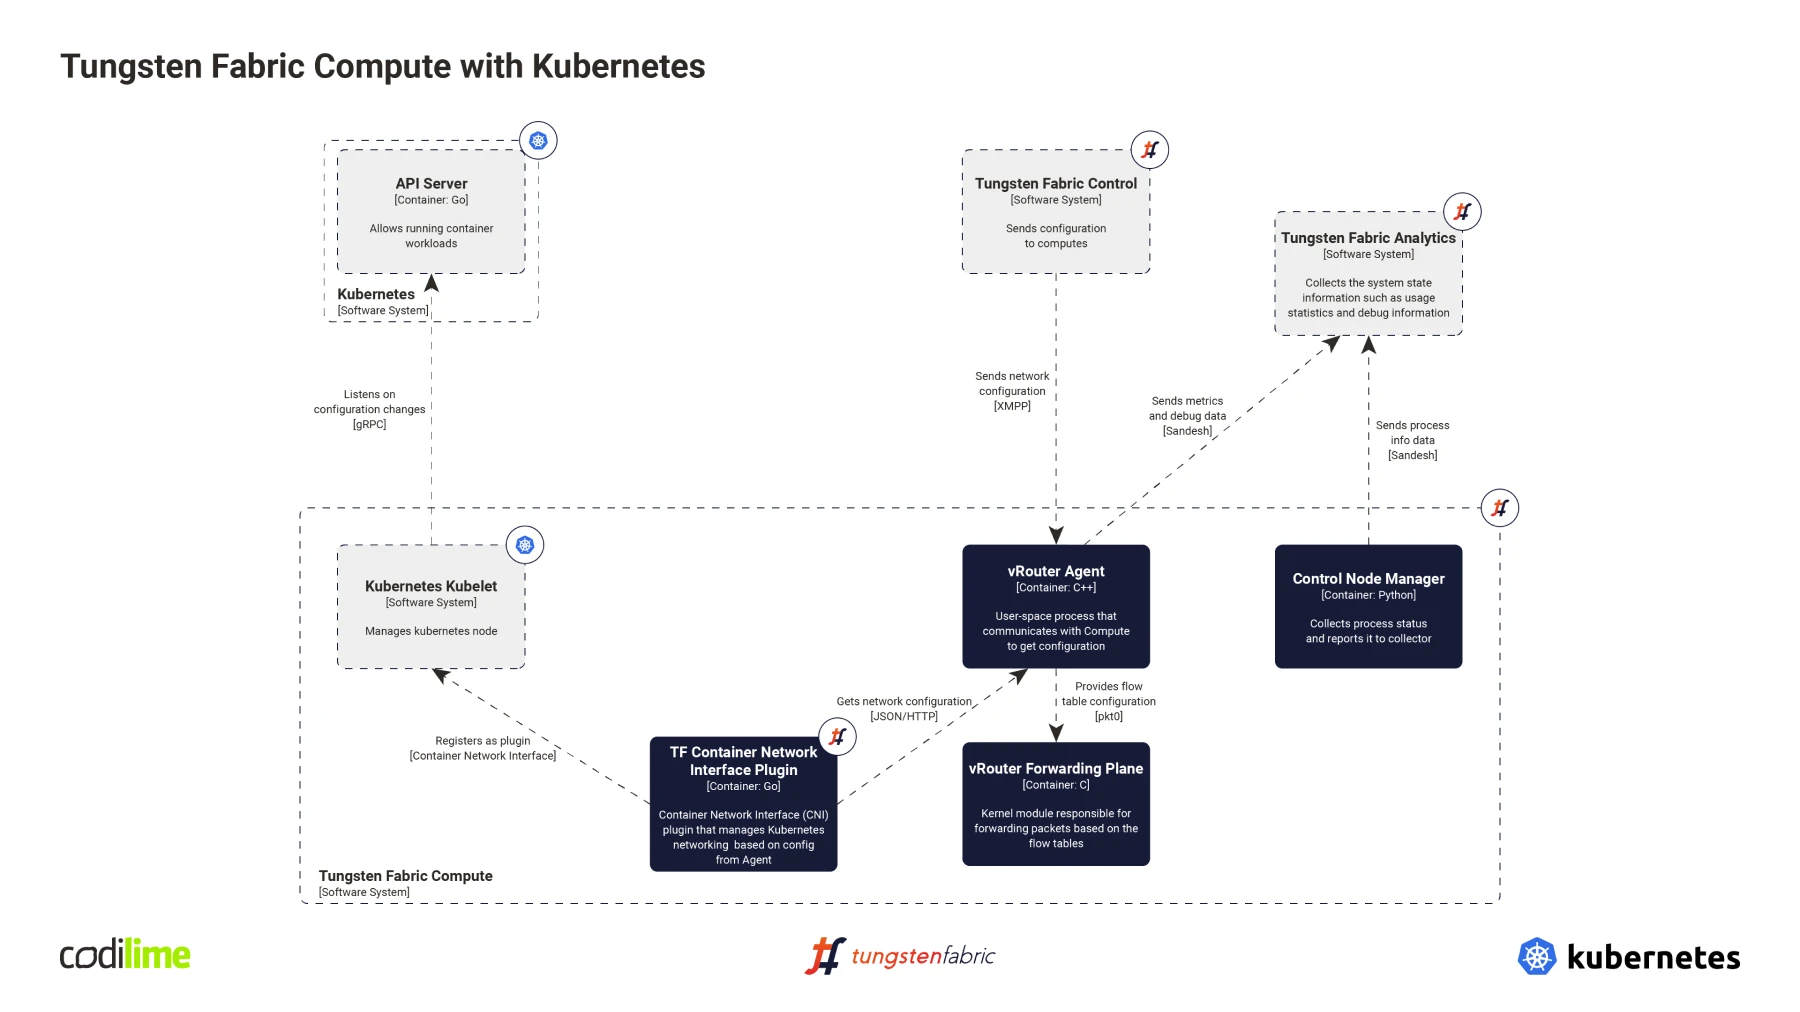
First things first: a kubelet is a Kubernetes daemon running on each node in a cluster. When the user creates a new pod, the Kubernetes API server orders a kubelet running on the node where the pod has been scheduled to create the pod. The kubelet will then create a network namespace for the pod, and allocate it by running the so-called “pause” container. One of the roles of this container is to maintain the network namespace which will be shared across all the containers in the pod. That’s why the containers inside the pod can “talk” to each other using the loopback interface. Then, for each container defined in the pod, the kubelet will call the CNI plugin.
But how does it know how to use each plugin? First, it looks for the CNI configuration file in a predefined directory ( /etc/cni/net.d by default ). When using Tungsten Fabric, the kubelet is going to find a file like this:
{
    "cniVersion": "0.3.1",
    "contrail" : {
        "cluster-name"  : "<CLUSTER-NAME>",
        "meta-plugin"   : "<CNI-META-PLUGIN>",
        "vrouter-ip"    : "<VROUTER-IP>",
        "vrouter-port"  : <VROUTER-PORT>,
        "config-dir"    : "/var/lib/contrail/ports/vm",
        "poll-timeout"  : <POLL-TIMEOUT>,
        "poll-retries"  : <POLL-RETRIES>,
        "log-file"      : "/var/log/contrail/cni/opencontrail.log",
        "log-level"     : "<LOG-LEVEL>"
    },
    "name": "contrail-k8s-cni",
    "type": "contrail-k8s-cni"
  }
This file, among other parameters, specifies the name of the CNI plugin and IP (vrouter-ip) and port (vrouter-port) of the vRouter agent. By looking at this file, the kubelet knows it should use the CNI plugin binary called “contrail-k8s-cni”. It looks for it in a predefined directory ( /opt/cni/bin by default ) and, when it wants to create a new container, executes it with the command ADD passed through environment variables together with other parameters like: path to the pod’s network namespace, container id and container network interface name. The contrail-k8s-cni binary (you can find its source code here
) will read those parameters and send appropriate requests to the vRouter Agent.

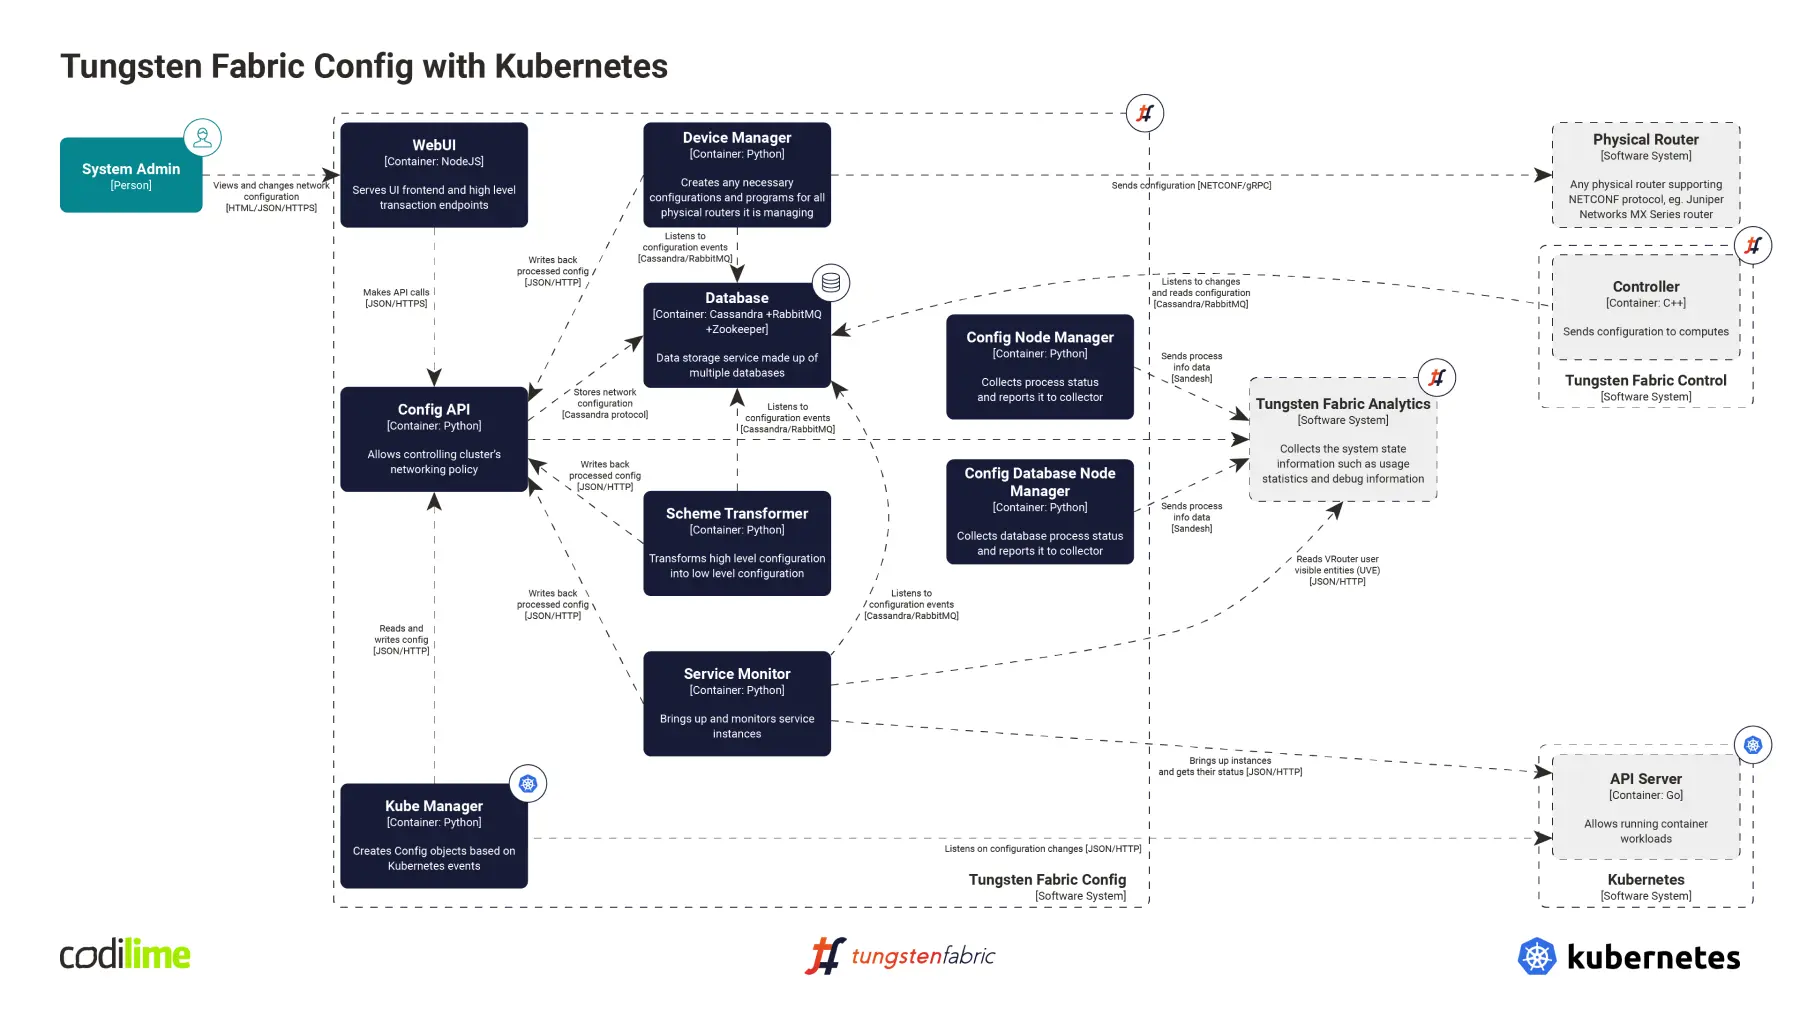
The vRouter Agent’s job is to create actual interfaces for the containers. But how does it know how to configure an interface? As you can see in the diagram above, it gets all this information from the Tungsten Fabric Control. So then how does the Tungsten Fabric Control know about all the pods, their namespaces, etc.? That’s where the Tungsten Fabric Kube Manager (you can find its source code here ) comes in. It’s a separate service, launched together with other Tungsten Fabric SDN Controller components. It can be seen in the bottom left part of the diagram below.

Kubemanager’s role is to listen for Kubernetes API server events like: pod creation, namespace creation, service creation, deletion. It listens for those events, processes them, and then creates, modifies or deletes appropriate objects in the Tungsten Fabric Config API. Tungsten Fabric Control will then find those objects and provide information about them to the vRouter agent. The vRouter Agent can then finally create the properly configured interface for the container. And that is how Tungsten Fabric can work as a Kubernetes CNI Plugin.
Because Tungsten Fabric and Kubernetes are integrated, container-based workloads can be combined with virtual machines or bare metal server workloads. Moreover, rules for connectivity between those environments can all be managed in one place.
Tungsten Fabric nested deployment
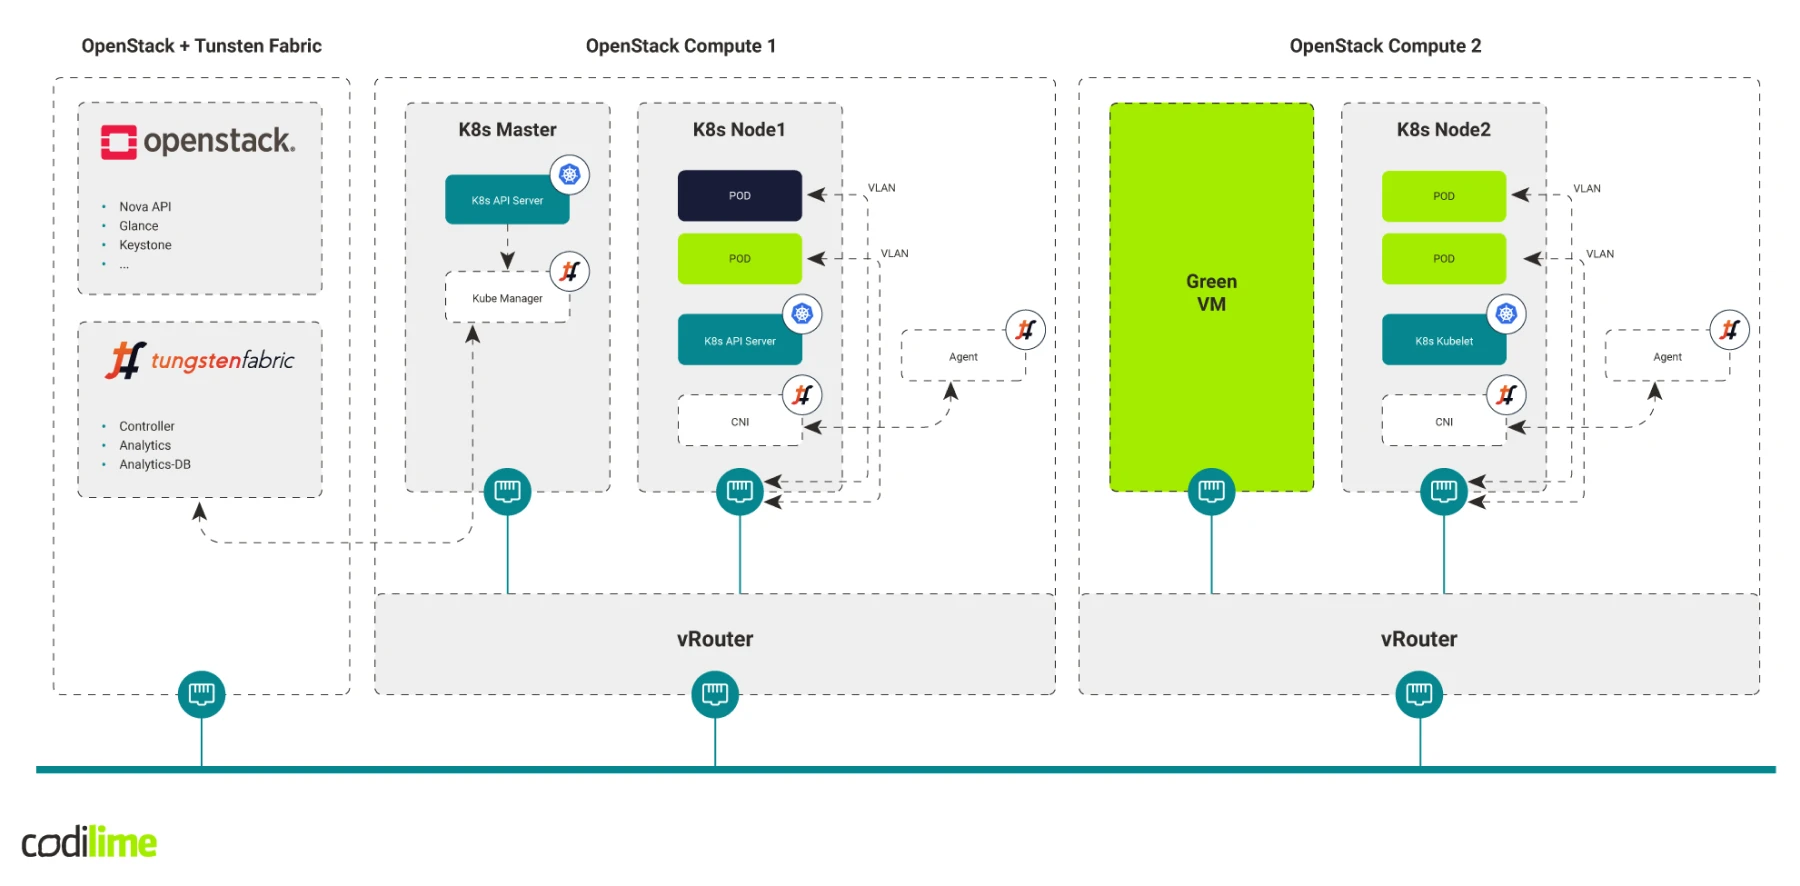
From the networking point of view, virtual machines and containers are almost the same thing for Tungsten Fabric, so deployments that combine them are possible. Moreover, in addition to Kubernetes, Tungsten Fabric can also be integrated with OpenStack. Thanks to that, the two platforms can be combined. Let’s say that we have an already deployed OpenStack with Tungsten Fabric, but we want to deploy some of our workloads using containers. With Tungsten Fabric we can create what is called a nested deployment—OpenStack compute virtual machines with a Kubernetes cluster deployed on them with Tungsten Fabric acting as the CNI plugin.
All of the Tungsten components need not be deployed, as most of them are already running and controlling the OpenStack networking. However, on one of the nodes in the nested Kubernetes cluster, preferably the Kubernetes master node, we have to launch the Tungsten Fabric Kube Manager (described above). It will connect to the Kubernetes API Server in the nested cluster and to the Tungsten Fabric Config Api server deployed with OpenStack.
Finally, the Tungsten Fabric CNI plugin and its configuration file must be present on each of the nested Kubernetes compute nodes. Please note that neither the Tungsten Fabric vRouter nor vRouter Agent need to be deployed on the nested Kubernetes nodes, as those components are already running on the OpenStack compute nodes and the Tungsten Fabric CNI plugin can send requests directly to them.

A nested deployment of a Kubernetes cluster integrated with Tungsten Fabric is an easy way to start deploying container-based workloads, especially for enterprises that have been using OpenStack to manage their virtual machines. Network admins can use their Tungsten Fabric expertise and need not necessarily master new tools and concepts.
Summary
As you can see, a Kubernetes CNI plugin allows you to benefit from one of Tungsten Fabric’s key features—its ability to connect different workloads regardless of their function— containers, VMs or bare metals. Should you need to use containers and ensure their connectivity with your legacy infrastructure based on OpenStack, you can create a nested deployment of the Kubernetes cluster integrated with TF.
>> Here you can read more about our network solution services.


